Table of contents
No headings in the article.
Many internal tools, especially administrative applications, often require file uploading and file management features. File pickers, and file selectors, therefore, are some of the most used components in internal tool development. Developers experience numerous challenges when it comes to implementing these features resulting in delayed operations. This can easily be mitigated by using Appsmith to build and deploy applications quickly. Appsmith has a dedicated filepicker widget that can be used to upload files to any of the developers' preferred cloud storage services, such as Cloudinary, S3, among others.
In this short blog, we’re going to focus on one such widget, the filepicker. With this, you can upload files from your local machines to any cloud storage via API. You can upload files by implementing a POST API and reference the base64 or binary version in the post body.
Features of the Filepicker Widget
The Allowed File Types properties allow us to restrict the types of files that a user (of our application) can upload.
The Maximum File Size attribute allows us to specify the total file size that a user can upload.
When the user selects files to be uploaded, we can immediately use an API or utilize the S3 plugin to upload the file's base64 to our cloud storage.
The visibility property controls the widget's visibility on the page. When the widget is switched off, the widget will not be displayed when the app is published.
There is a parameter that allows us to specify the maximum number of files that a user is allowed to upload.
How Does the Filepicker Widget Work?
In this section, we'll look at how the filepicker works. First, let’s set up a new application to get started!
- Create a new account on Appsmith (it’s free!), if you are an existing user, log in to your Appsmith account.
- Create a new application by clicking on the Create New button under the Appsmith dashboard.
- We’ll now see a new Appsmith app with an empty canvas and a sidebar with two directories: Datasources and Widgets. This is where we can connect to data sources and find all the widgets.
Now, we’re all set to explore how the filepicker widget works in Appsmith.
Drag and drop the filepicker widget (as shown in the image below).

Now that we have our filepicker widget on the canvas, we can customize the properties as desired.
After selecting our file(s), we get the following result:

How to manage files on Cloudinary using Appsmith
Filepicker configuration
We'll go over each of the configurations accessible in the Appsmith filepicker one by one.
Label: This is used to set the label of the Filepicker from the default “Select Files” to any label of our choice.
Maximum No. of files: This allows us to specify the maximum number of files that a user is authorized to upload.
Maximum File Size: This property allows us to specify the maximum file size that a user can upload.
Data Type: This determines the data format of the files uploaded.
Allowed File Types: Allows us to restrict the types of files that a user can upload.
Accepts an array of wildcardsimage/, exact mime types image/jpeg, or file extensions .jpg:['image/', '.jpg', '.jpeg', '.png', '.gif']
Required: When turned on, it marks user input as a required field and disables form submission until the input is made.
Visible: Controls widget's visibility on the page. When turned off, the widget will not be visible when the app is published.
See the documentation to learn more.
Uploading single and multiple images to cloud storage via Filepicker using a Cloudinary API
Let's now explore how to upload single or multiple files using filepicker to cloud storage using the Cloudinary API.
Setting up a data source
We'll need to connect to our data source by clicking on the Plus icon next to the data sources link in the sidebar, then selecting "Create New" from the menu, as shown below:

After this, we should now choose the "Create New API" option. This will take us to the screen shown below:

We renamed the data source from the default "Api1" to "Cloudinary API" in the image above to have a clear description.
We will be making use of the Cloudinary API: [https://api.cloudinary.com/v1_1/{cloud_name}/image/upload](https://api.cloudinary.com/v1_1/olanetsoft/image/upload) where {cloud_name} is our cloudinary username.
The API requires our Cloudinary cloud_name and upload_preset.
To get our cloud_name and upload_preset, we follow the steps listed below.
The cloud name is obtained from our Cloudinary dashboard, as shown below.

An upload preset can be found in the “Upload” tab of our Cloudinary settings page, which we access by clicking on the gear icon in the top right corner of the dashboard page.

We then click on the Upload tab on the settings page:

We scroll down to the bottom of the page to the upload presets section, where we see our upload preset or the option to create one if we don't have any.
Adding the Cloudinary API URL and setting the header should look similar to what we have below:

Let's go to the "Body" tab and configure it, as shown below.

We specified the file(s) to be uploaded as well as our upload preset in the image above, and we configured our request body in a multipart structure.
Now that we've finished configuring the API, let's put it to the test before using it in our filepicker.
We will click on the FIlePicker Widget as shown below and select a file to be uploaded from our system.

Now let’s head over to the API section; the following is the test result:

Yay! That works! We’ve successfully tested our API and got a valid response.
Upload images using Filepicker
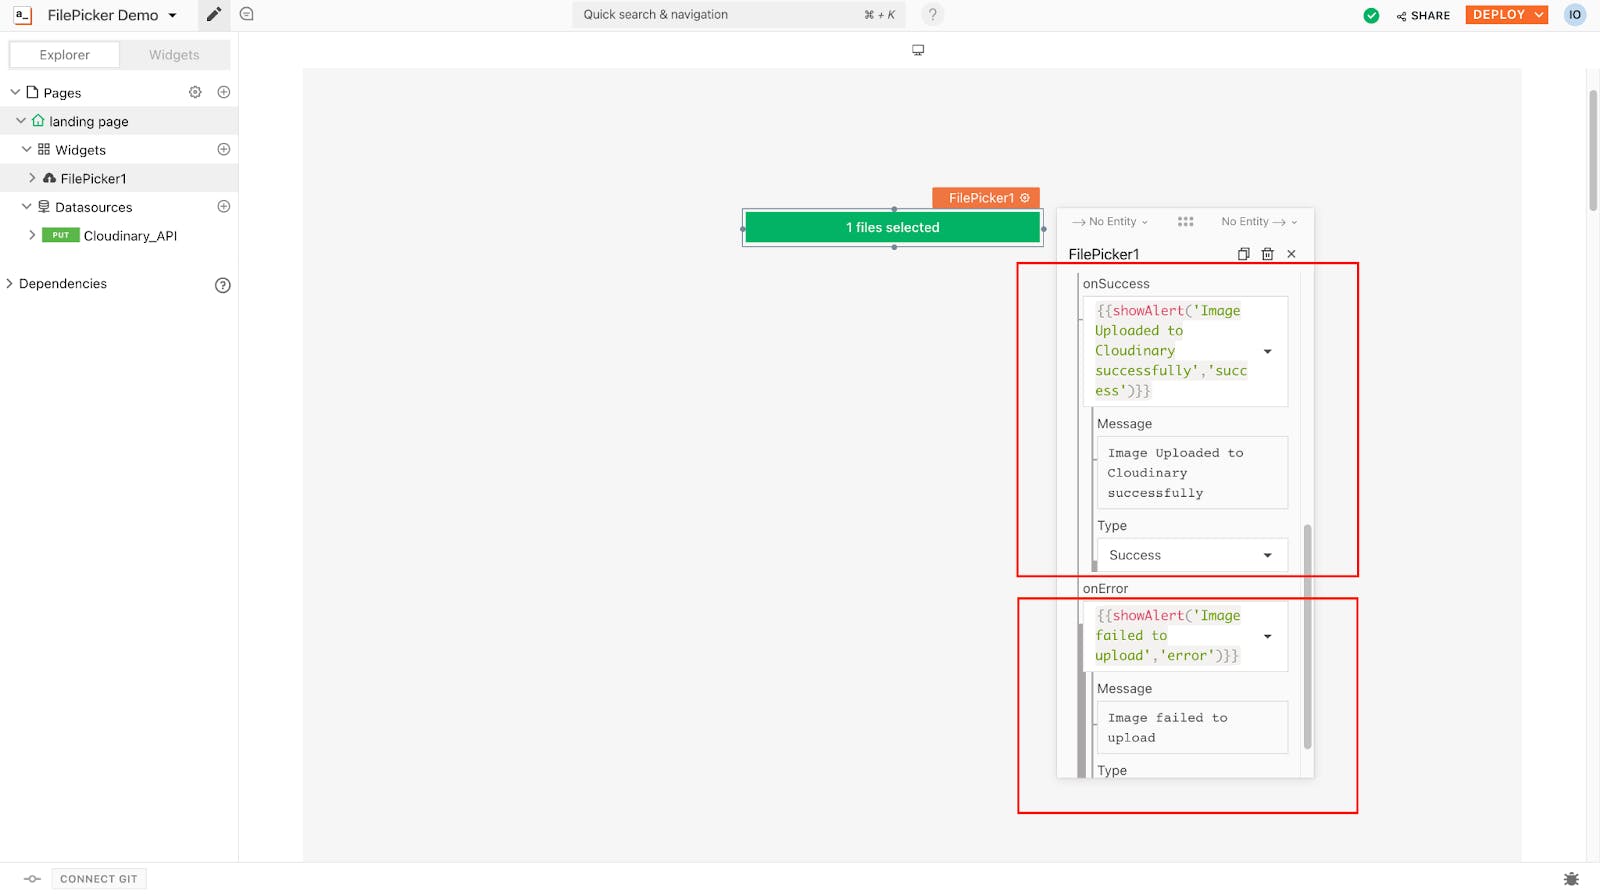
Let's upload a single image directly from our filepicker to cloud storage by connecting to the API Datasource we just created. We will head over to the filepicker configuration and update the "onFilesSelected" property.

As seen below, we can add a success alert to show when the image is successfully uploaded and when there is an issue after selecting our query to be conducted.

The response below shows a success alert after uploading our image to cloud storage utilizing the Cloudinary API directly from our filepicker widget.

We hope that you found this short guide helpful. If you want to know how to upload or download files from S3, you can look at this document and follow this discussion. To learn more about how to upload a file to a local server, take a look at this discussion on our community forum.
Appsmith has more than 35 UI widgets, and these can cut your development time in half! To know more, head to our docs!
Did you get stuck somewhere? We’re happy to help! Join us on Discord today!
Olubisi Idris Ayinde is a software engineer, technical writer, and community builder. This article was written as part of the Appsmith Writers Program. If you’d like to write for Appsmith, send an email expressing your interest to writersprogram@appsmith.com.

