

Building a CRUD app with Google Sheets
This tutorial covers the basics for creating a CRUD (Create, Read, Update, Delete) app using Google Sheets as the datasource.

NO LONGER ON HASHNODE: Follow at: https://news.greenflux.us/
Nuclear Plant Operator (US Navy), Turned Freelancer, Turned Developer Advocate. Head of Developer Relations @ Appsmith, Inc Founder/ Freelancer @ GreenFlux, LLC
GREENFLUX, LLC WE'VE GOT YOUR APP COVERED. Veteran Owned & Operated Since 2016 - Tallahassee, FL
Goal
This tutorial covers the basics for creating a CRUD (Create, Read, Update, Delete) app using Google Sheets as the datasource.
Prerequisites
An Appsmith account
A Google account
Overview
Google Sheets is actually our most used datasource in Appsmith! It's great for quickly prototyping an app, or building a PoC (proof of concept) or MVP (minimum viable product).
For this tutorial, we'll be using a mock dataset for an events app at a software company. Start out by copying the sample sheet to your Google account, and give it a unique name so it's easy to find from Appsmith.
Sample Events sheet <= Make a copy
Next, we'll create a Google Sheets datasource in Appsmith, and then add APIs and a table widget to display and edit the sheet data.
Create a Google Sheets Datasource
Start out by creating a new app, and then add a Google Sheets datasource.
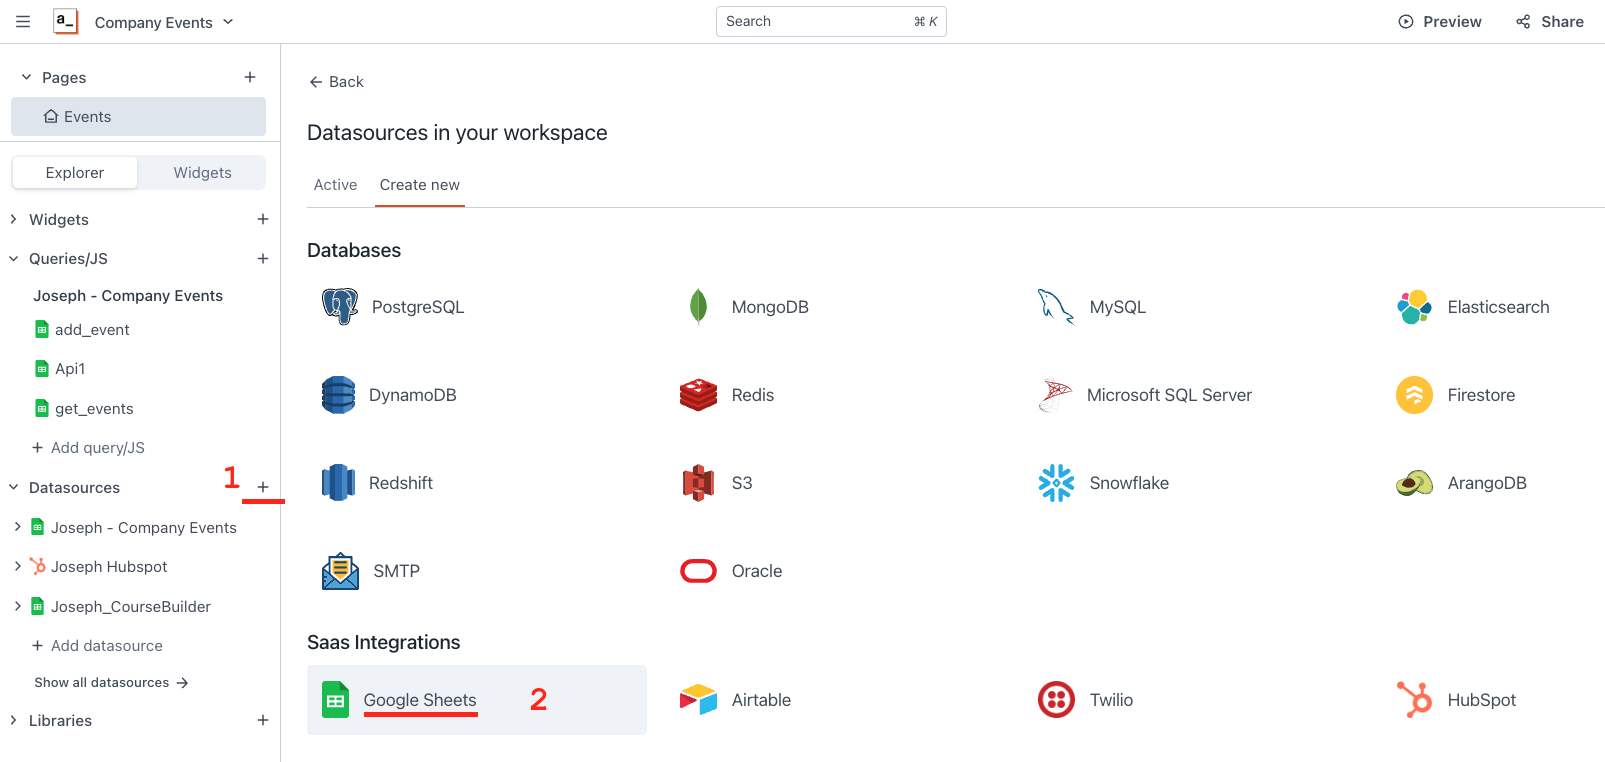
In the Appsmith editor, click the Datasources [+] button and choose Google Sheets
Name the datasource
Set the Permissions to:
Read / Write / Delete | Selected google sheetsClick Save and authorize, then choose your Google account and authorize Appsmith to connect
In the next screen, find and select your new copy of the Events sheet
Note: Best practice is to create a new datasource for each sheet, instead of using the Read / Write / Delete | ALL google sheets option.
Keep in mind, if you choose ALL Google Sheets, and you share the workspace with someone else as a developer or admin, they will be able to access all of your Google Sheets!
Get data from Google Sheets
Next, we'll add an API to get data from the sheet. Make sure to create the new API under the Google Sheets datasource you just created. You can use the [+] New query button on the Google Sheets datasource, or the [+] Query/JS button, then select the Google Sheets datasource.
Pro Tip: You can also use the keyboard shortcut
cmd-shift-+to add a new API. More keyboard shortcuts here.Add a new Google Sheets API and name it
getRowsConfigure as follows:
Operation: Fetch Many
Entity: Sheet Row(s)
Spreadsheet: The Events sheet you just copied
Sheet: events
- Click RUN
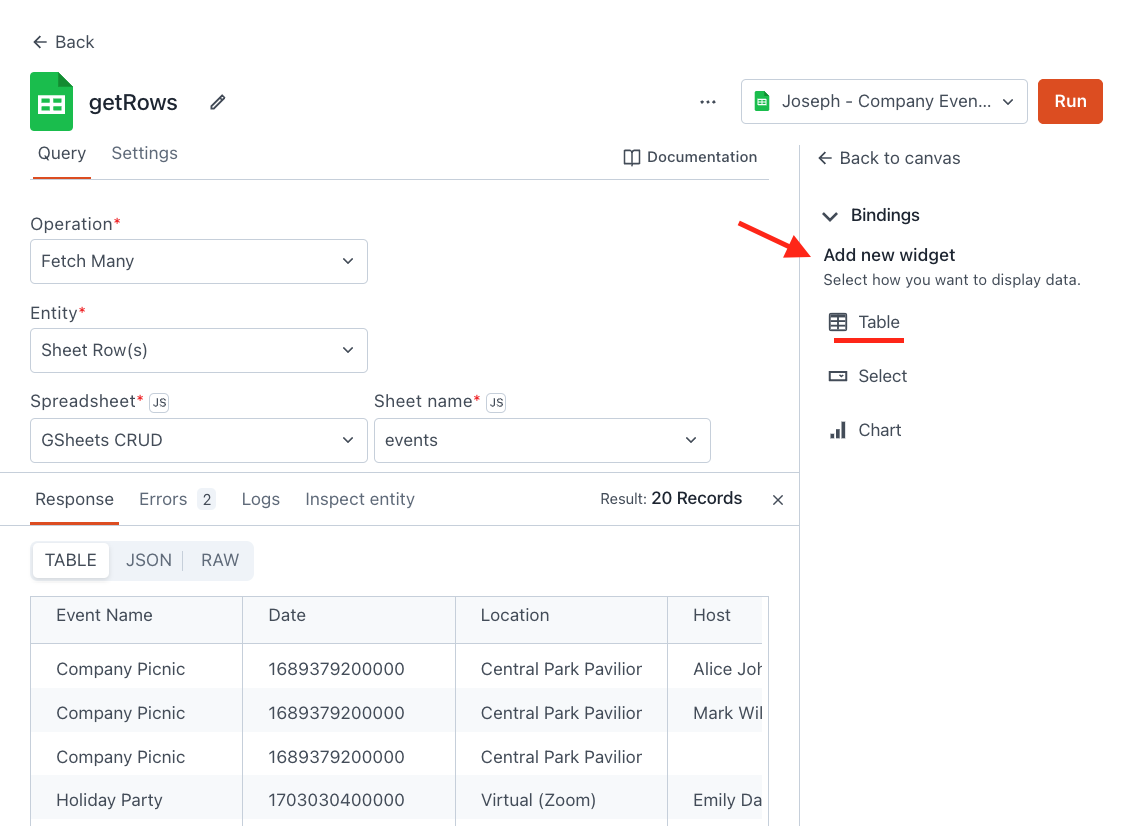
You should get back a response with data from the spreadsheet. Now, on the right panel under Add new widget, click the Table binding shortcut. This will add a table widget to the canvas and automatically connect it to the getRows API. Alternatively, you can drag in a table widget, then set the Table Data property to {{getRows.data}}.
Notice the toast message about the getRows API running on page load now? Appsmith automatically sets a query to run on page load if it's connected to a widget. This way the widget will have data to display when the app first opens. You can also set a query to run on page load in the Settings tab for that query.
Add a row to Google Sheets
The table widget has an awesome new feature for adding a row directly from the table, instead of using a form widget. First, we'll enable adding a row, then we'll create the new API, and lastly, we'll connect the new API to the table widget.
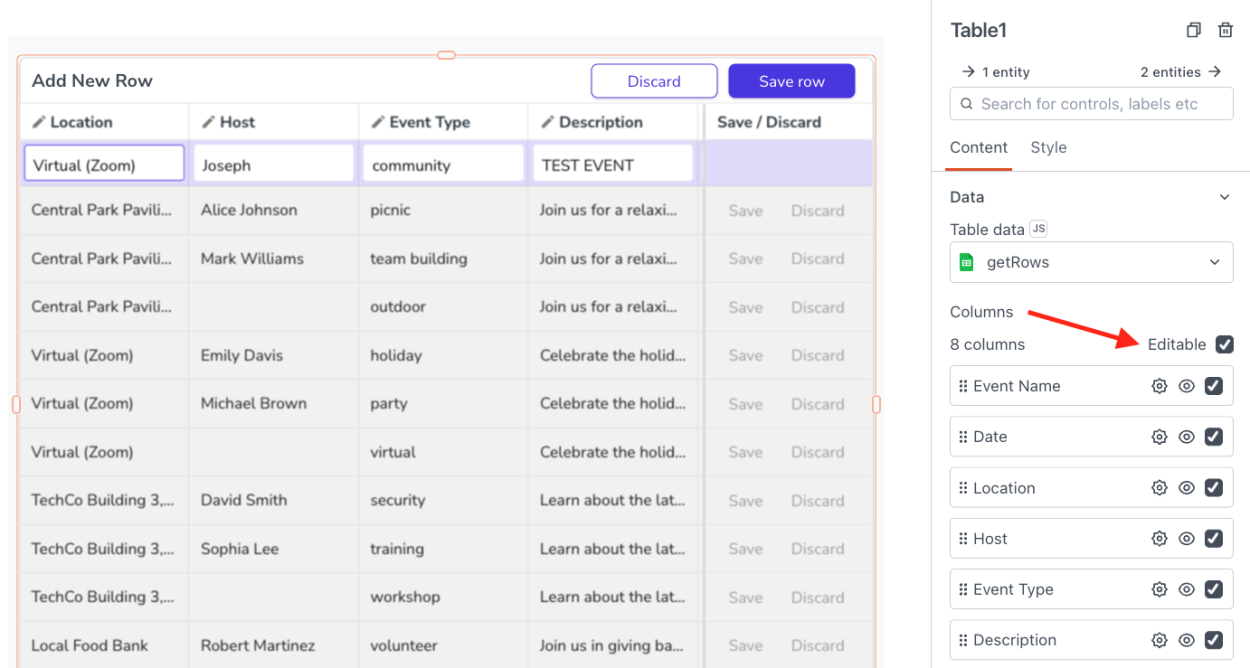
To get started, select the table widget and find the Adding a row section at the bottom of the property pane:
Table Widget > Adding a row >
- Allow adding a row => ON
Then go up to the column settings for the table widget:
Table Widget > Data > Columns >
- Click the checkbox to mark all columns as editable
On the top of the table widget, click the + Add new row button
- Enter some dummy data in the new row, but don't click Save row yet!
This will give us a draft row object to use in the addRow API.
- Enter some dummy data in the new row, but don't click Save row yet!
Next, create a new API under the Google Sheets datasource.
Add new API: Insert One > Sheet row
Name the API
addRowSet the Row object to:
{{Table1.newRow}}
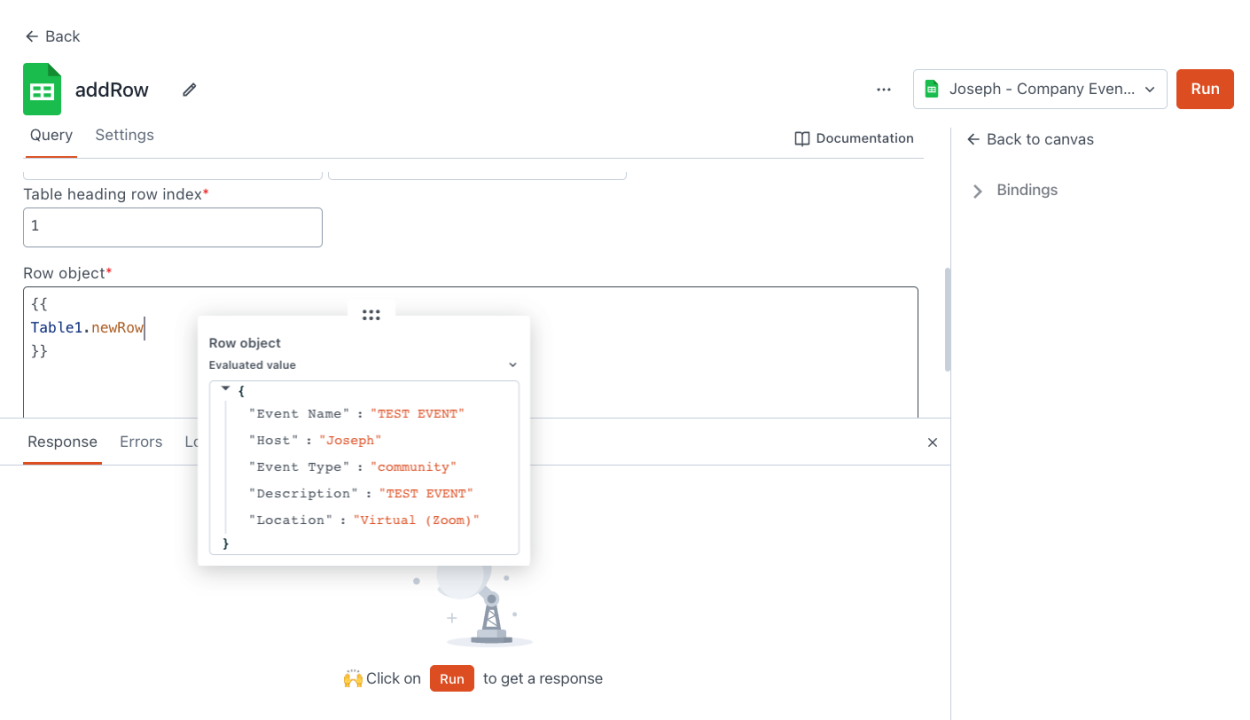
You should see the data you entered for the new row in the evaluated value pane. Now, head back to the table widget properties to connect the API to the SAVE button. Once the addRow API runs, you'll want to run the getRows API again to update the data in the table widget. This can easily be done using the callback option in the action selector.
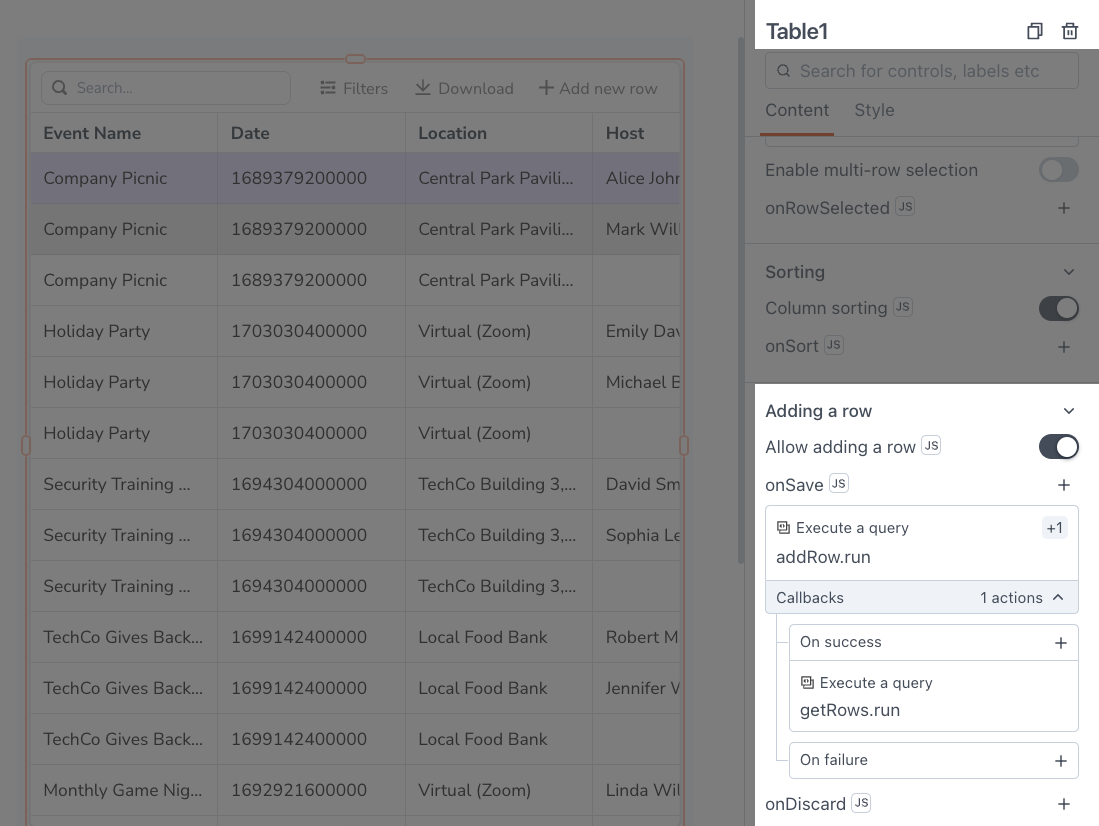
Table Widget > Adding a row >
On Save => addRow API
- Callbacks: On Success => getRows
Now, head back to the new row you started to add on the table widget and click Save row. You should see the new row added to the sheet, and the table widget updated with the new data.
Updating a row in Google Sheets
Next, we'll add a new API for updating a row and use the table widget's row editing feature. This will be similar to the addRow API, but now we must also specify the rowIndex of the row to update. Start out by creating the new API.
Add new API: Update One > Sheet Row
Name the API
updateRowSet body to
{{Table1.updatedRow}}
Notice how there's a new SAVE/DISCARD column in the table widget now? That gets added when you enable row editing, but you have to configure which action to run when the user clicks save.
Table Widget > Columns > Save/Discard (click the gear icon)
Set the On Save to
updateRow- Callback: On Success =>
getRows
- Callback: On Success =>
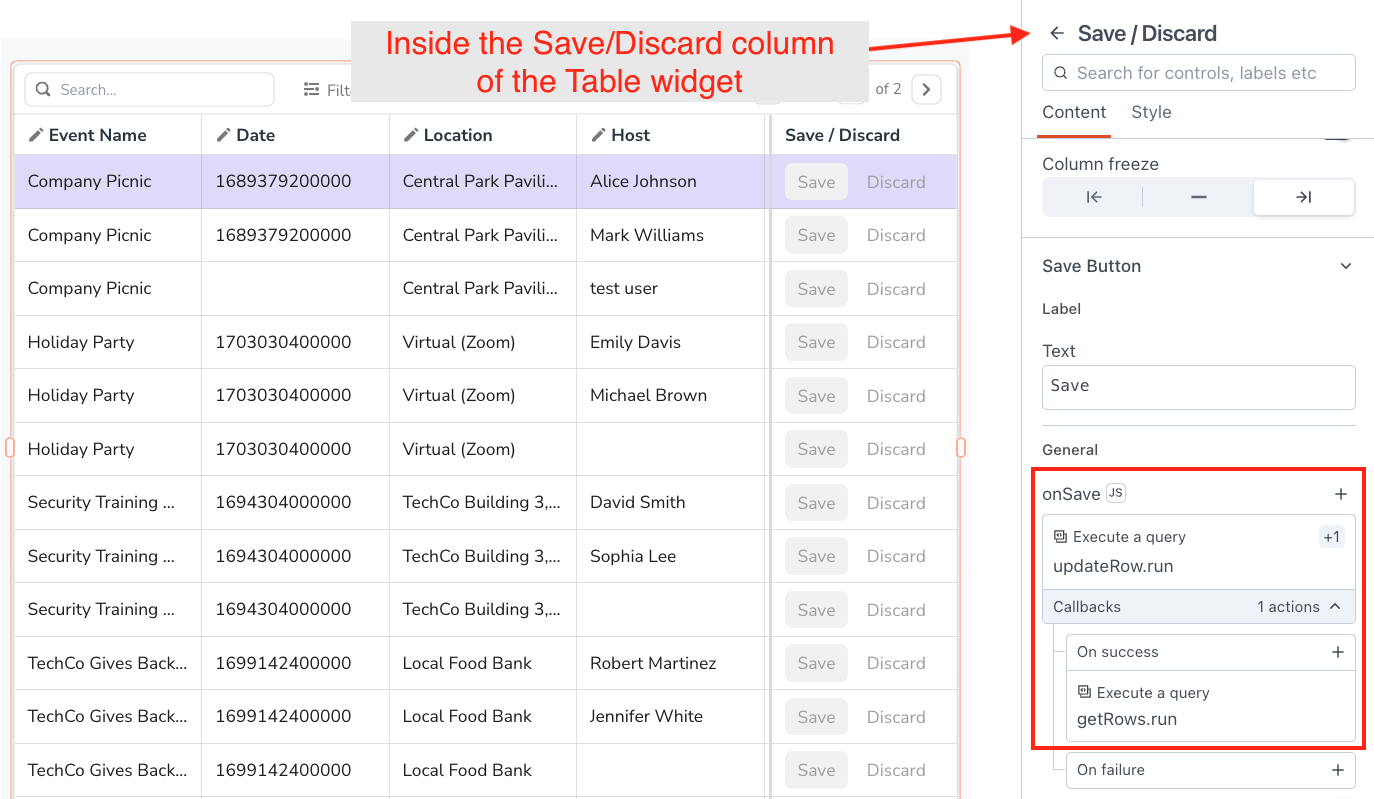
Now you should be able to edit a row, then click SAVE to update the sheet and refresh the table widget.
Deleting a row in Google Sheets
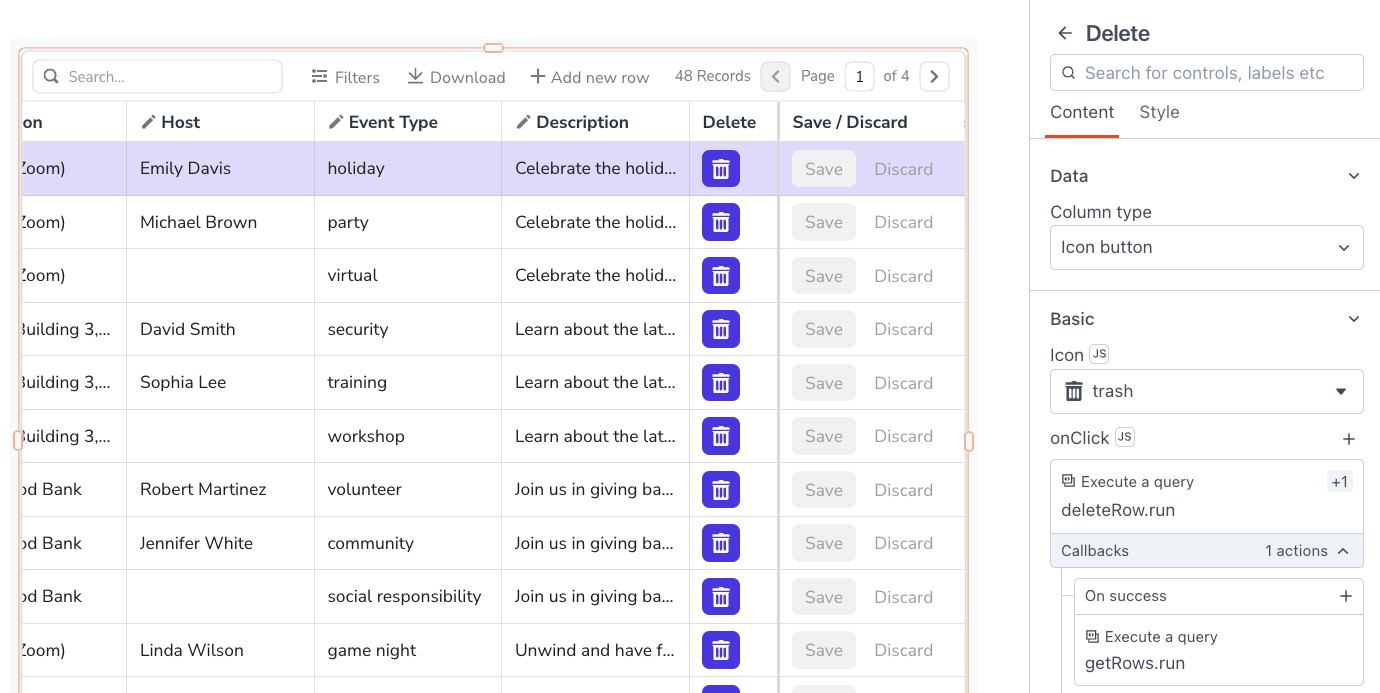
Lastly, we'll add an API for deleting a row, then connect it to a new button in the table widget. Start out by adding a new button column to the table widget, then create an API and link it to the new button.
Table Widget > Columns > [+] Add new column
Set the column name to
DeleteClick the gear icon to open the column settings
Set Column type to Icon Button, and select the trash icon
Now, add the deleteRow API.
Add new API: Delete One > Sheet Row
Name the API
deleteRowSet the rowIndex to
{{Table1.triggeredRow.rowIndex}}
Lastly, connect the API to the new delete button.
Table Widget > Columns > Delete (click the gear icon)
OnClick => deleteRow
- Callback: On Success => getRows
And that's it! You now have APIs for Creating, Reading, Updating, and Deleting data in Google Sheets; a complete CRUD app without writing a single line of code.
Conclusion
Google Sheets is a great choice for a backend when you need to quickly throw together an app, build a PoC or test out an idea. And Appsmith's native Google Sheets connector makes it easy to quickly build a full CRUD app on top of your sheets data.


