


Building a UI from scratch is not always a fun thing to do, it often involves different tasks such as configuring file systems, creating UI components, styling them, and integrating several API and database queries. It's tedious work, and not to mention, considering that the final users of such applications are not necessarily developers but administrative employees within organizations. To adapt to using such applications, the UI and design need to consider specific sensibilities. All this becomes quite easy to do with Appsmith . You can create UI in minutes by dragging and dropping UI components and then connecting databases or APIs, on top of which you can add custom functions using JavaScript. It hardly takes less than a few minutes to set up a dashboard. For example, you can build an HR and Operations dashboard to manage your employee payrolls, leaves, company announcements. These are some typical examples of CRUD applications, and of course, the possibilities are countless.
In this blog, I will teach you how to build a frontend that can connect to MSSQL as a datasource.
Microsoft SQL Server is a relational database management system developed by Microsoft. A database server is a software product with the primary function of storing and retrieving data as requested by other software applications—which may run either on the same computer or on another computer across a network (including the Internet).
Getting Started: Connecting MSSQL on Appsmith
On Appsmith, it’s pretty straightforward to establish a connection with any datasource, including MSSQL; be it on cloud, self-hosted version or local environment.
What we need to make the connection are the endpoint, database name, and user credentials. With this in mind, let’s get started.
- Create a new account on Appsmith (it’s free!), if you are an existing user, log in to your Appsmith account.
- Create a new application under the dashboard under your preferred organization.
- On your Appsmith application, click on the
+icon next to Datasources on the left navigation bar under Page1 - Next, click on the Now, navigate to the Create New tab and choose MySQL datasource, you’ll see the following screenshot:
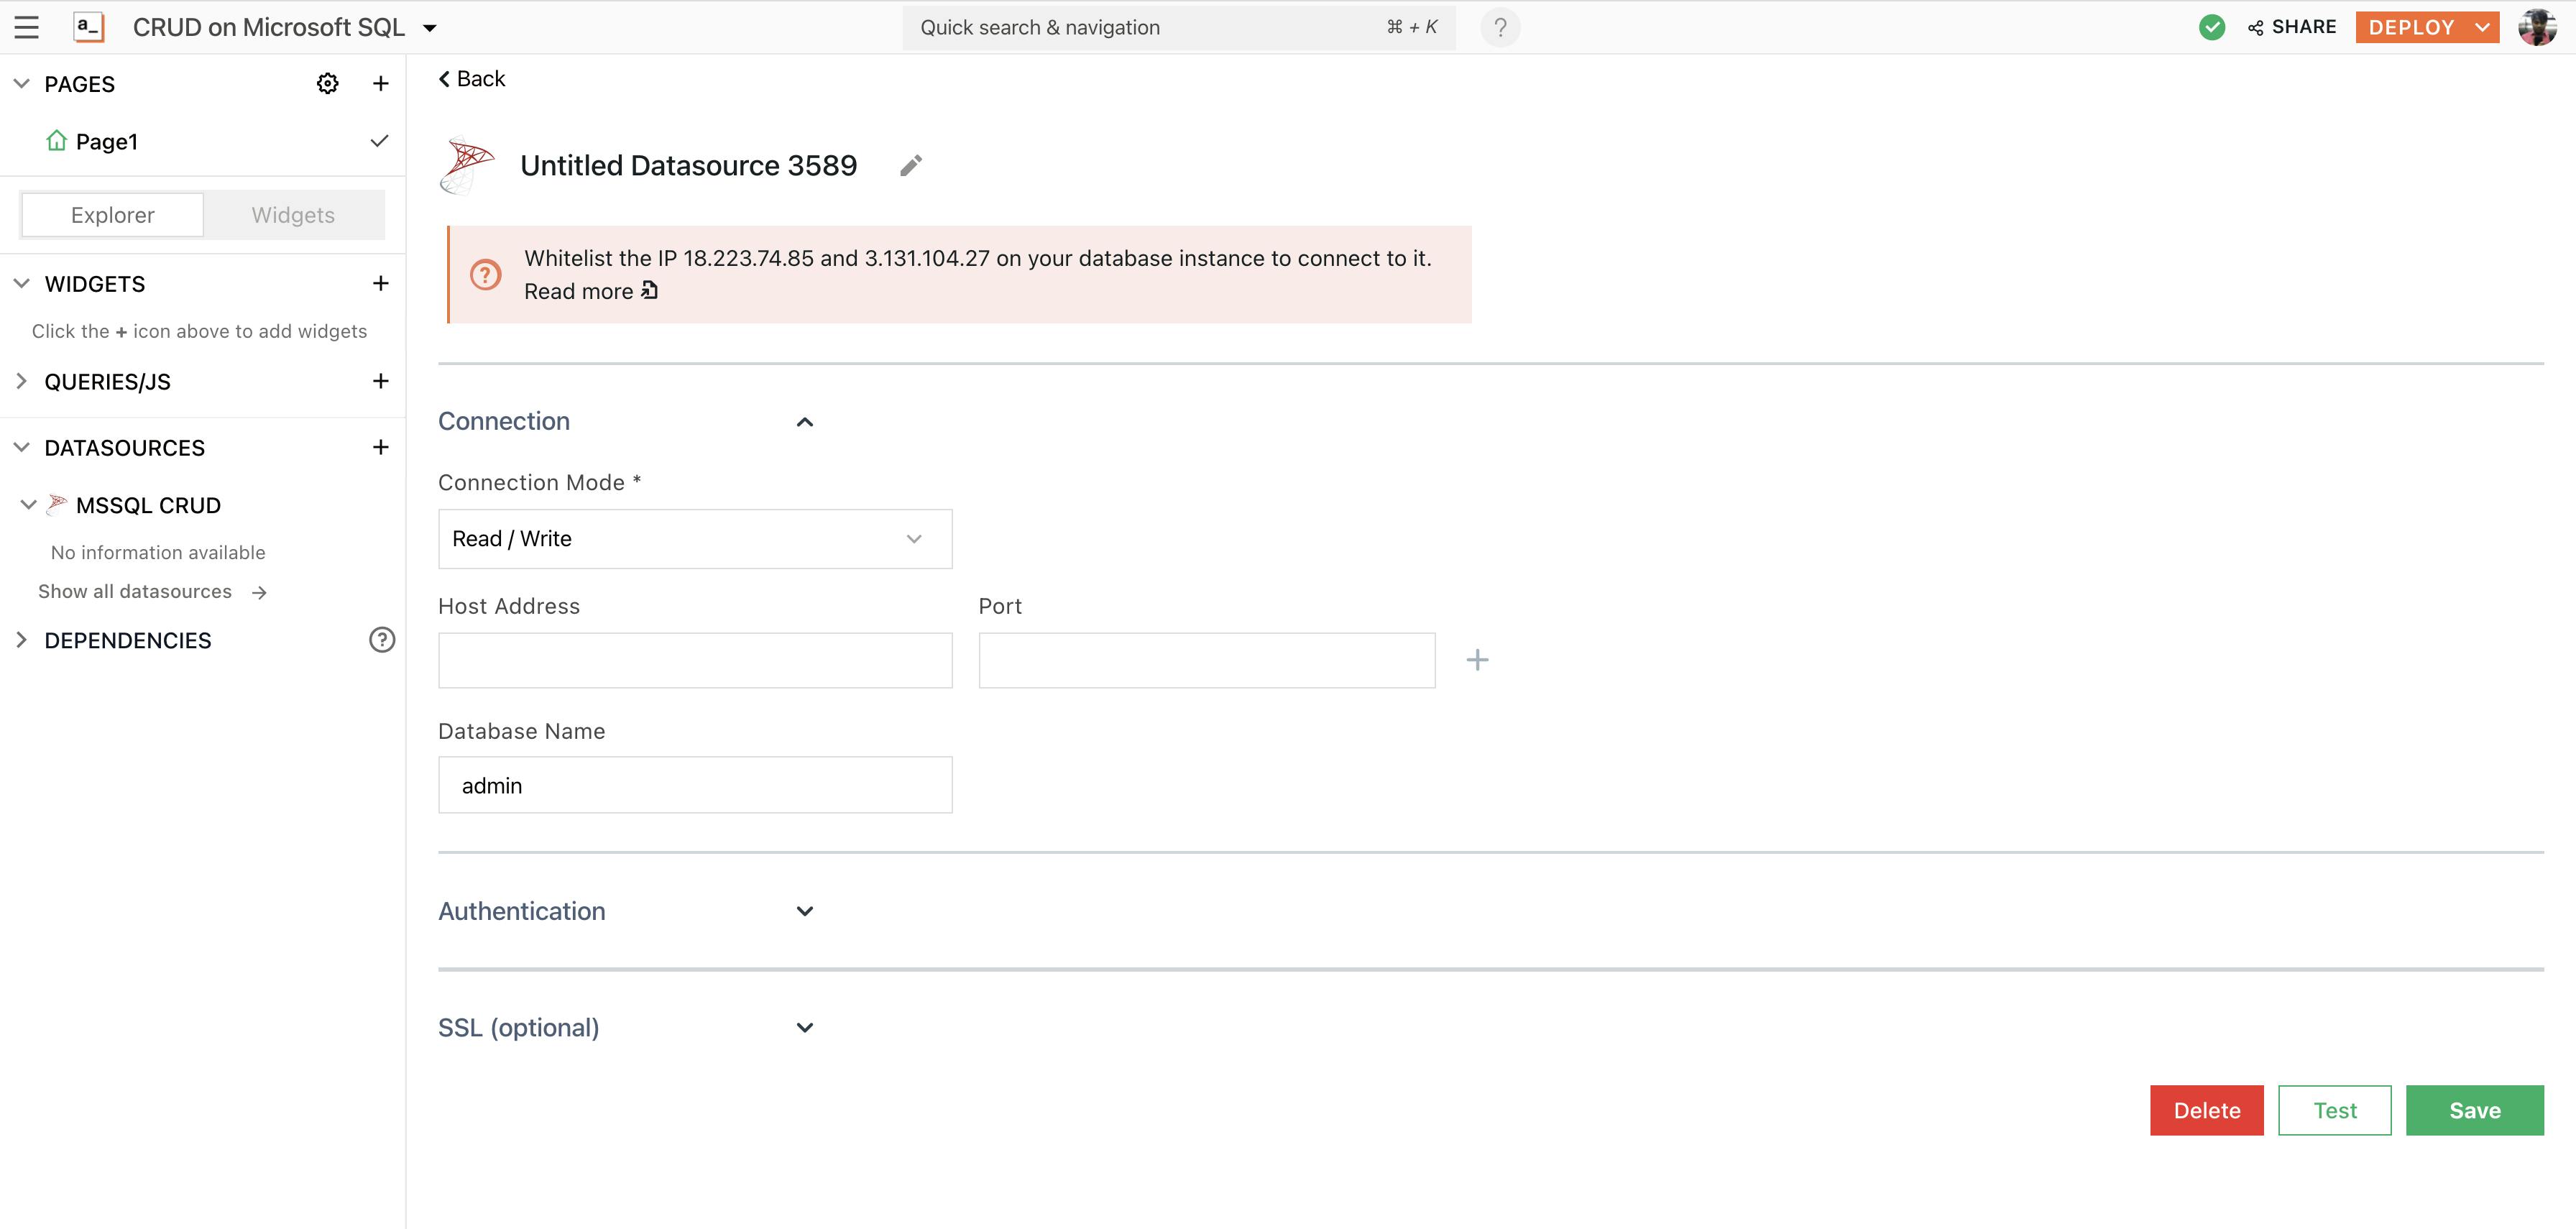
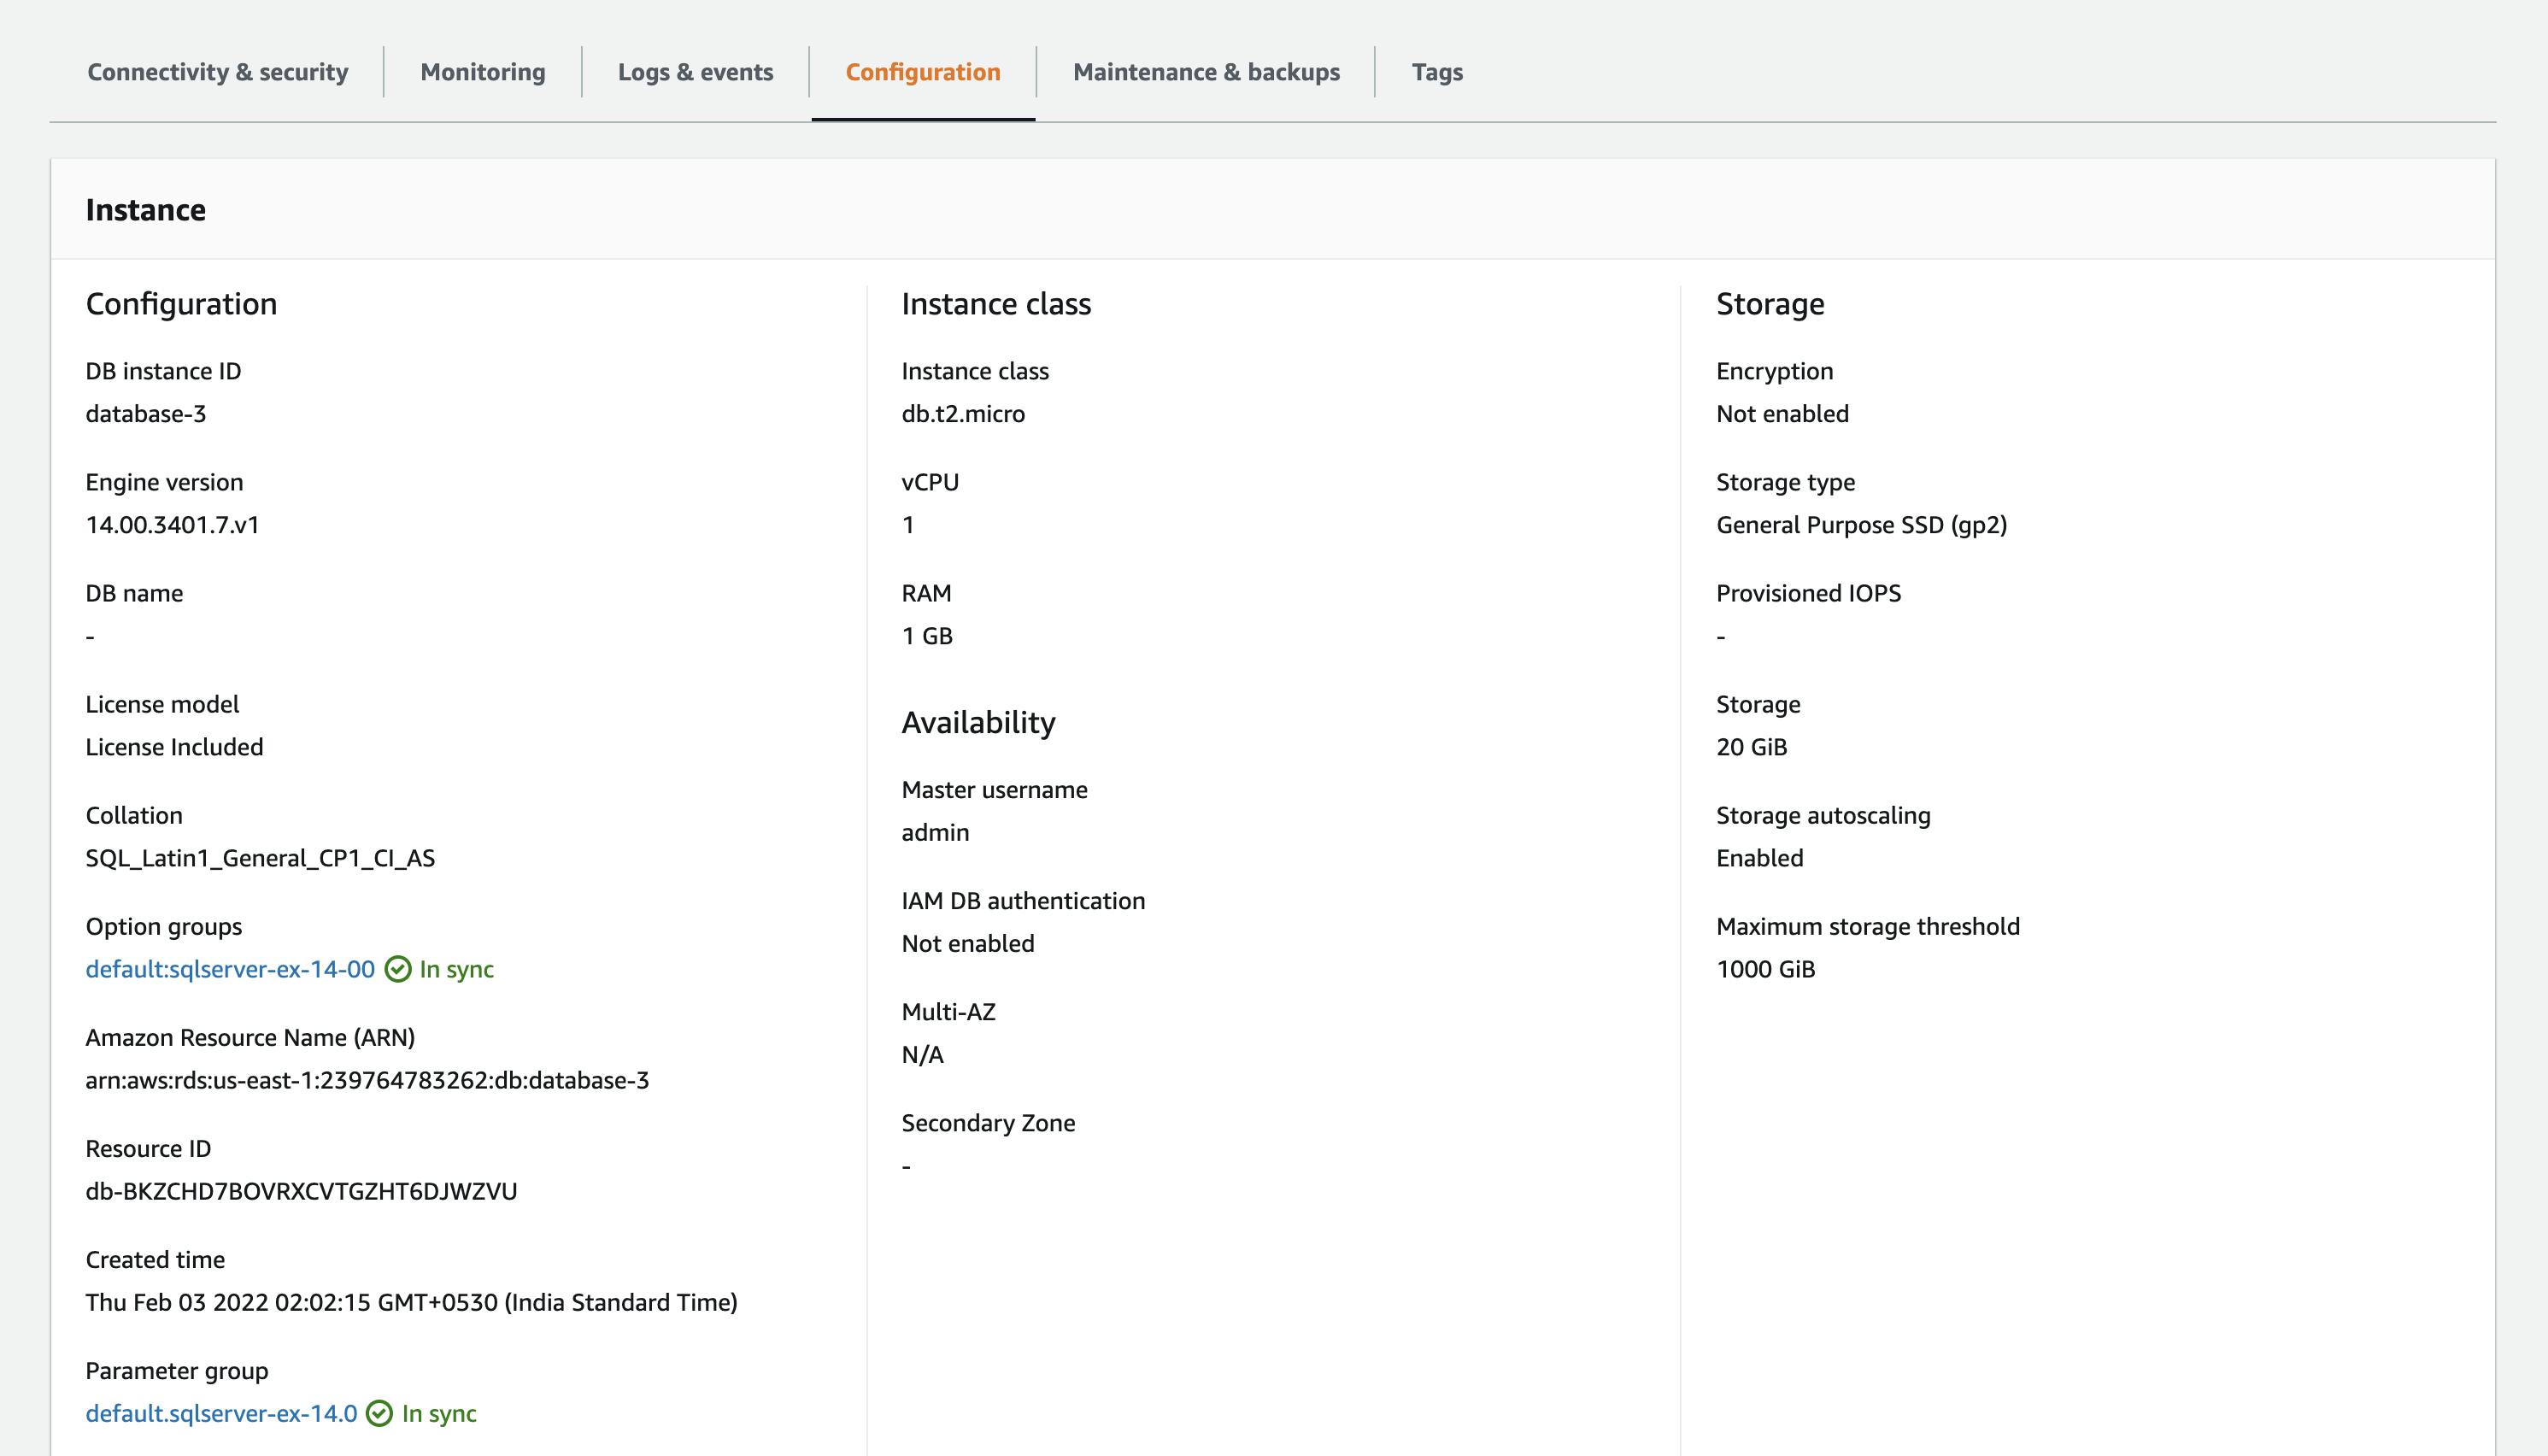
- When using MSSQL on a hosted service, all these details can be found under the configuration settings. In this example, I’m using a free MSSQL RDS on Amazon Web Services (AWS).
- Rename the Datasource to MSSQL CRUD by double-clicking on the existing one.
Here’s what the configuration would look like:
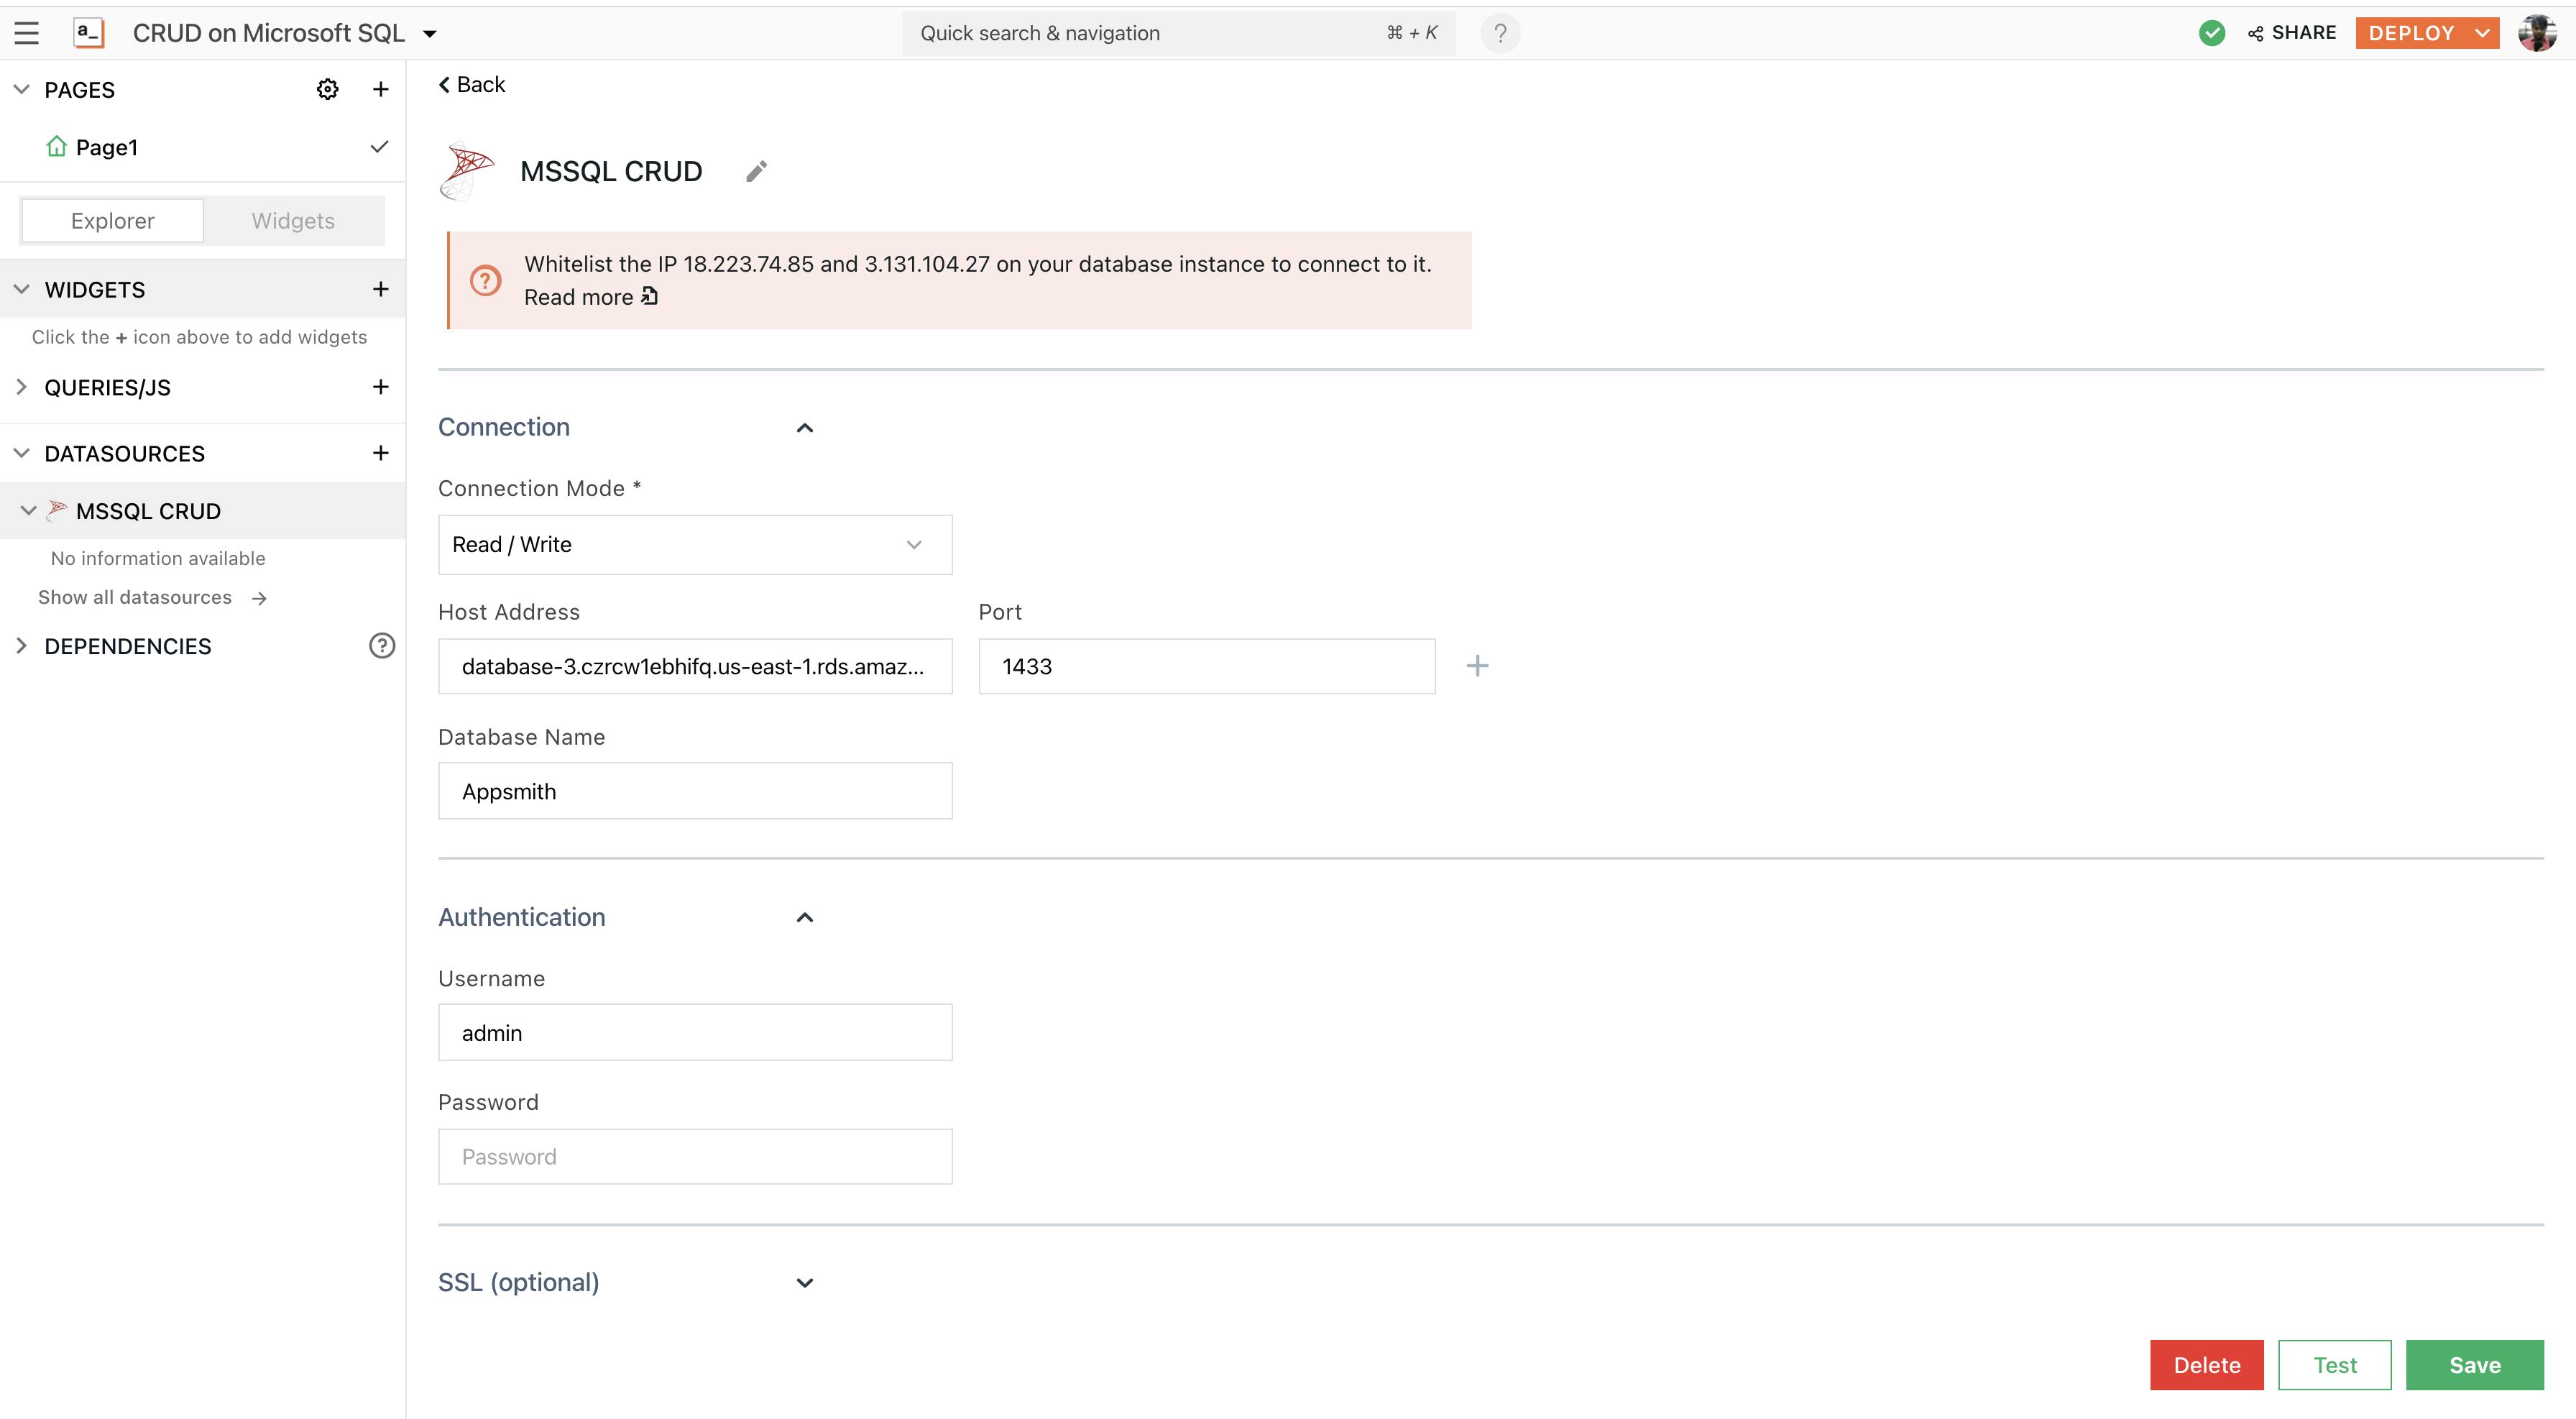
- Next, click on the
Testbutton at the bottom right of the screen. This will help you with understanding whether your configuration is valid or not. If it returns a successful message, hit the ‘Save’ button to establish a secure connection between Appsmith and MSSQL.
Creating a new Table on MSSQL
The basic configuration is complete, so now, we can create a new table and seed it to build a fully customisable CRUD app on MSSQL.
Note: After the connection is established, we can see all the (tables) under the connected datasource.
- Click on the + icon next to Datasource and click on Create New + from the MSSQL CRUD we’ve just created.
- This will redirect you to the query pane, where you can write MSSQL SQL queries, now rename the query to seedData, and choose to
createfrom the template and paste the following in the query body:
CREATE TABLE employees(
  id INT NOT NULL IDENTITY PRIMARY KEY,
  last_name VARCHAR(50) NOT NULL,
  first_name VARCHAR(50),
  role VARCHAR(50),
  salary INTEGER
);

INSERT INTO employees (last_name, first_name, role, salary) VALUES ('Tony', 'Stark', 'Dev Rel', 1000);
This is a simple SQL query that’ll create a employees table, the idea for us is to build a simple CRUD application, that’ll let us employees for an org.
Also, note that we’ve seeded the table with an insert statement where we added the details of our first employee.
Alrighty, not that our table is created, let’s get into CRUD.
CRUD on MSSQL with Appsmith
Implementing the Read Operation
First, let’s read our seed data from the database and display it on a beautiful table widget. Follow the below steps:
- Click on the
+icon next to the datasources and choose to Create New + from the MSSQL CRUD datasource. - Rename the query to getEmployees
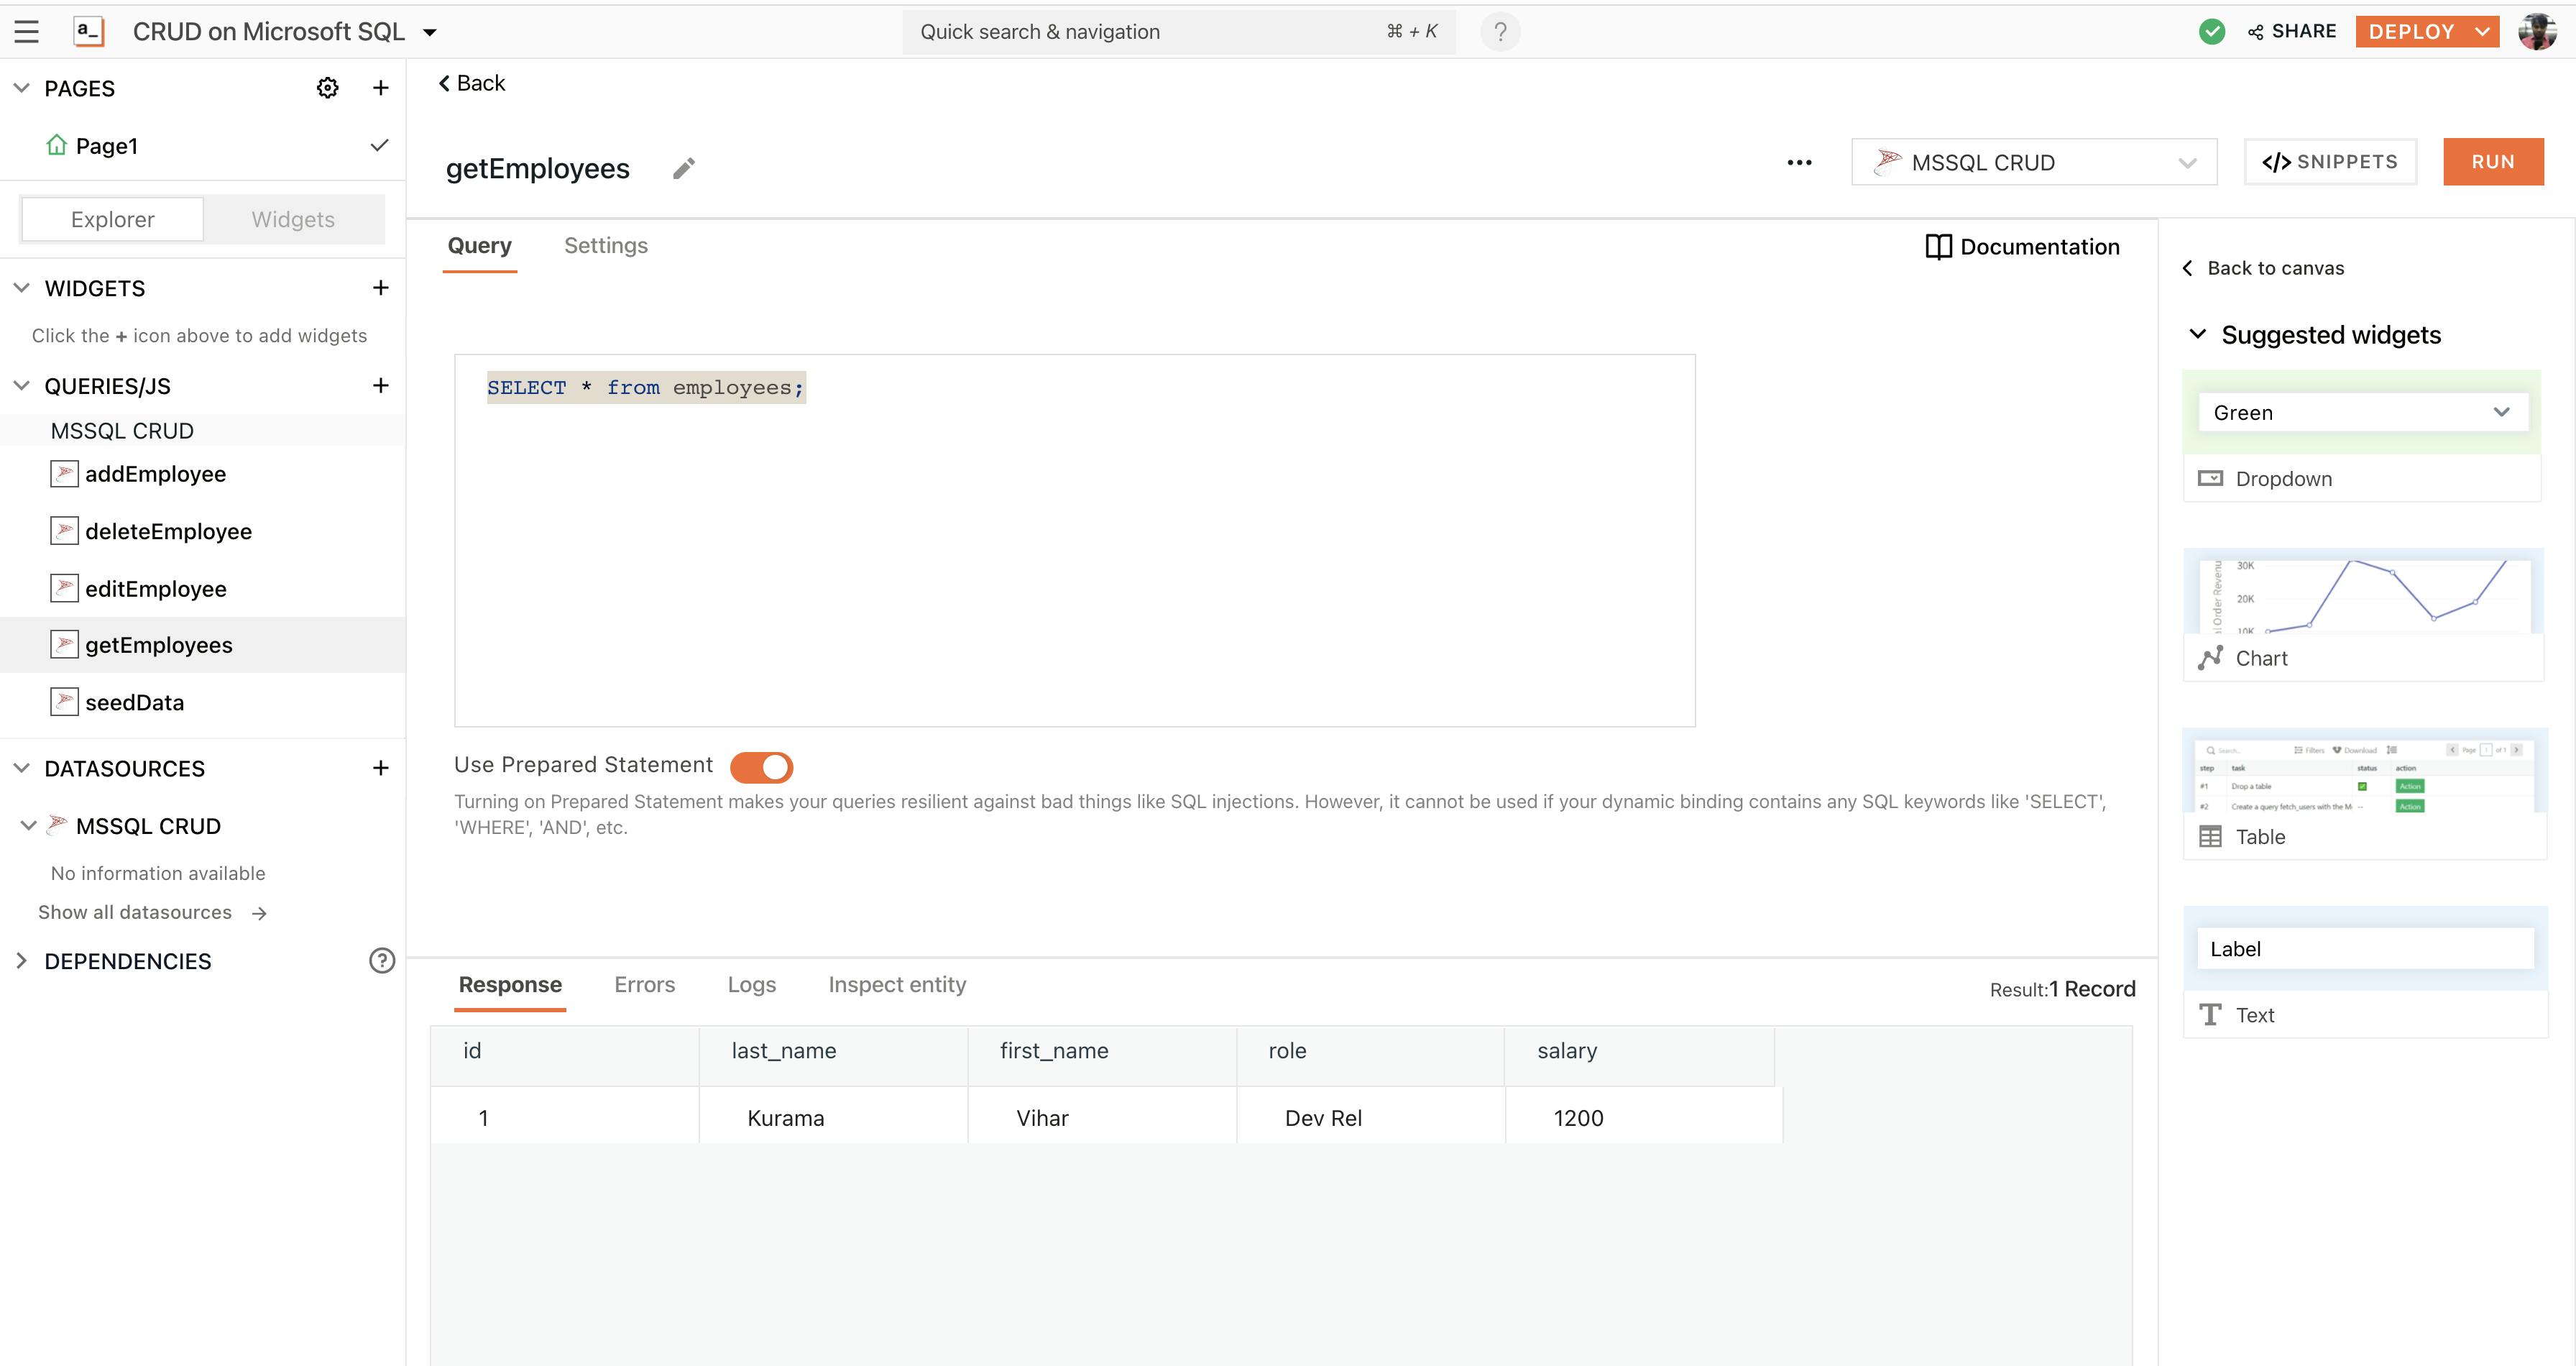
- Copy the following SQL script to query all the Employees from the employees' table:
SELECT * from employees;
- This simple query returns all the employee details present in the sample data item. Hit the RUN button to view all the results.
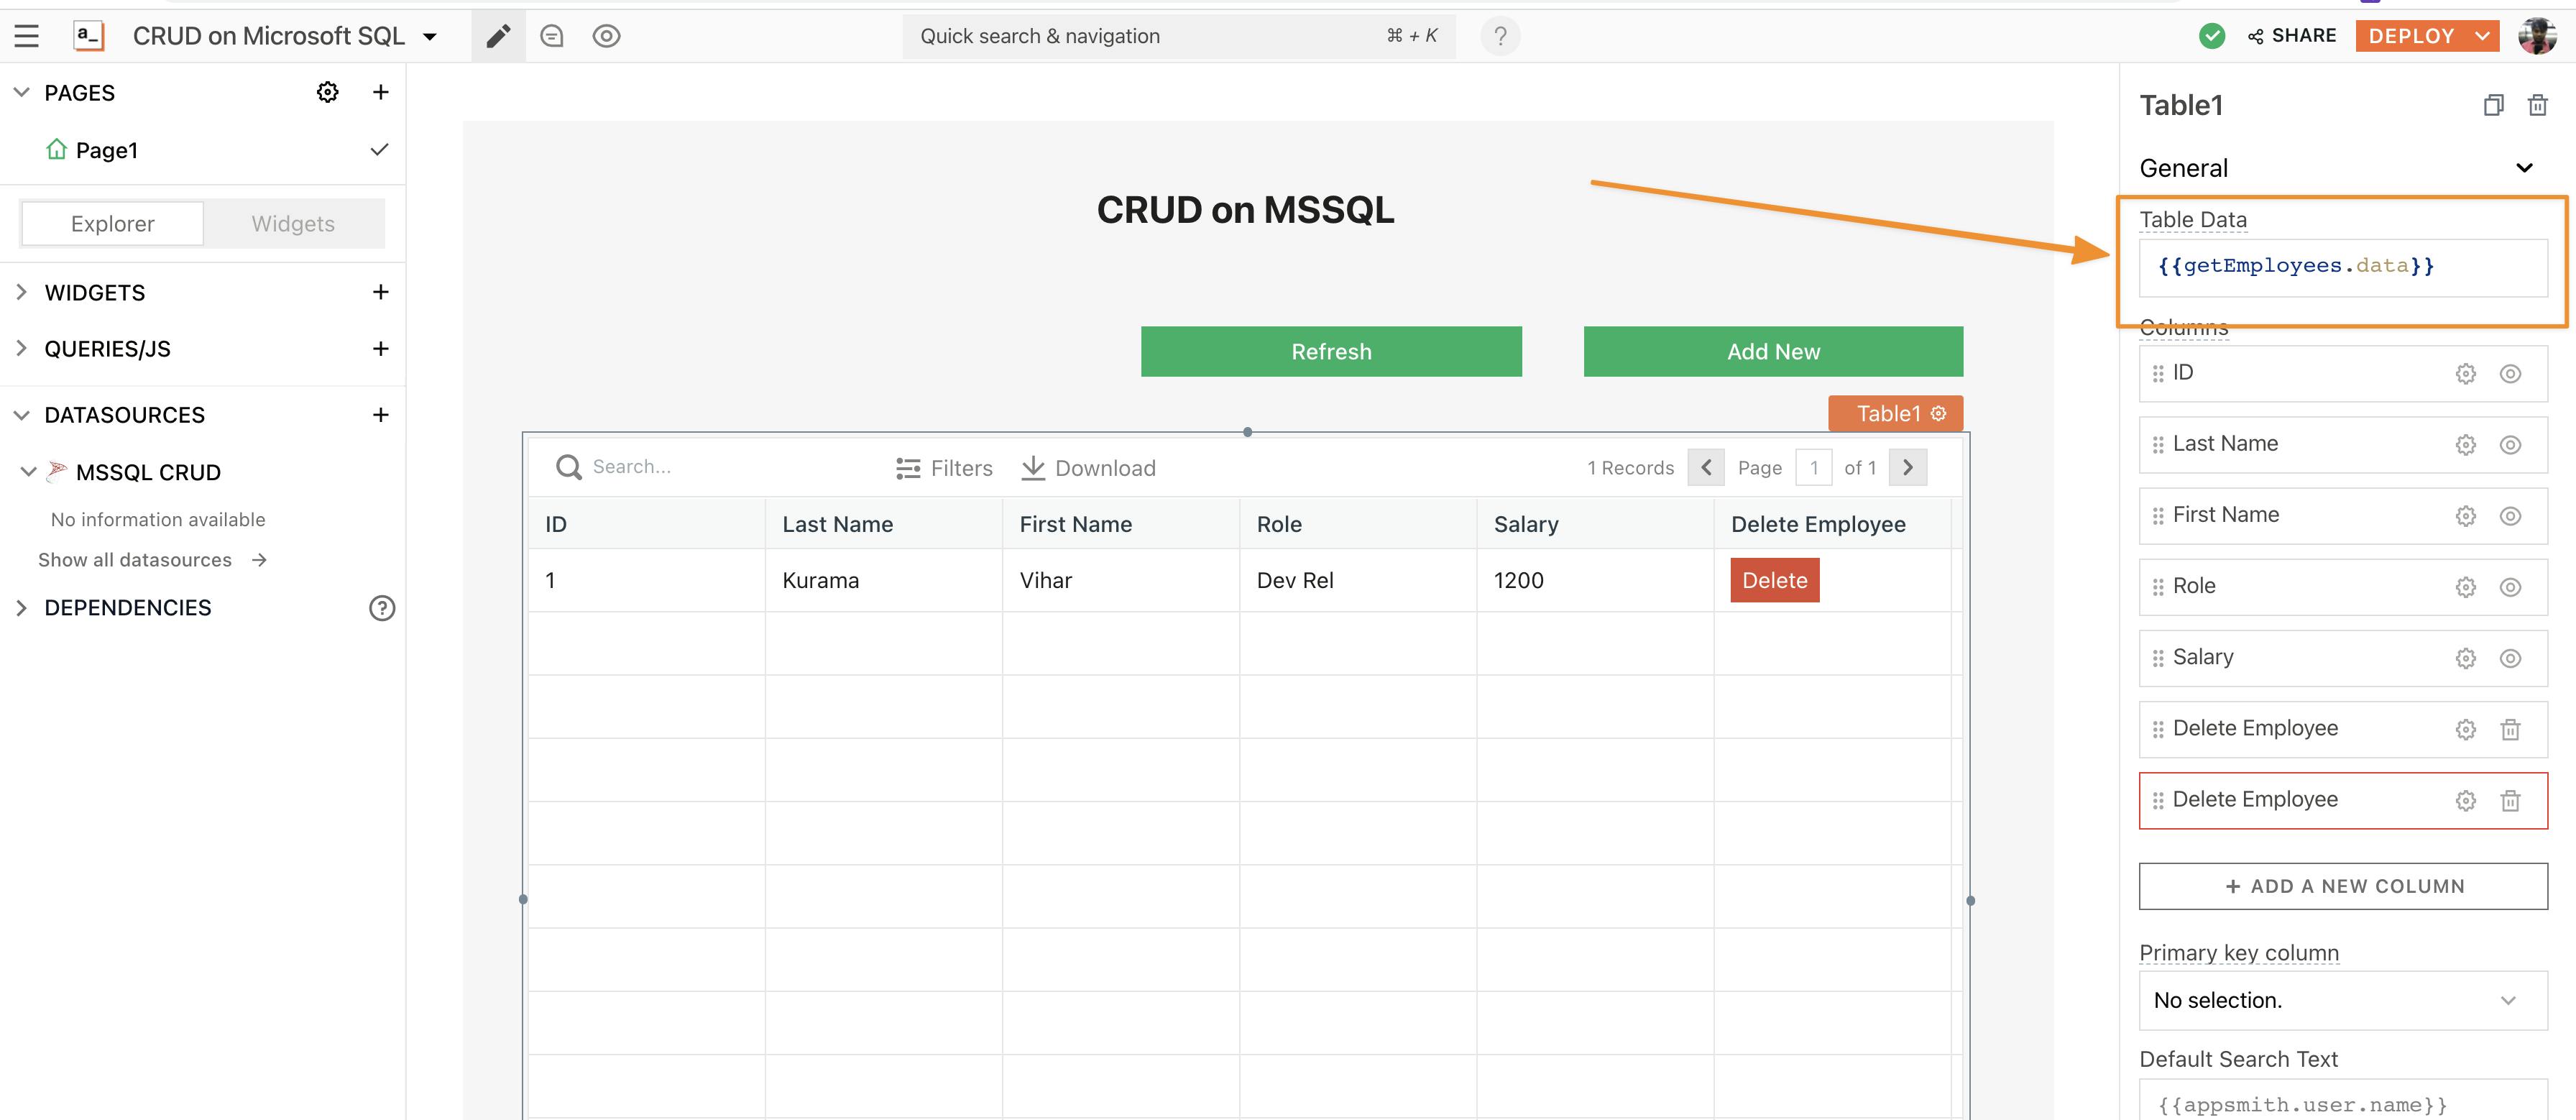
We now have our query; let's bind this onto the table widget; for this follow the below steps:
- Click the
+icon next to widgets on the sidebar, search for the table widget, and drag and drop it onto the canvas. - You can make any configurations to any widget via the property pane. Click on the table widget on the canvas, you will see the property pane docked to the sidebar on the right. Now, under the Table Data property, use the moustache syntax to bind the query:
{{getEmployees.data}}
With this, we should see all the data displayed on the table. The column names can be configured and re-organized under the property pane.
Implementing the Create Operation
To add the create operation on MSSQL, let’s make UI.
- Drag and drop a button widget onto the canvas. Open its property pane, set the onClick property to
Open a New Modal, and chooseCreate New. - This will open up a new modal now; let’s drag and drop a few widgets to create a form that we can use to add new employees into our database.
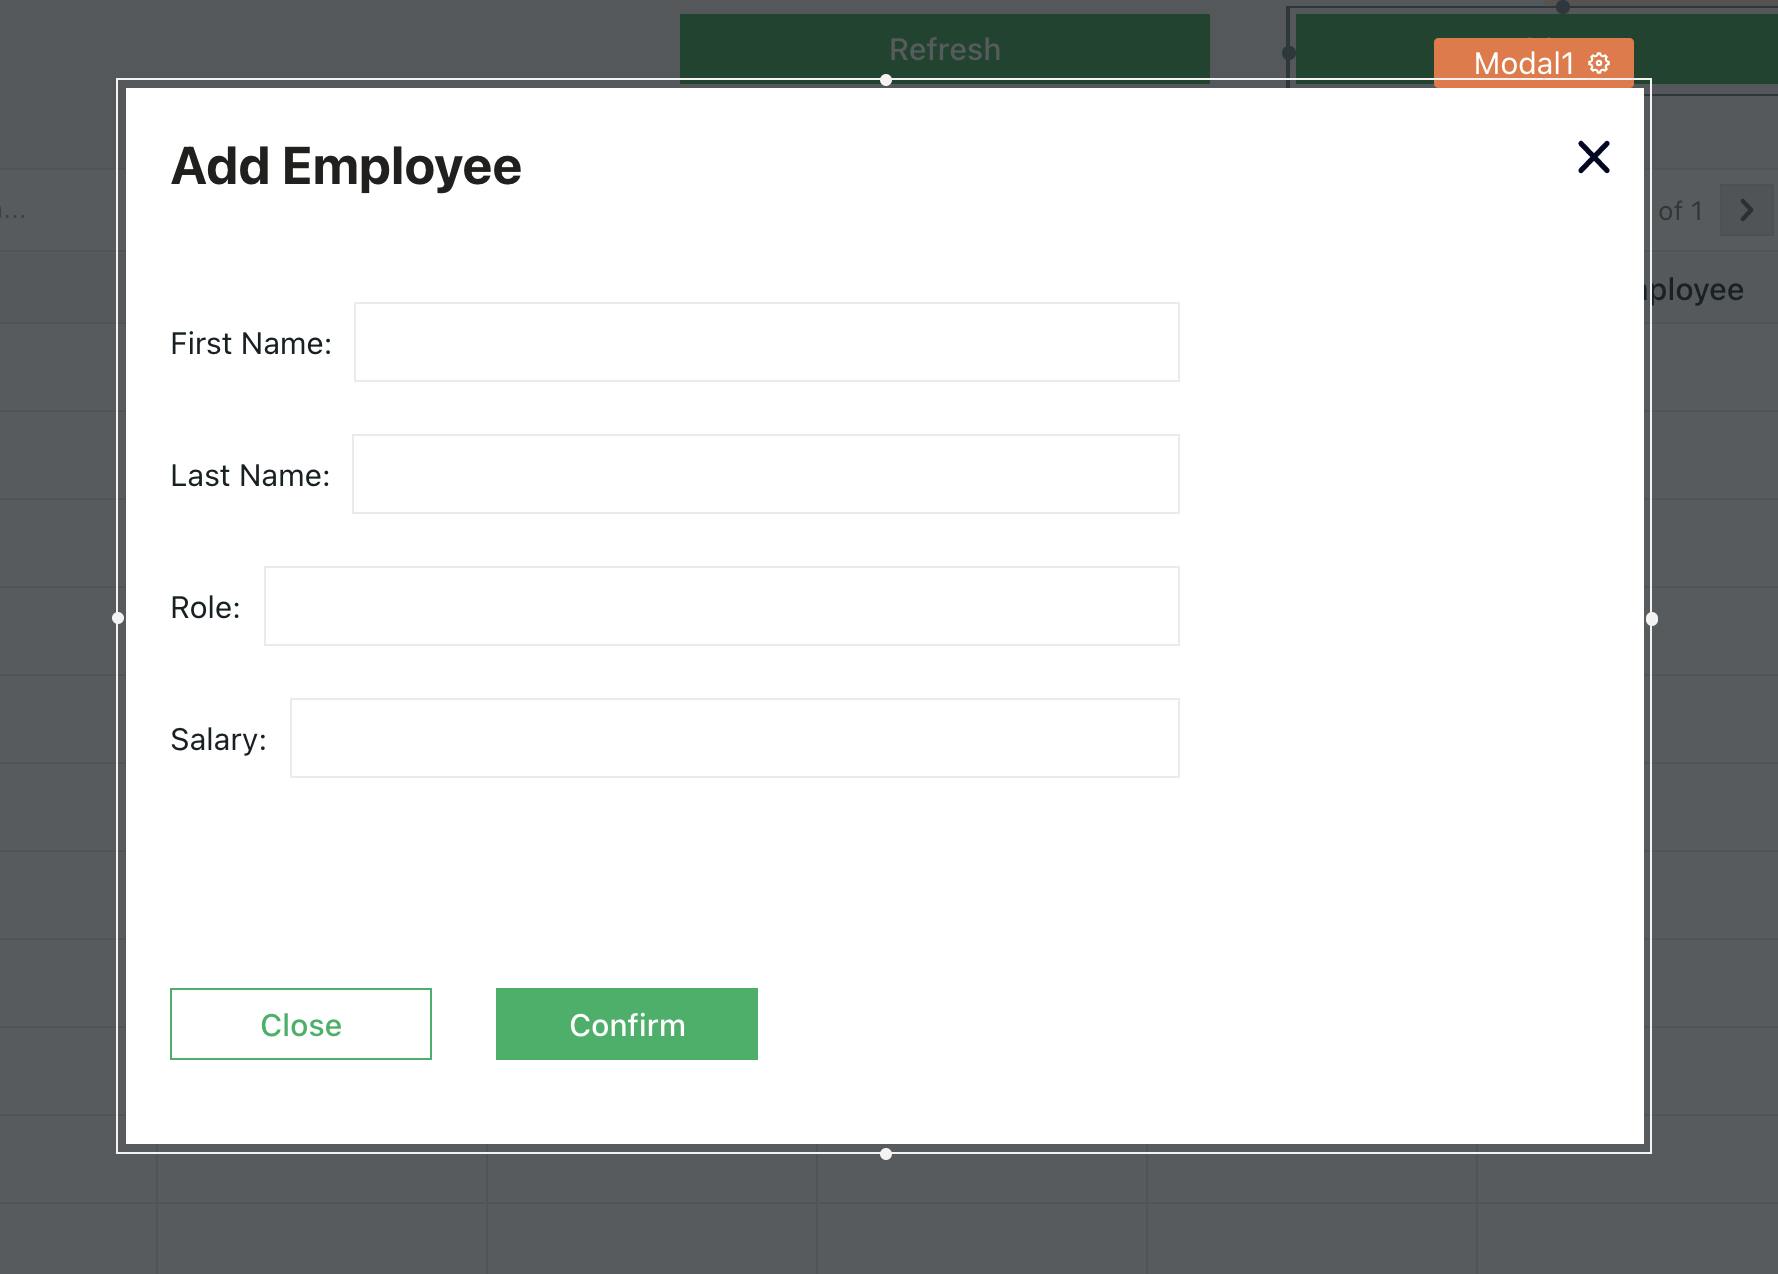
Here, we have four input widgets to add to our employees. We can configure the default values, labels, and placeholders by selecting the respective property panes. Now, let’s write the query that lets us create a new employee on MSSQL.
Follow the steps below:
- Click on the
+icon next to the datasources and choose to Create New + from the MSSQL CRUD datasource - Rename the query to
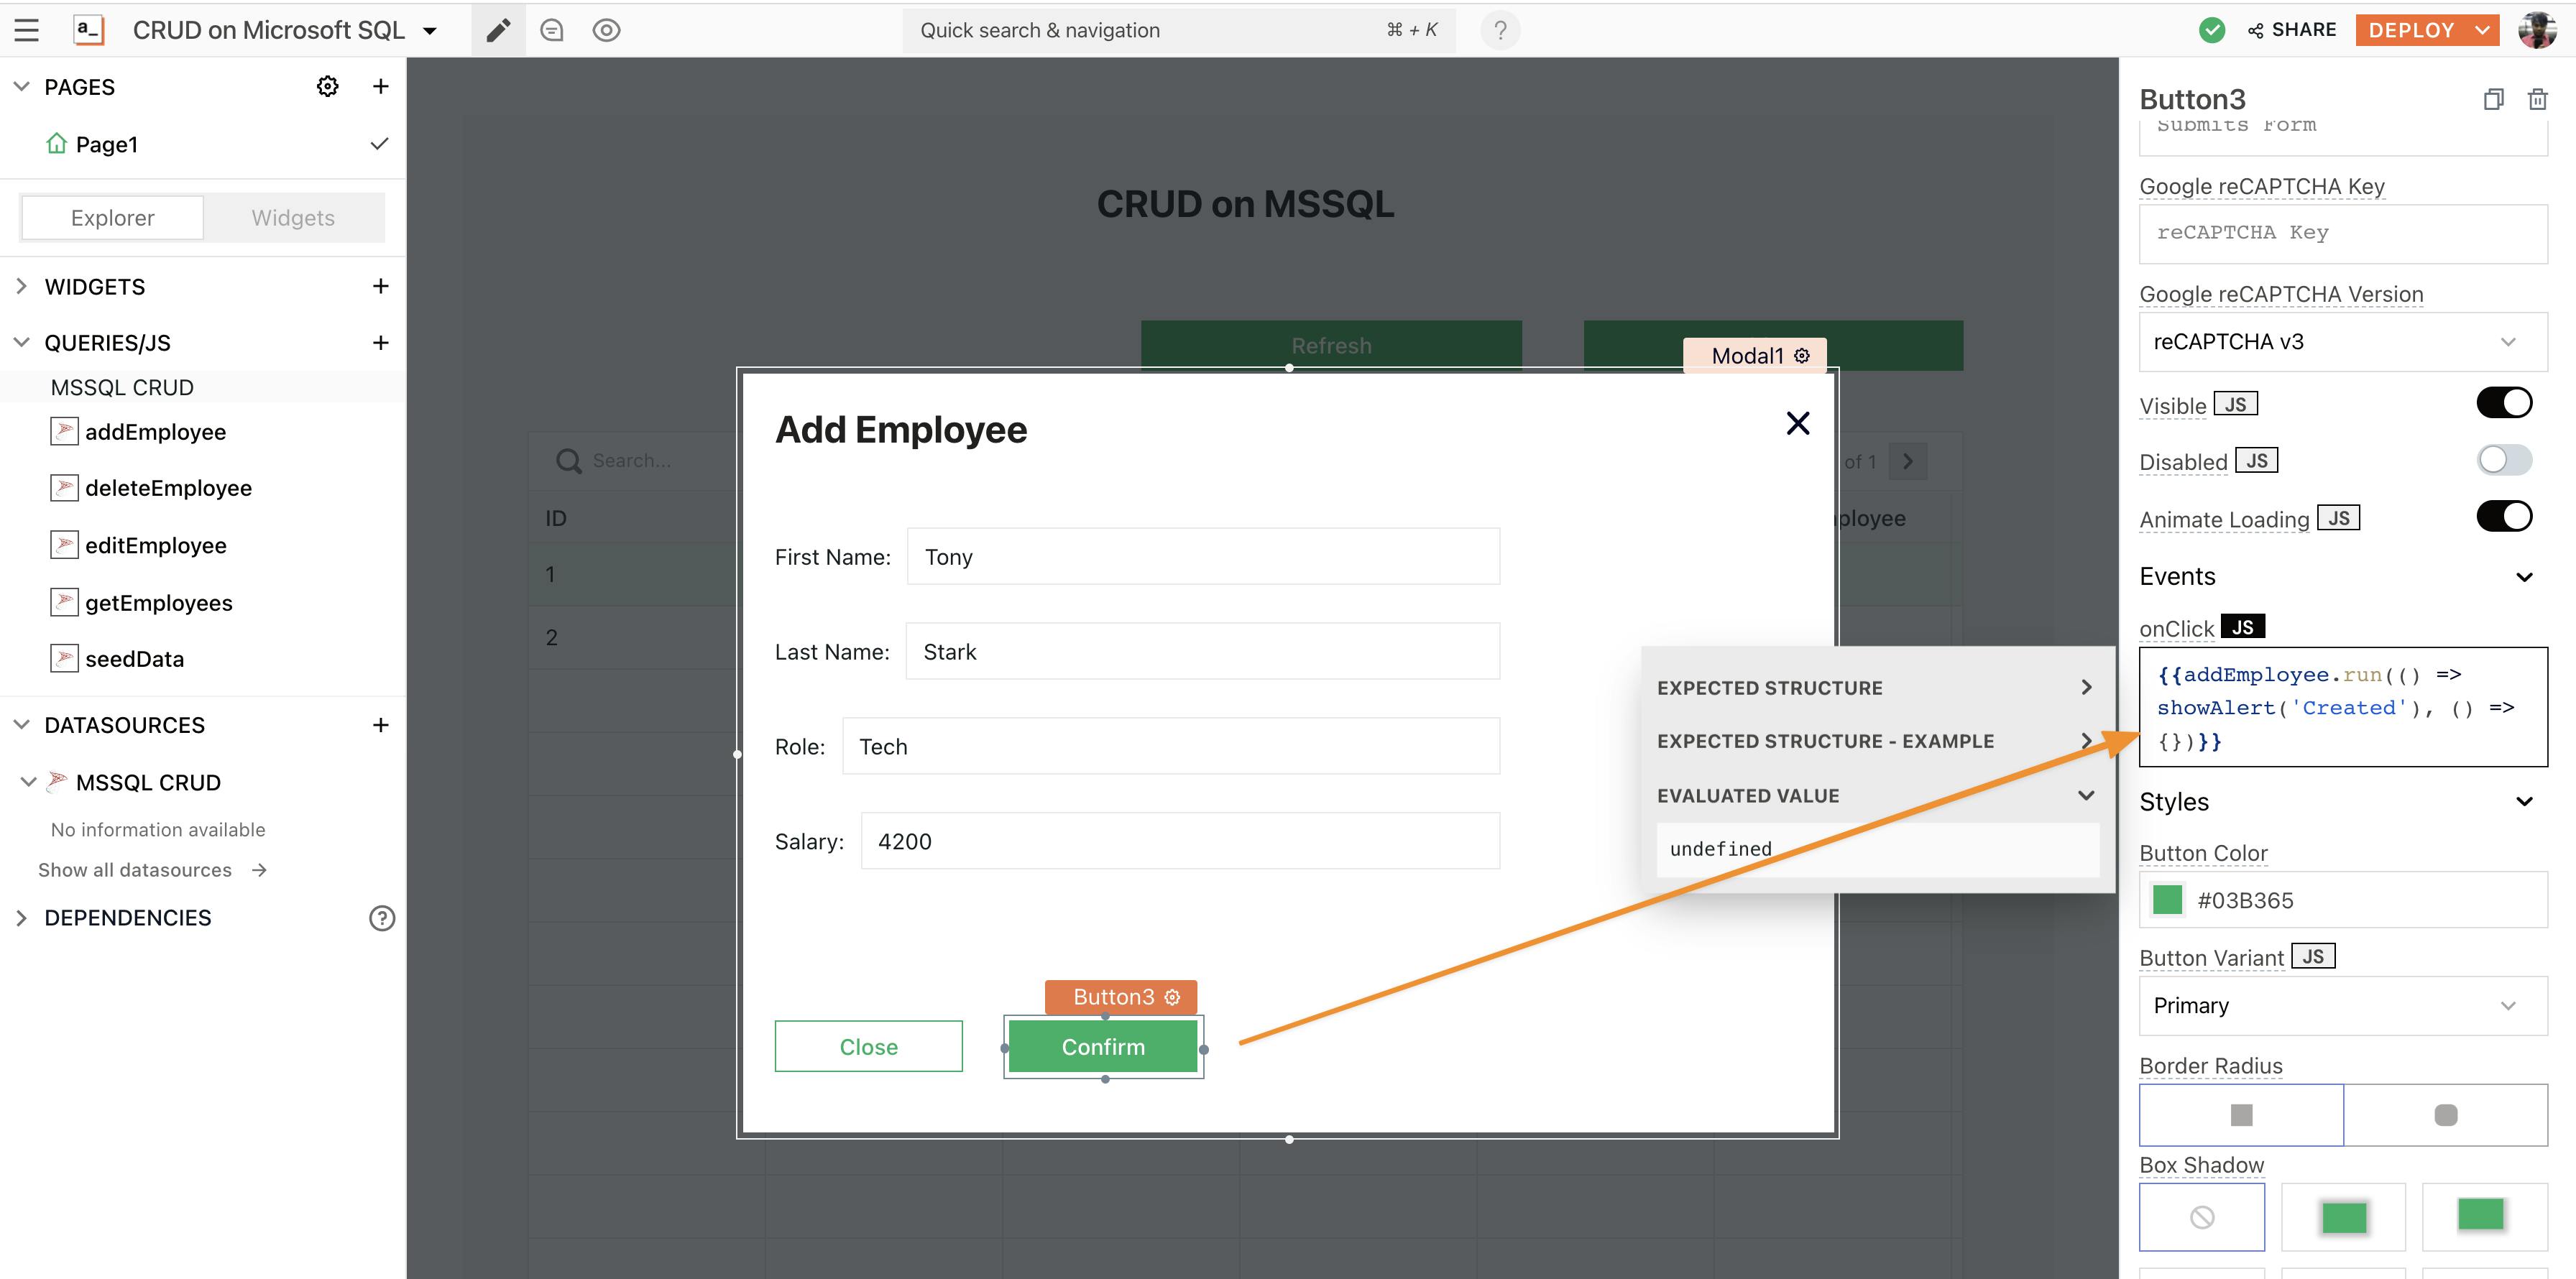
addEmployee - Copy the following SQL script:
INSERT INTO employees (last_name, first_name, role, salary) VALUES ('{{Input2.text}}', '{{Input1.text}}', '{{Input3.text}}', '{{Input4.text}}');
Here, we have an insert query that collects all the data from the form widgets we've created. Note that we use the moustache syntax to bind the data from the widgets onto the query body.
Lastly, we’ll need to configure the submit button; for this, go back to the modal and set the button’s onClick property to execute a query and choose addEmployee under the events property:
Implementing the Update Operation
The Update operation is quite similar to the create operation. First, let’s build UI by creating a new custom column on the table by clicking on ADD A NEW COLUMN under the columns property.
Now, rename the column to Edit Employee, and click on the cog icon next to it, to configure column settings. Under this, we’ll see column-type properties set to a Button type. When clicked, a modal should open up with the necessary fields to update the item.
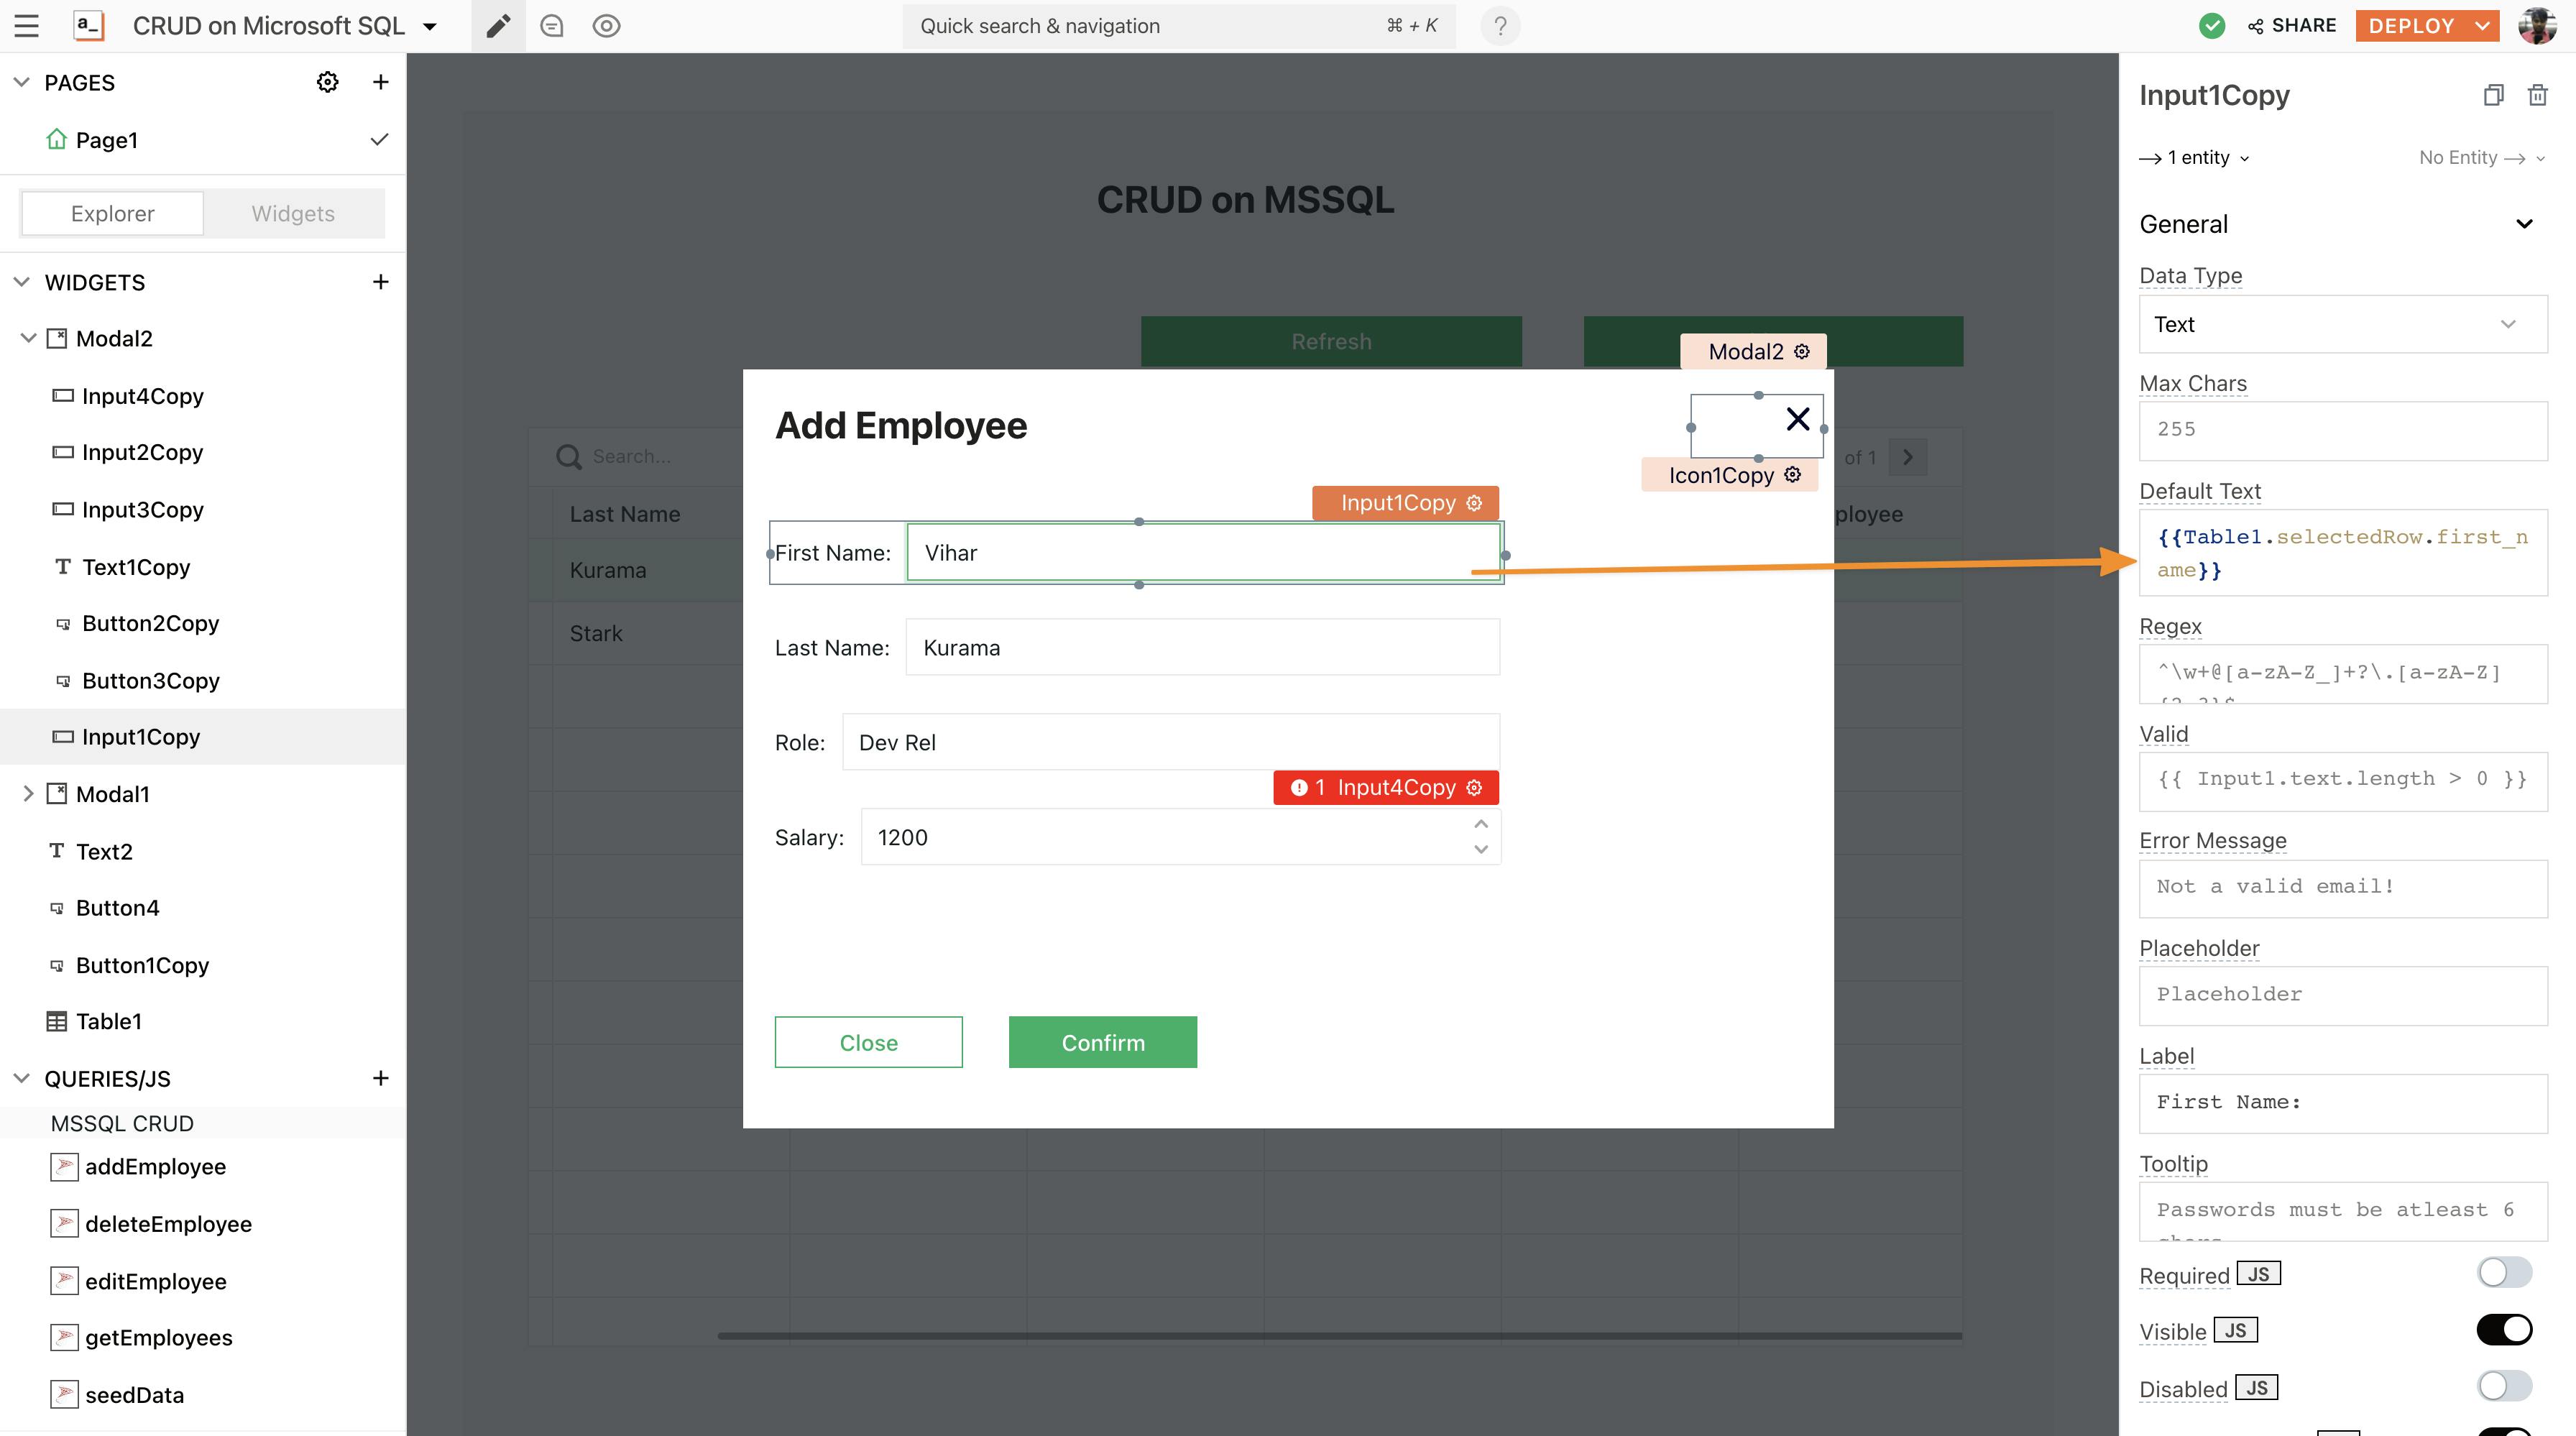
Now, copy-paste Modal1 and rename it to Modal2, and set the onClick property of the Edit Employee button to open Modal2. Here, in the form, we can also set the default value to show existing information, to display this, use the selectedRow property from the table widget.
Let’s write the Edit query using SQL:
- Click on the
+icon next to the datasources and choose to Create New + from the MSSQL CRUD datasource - Rename the query to editEmployee
- Copy the following SQL script:
UPDATE employees
  SET last_name = '{{Input2Copy.text}}', first_name = '{{Input1Copy.text}}', role = '{{Input3Copy.text}}', salary = {{Input4.text}}
  WHERE id = {{Table1.selectedRow.id}}
Here, we have an edited query that collects all the data from the form widgets on Modal2. Note that we use the moustache syntax to bind the data from the widgets onto the query body.
We’ll now need to configure the submit button; for this, go back to Modal2 and set the button’s onClick property to execute a query and choose **_editEmployee_** under the events property:
Implementing the Delete Operation
The delete operation is pretty straightforward with the Table’s selectedRow property; before we dive into it, let’s create a new column on the table and set it to the button. For this:
- Create a new custom column on the table by clicking on
Add a New Columnunder the columns property. - Now, rename this column to ‘Delete Employee,’ and click on the cog icon next to it, to configure column settings. Under this, we’ll see column-type properties set to a button type.
Now, let’s write the Delete query using SQL:
- Click on the
+icon next to the data sources and choose the Create New + from the MSSQL CRUD datasource - Rename the query to deleteEmployee
- Copy the following SQL script:
DELETE FROM employees WHERE id = {{Table1.selectedRow.id}};
Set the Delete Employee button’s onClick property to run the deleteEmployee query.
With these four operations configured, you will be able to read and analyze information from your database, edit the data, add or delete information and update records.
If you’re interested in using a database that is not listed on our website as an integration, please let us know about it by raising a PR on Github and we will do our best to include it at the earliest.
Join our growing community on Discord, and follow us on Youtube and Twitter to stay up to date.