


Table of contents
- Step 1: Set up your Backend on HarperDB
- Step 2: Create the Database (Schema)
- Step 3: Create Roles and Users on HarperDB
- Step 4: Build UI on Appsmith
- Step 5: Configure the Login page
- Step 6: Write queries and bind data to widgets
- Step 7: Control access to information based on user roles
- Step 8: Configure the Logout button
This guide explains how to quickly build an Inventory Management tool to manage movie rentals by connecting a HarperDB backend to an Appsmith frontend. It also implements authentication using HarperDB’s role-based access control feature.
HarperDB is a distributed database that supports key-value, document store, and traditional SQL. As a flexible platform for distributed applications and data, HarperDB is read/write optimized and globally replicates data in under 100ms.
You will need a HarperDB account, which can be created by signing in here.
Appsmith is an open-source framework for building internal tools. It lets you drag-and-drop UI components to build pages, connect to any API, database, or GraphQL source and write logic with JavaScript objects
If you don't have an Appsmith account, create one here.
Let’s get started!
Step 1: Set up your Backend on HarperDB
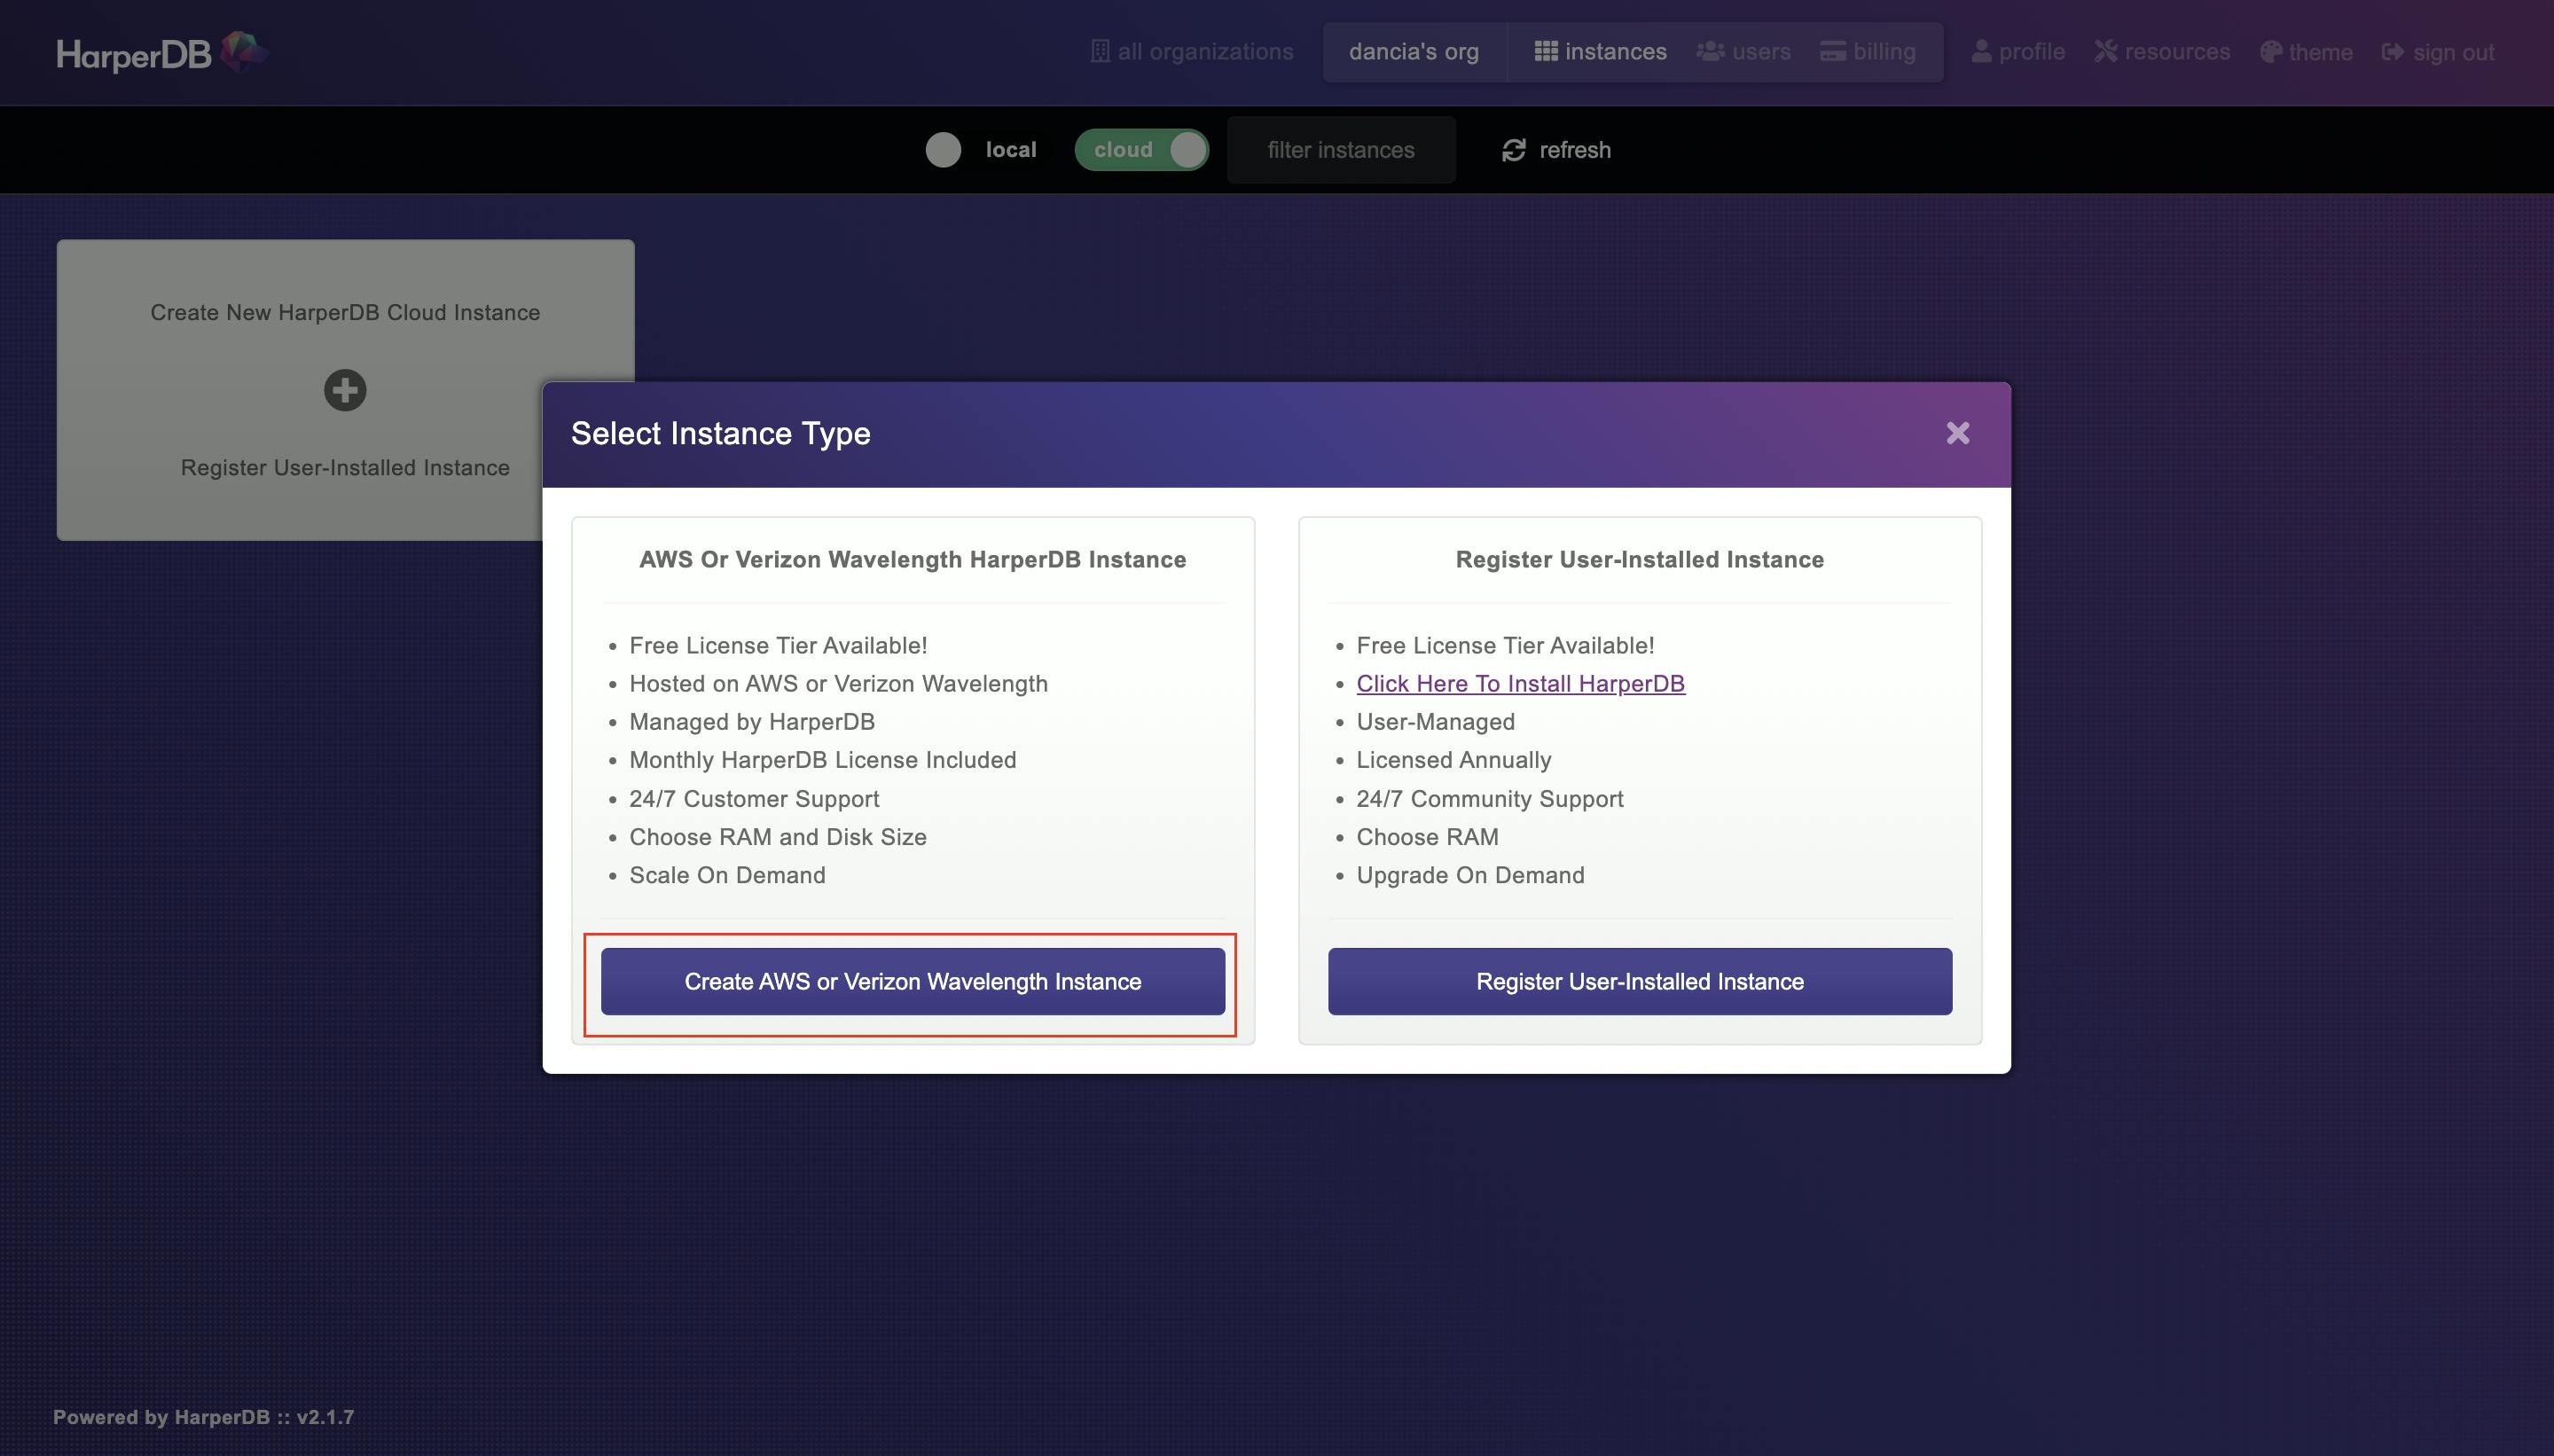
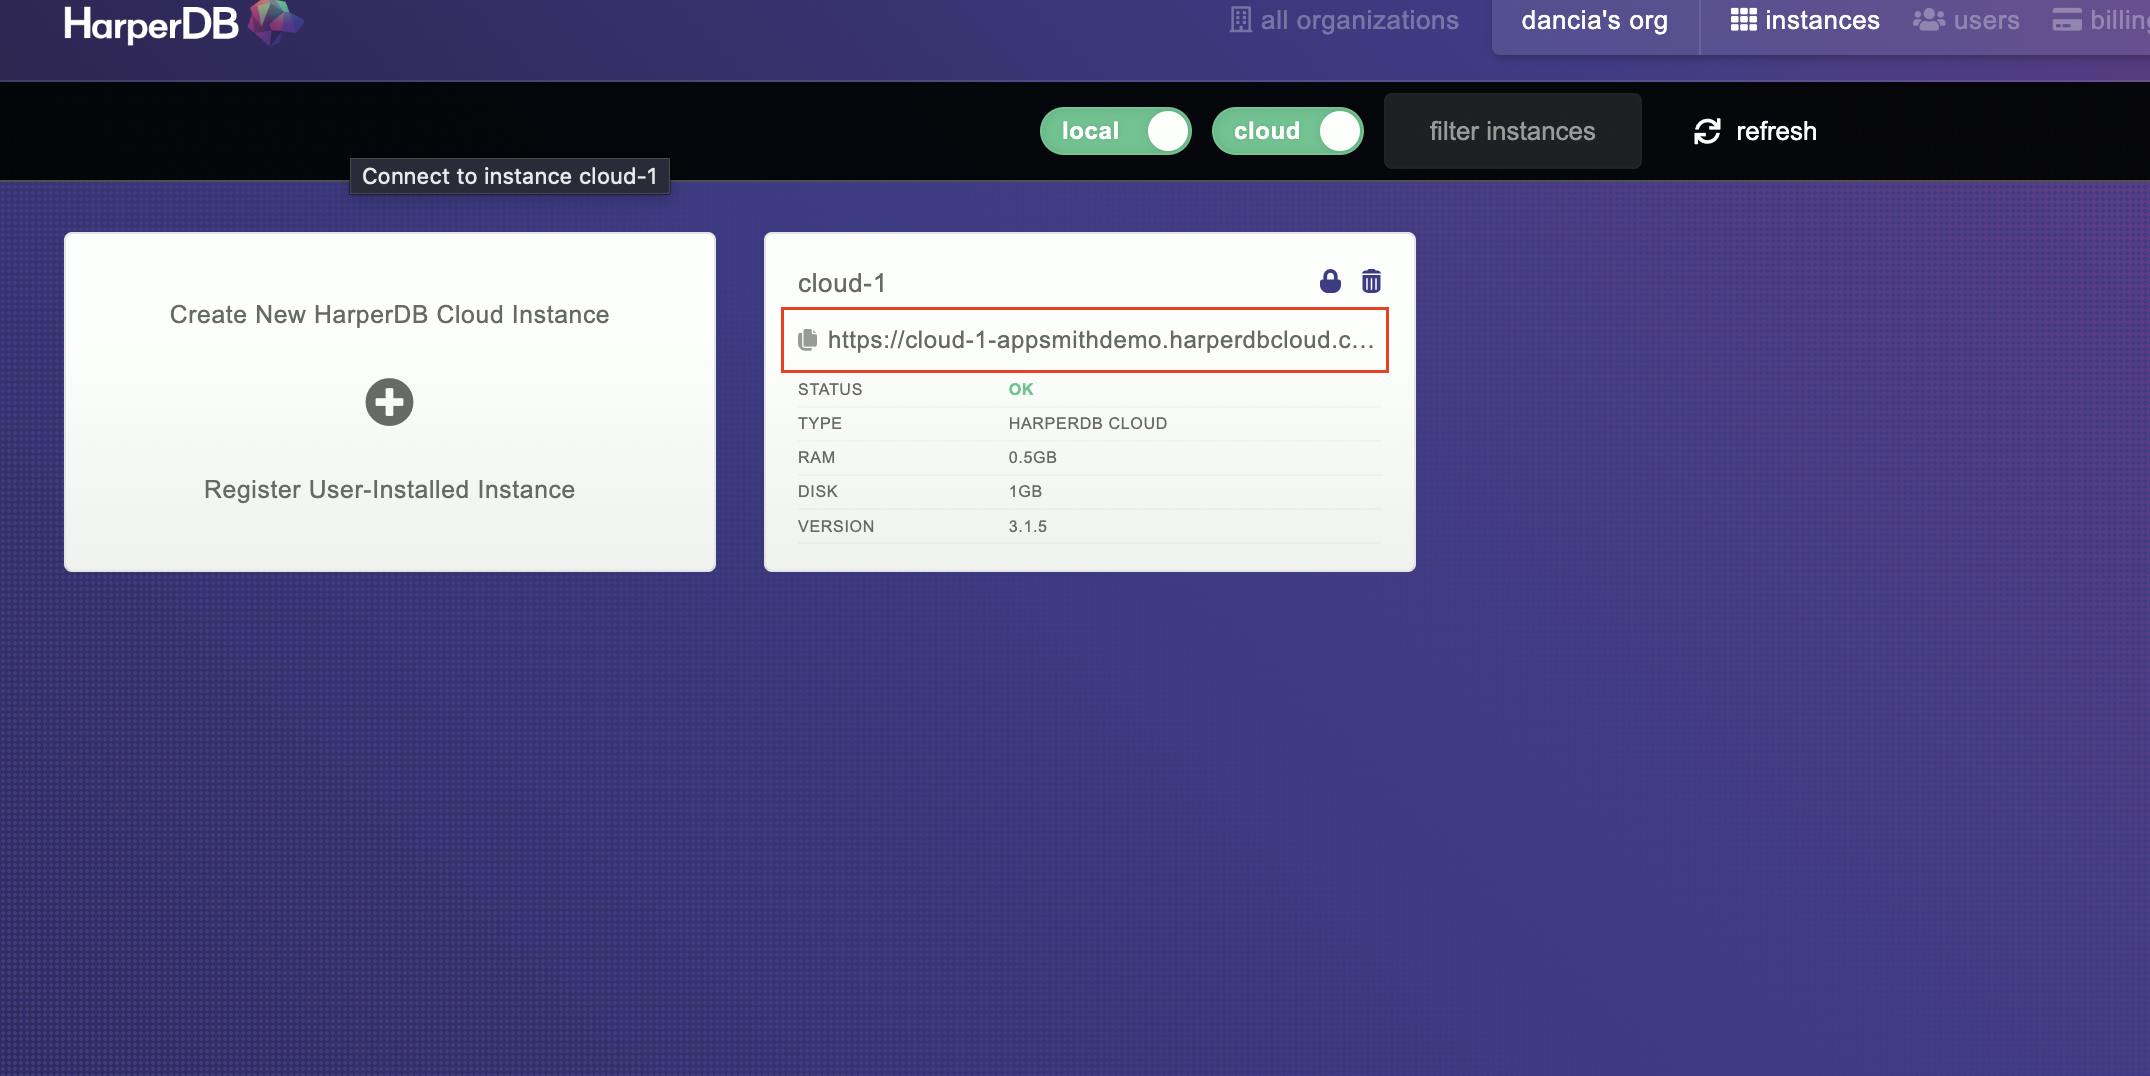
We’ll be using the HarperDB cloud instance free - tier. Click on Create New HarperDB Cloud Instance → Create AWS or Verizon Wavelength Instance
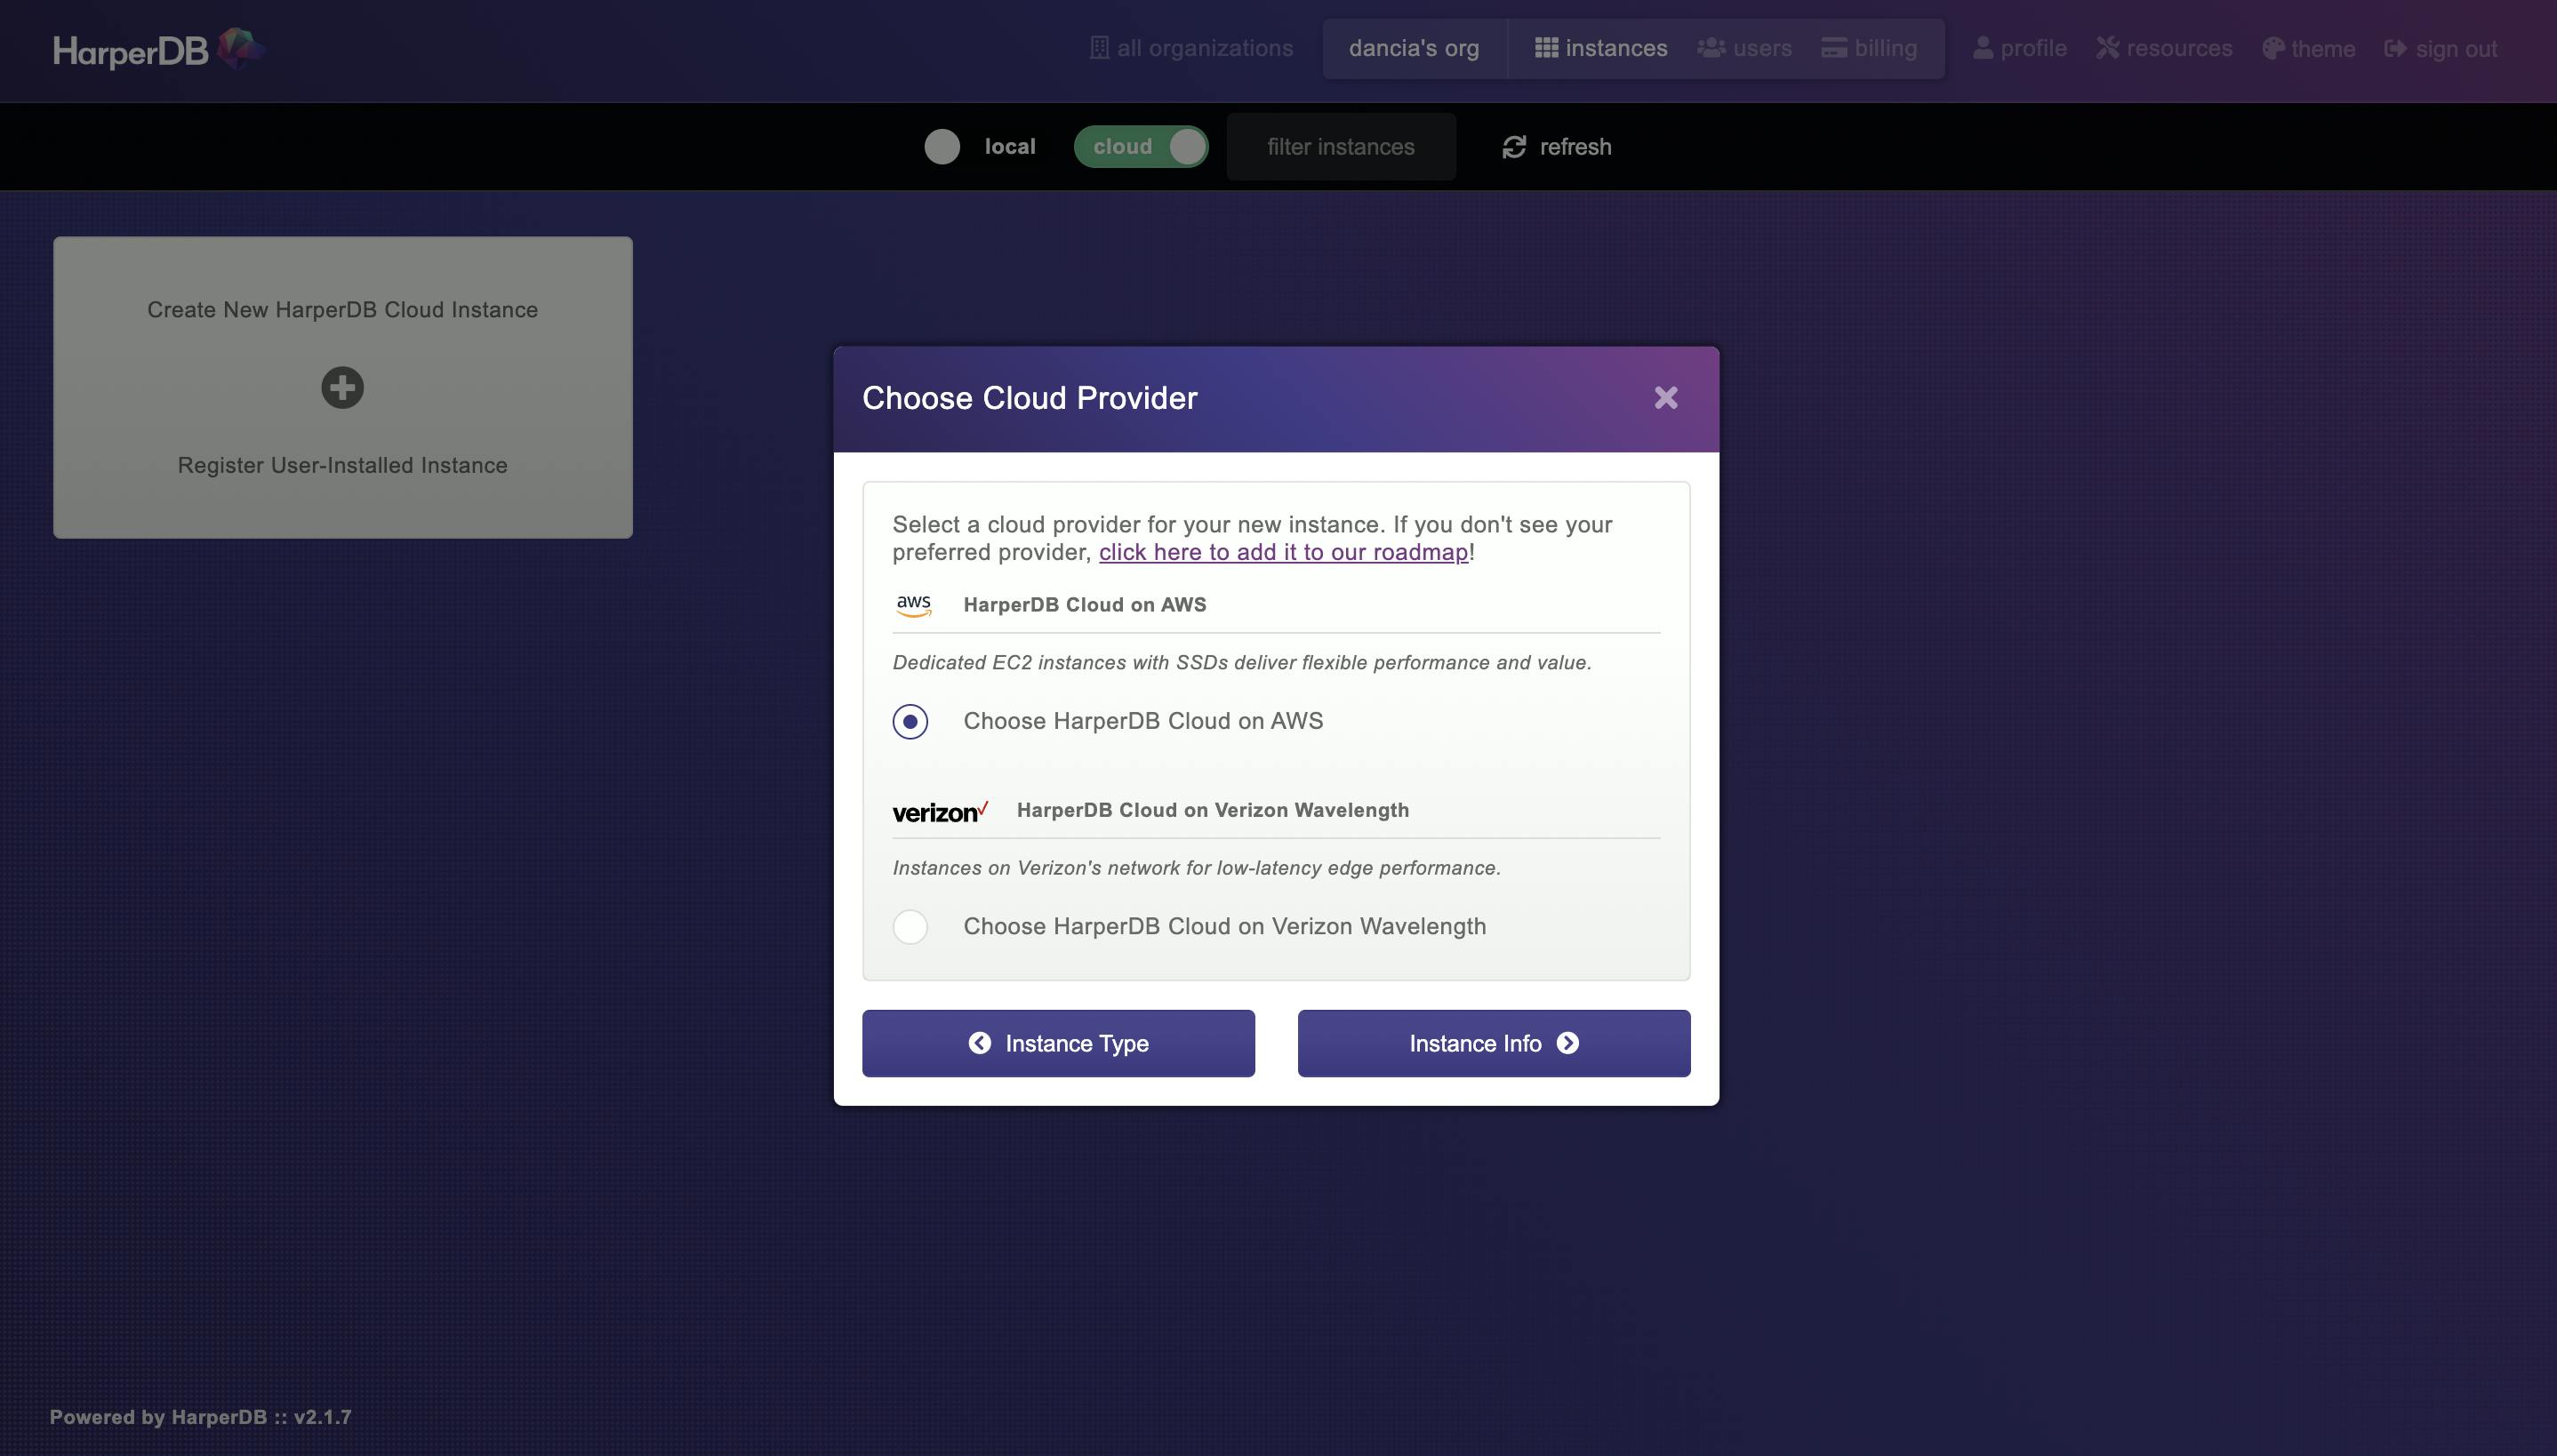
Select Choose HarperDB Cloud on AWS and then click on Instance Info
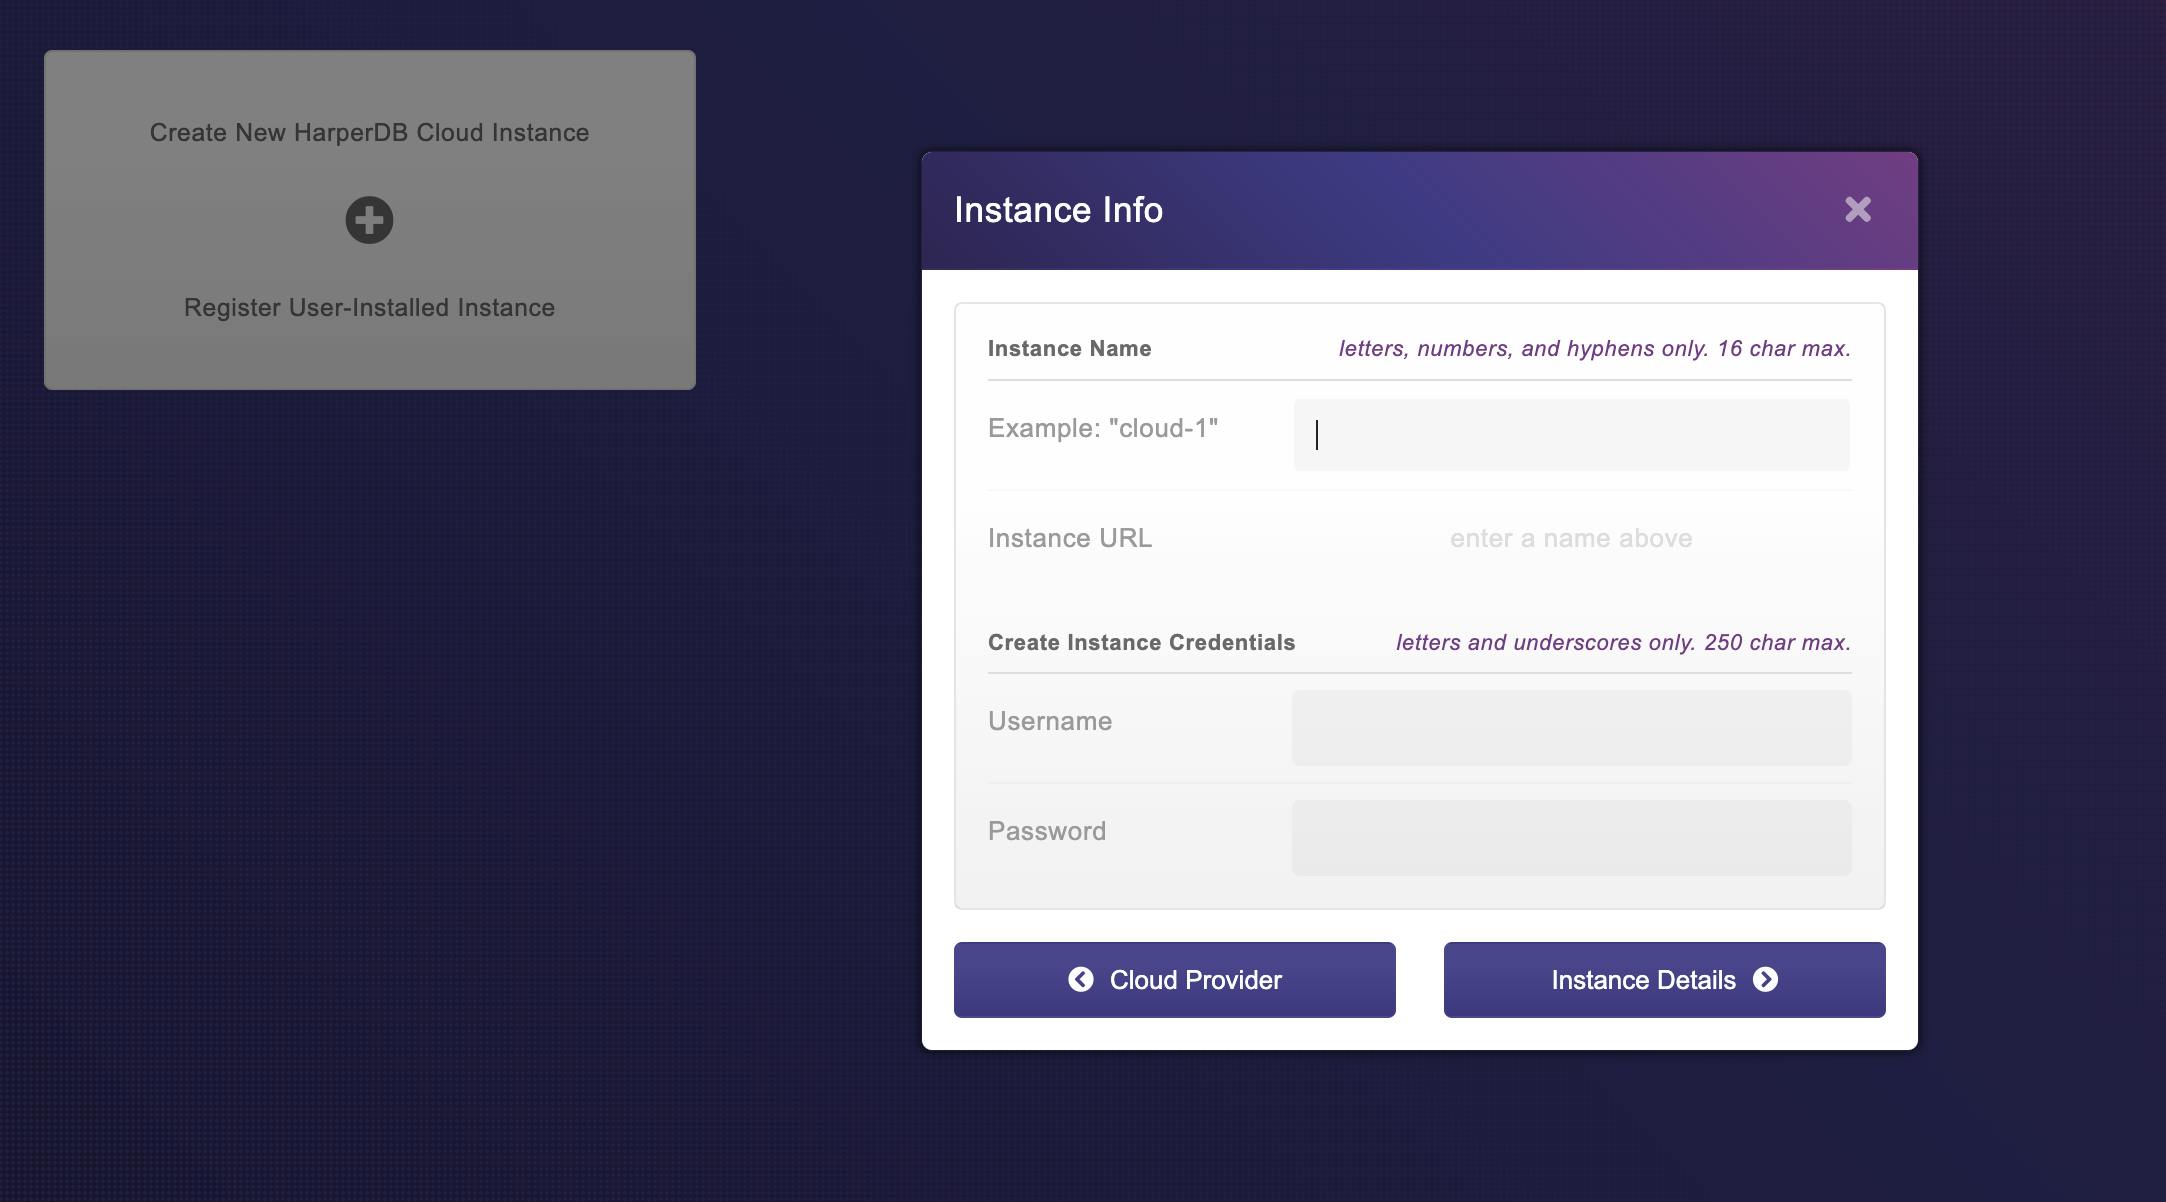
Fill in the details about your instance and click on Instance Details button
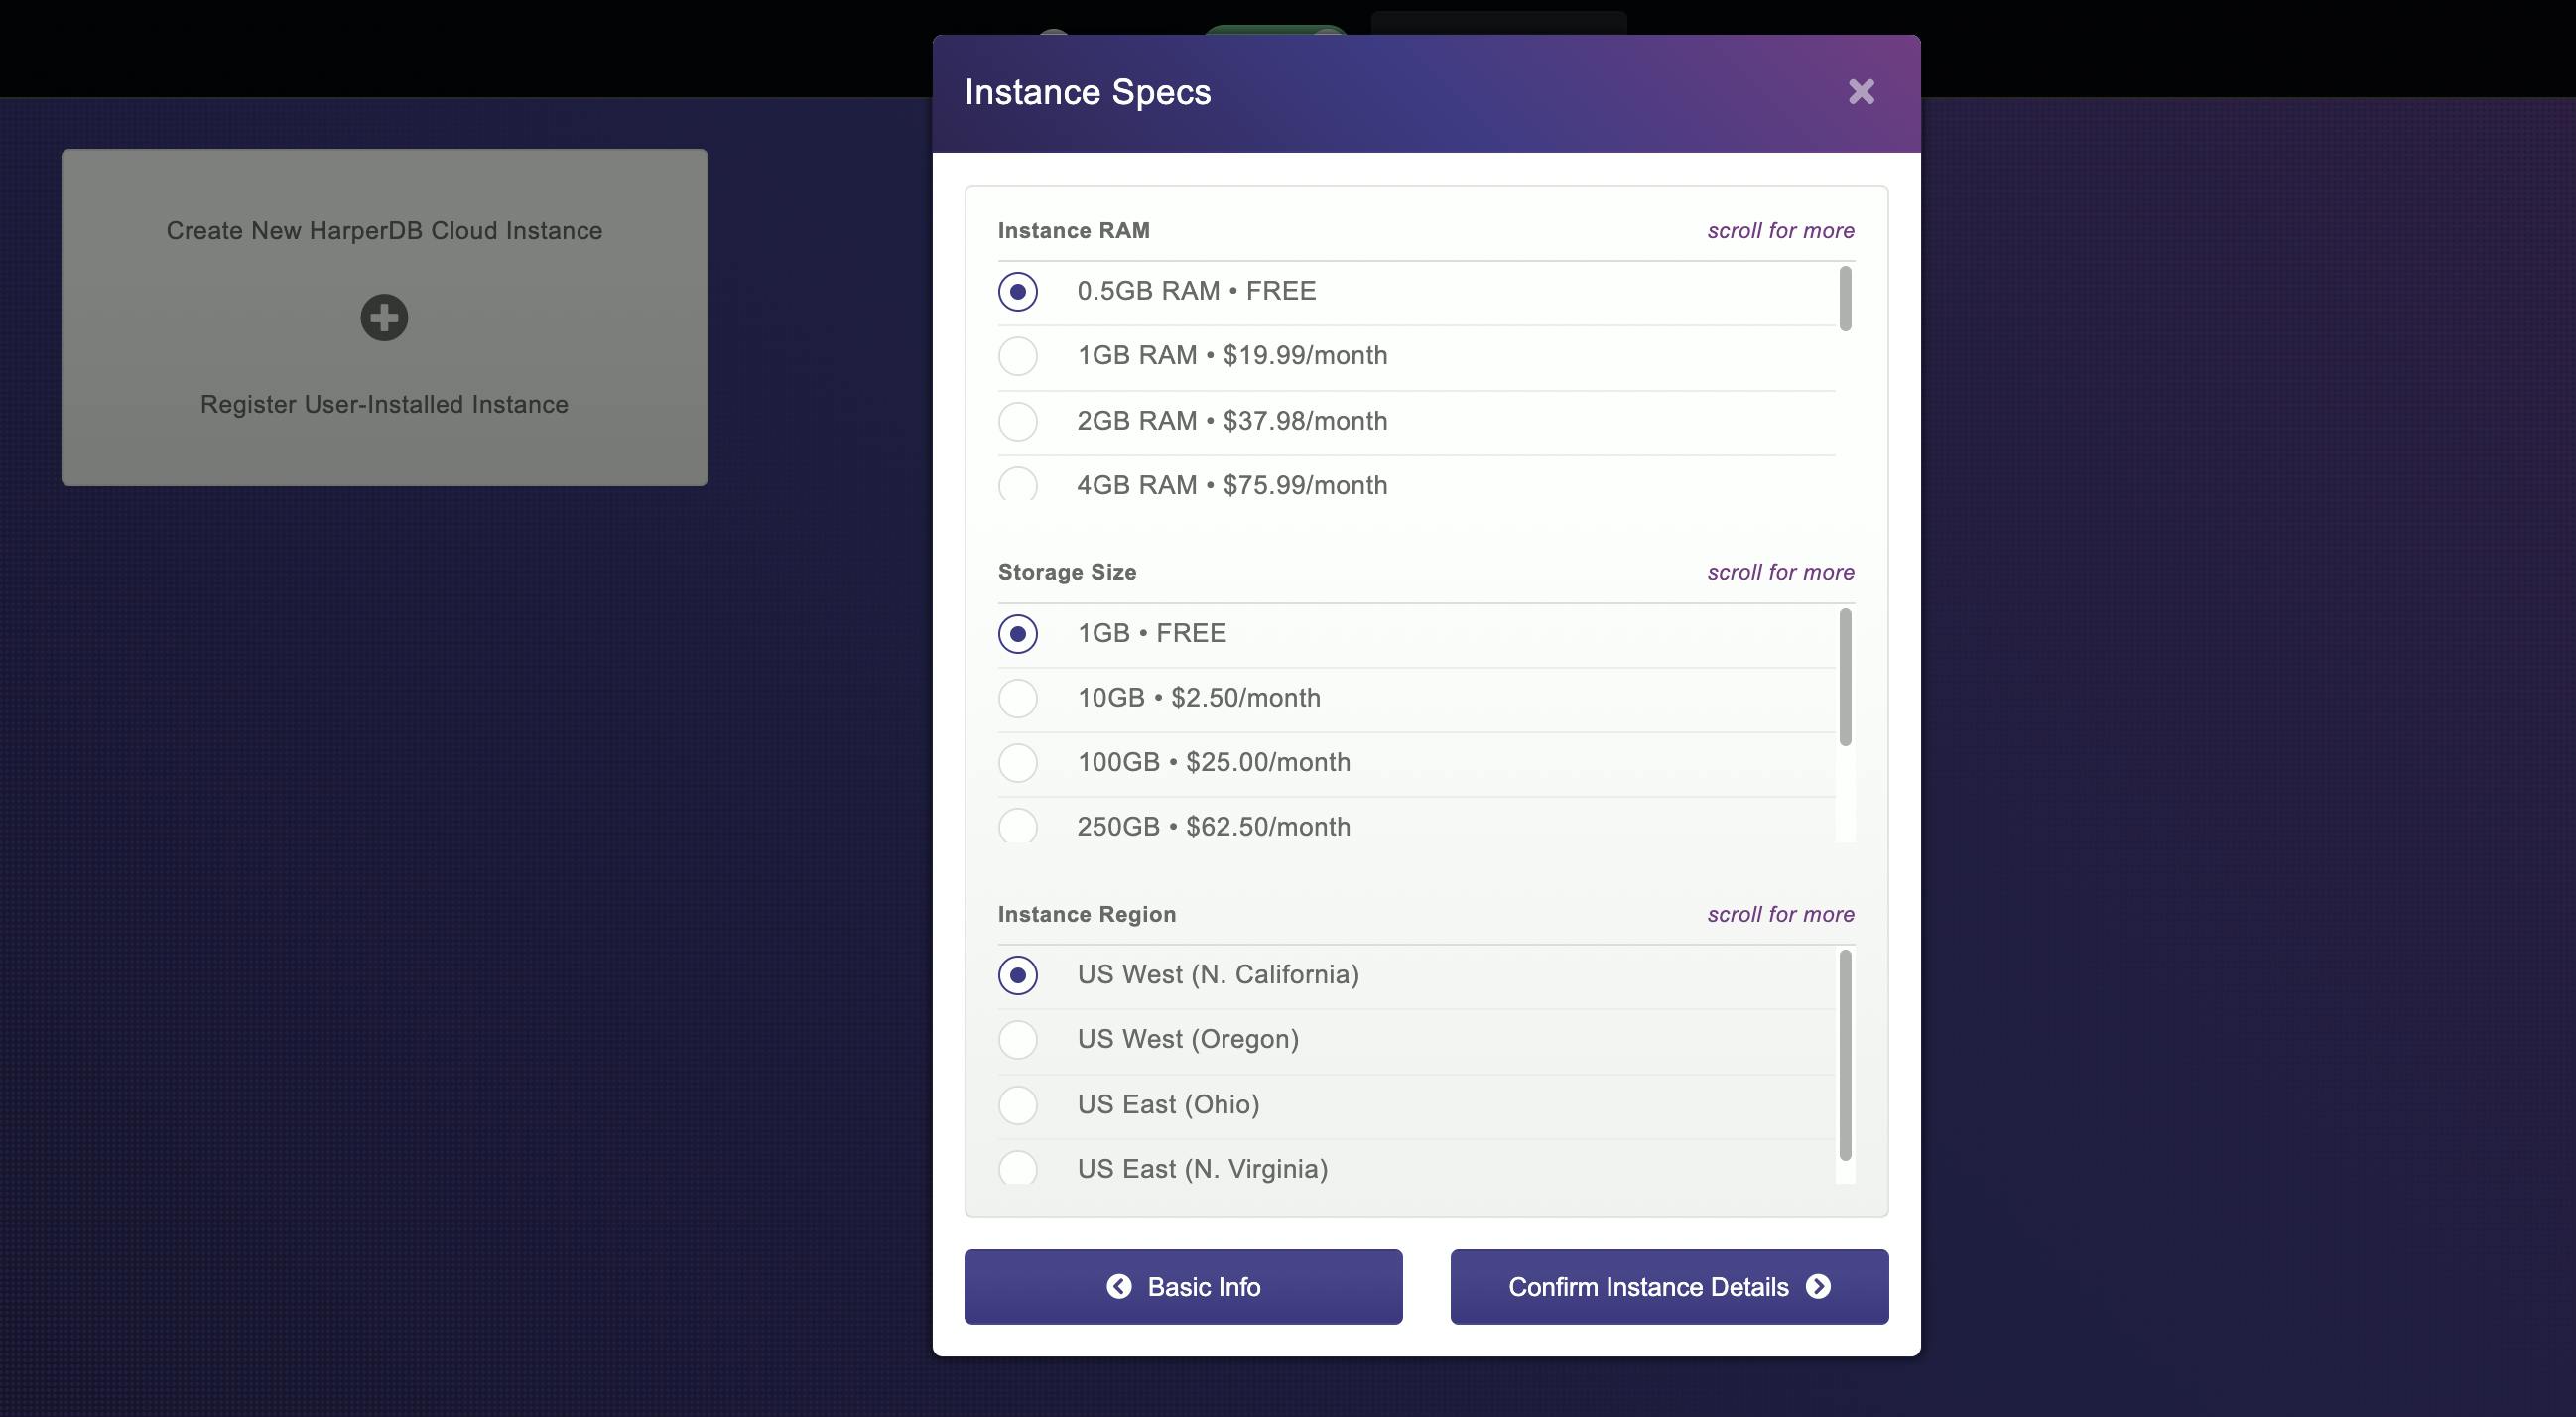
Keep the default settings in the Instance Specs modal and click on Confirm Instance Details
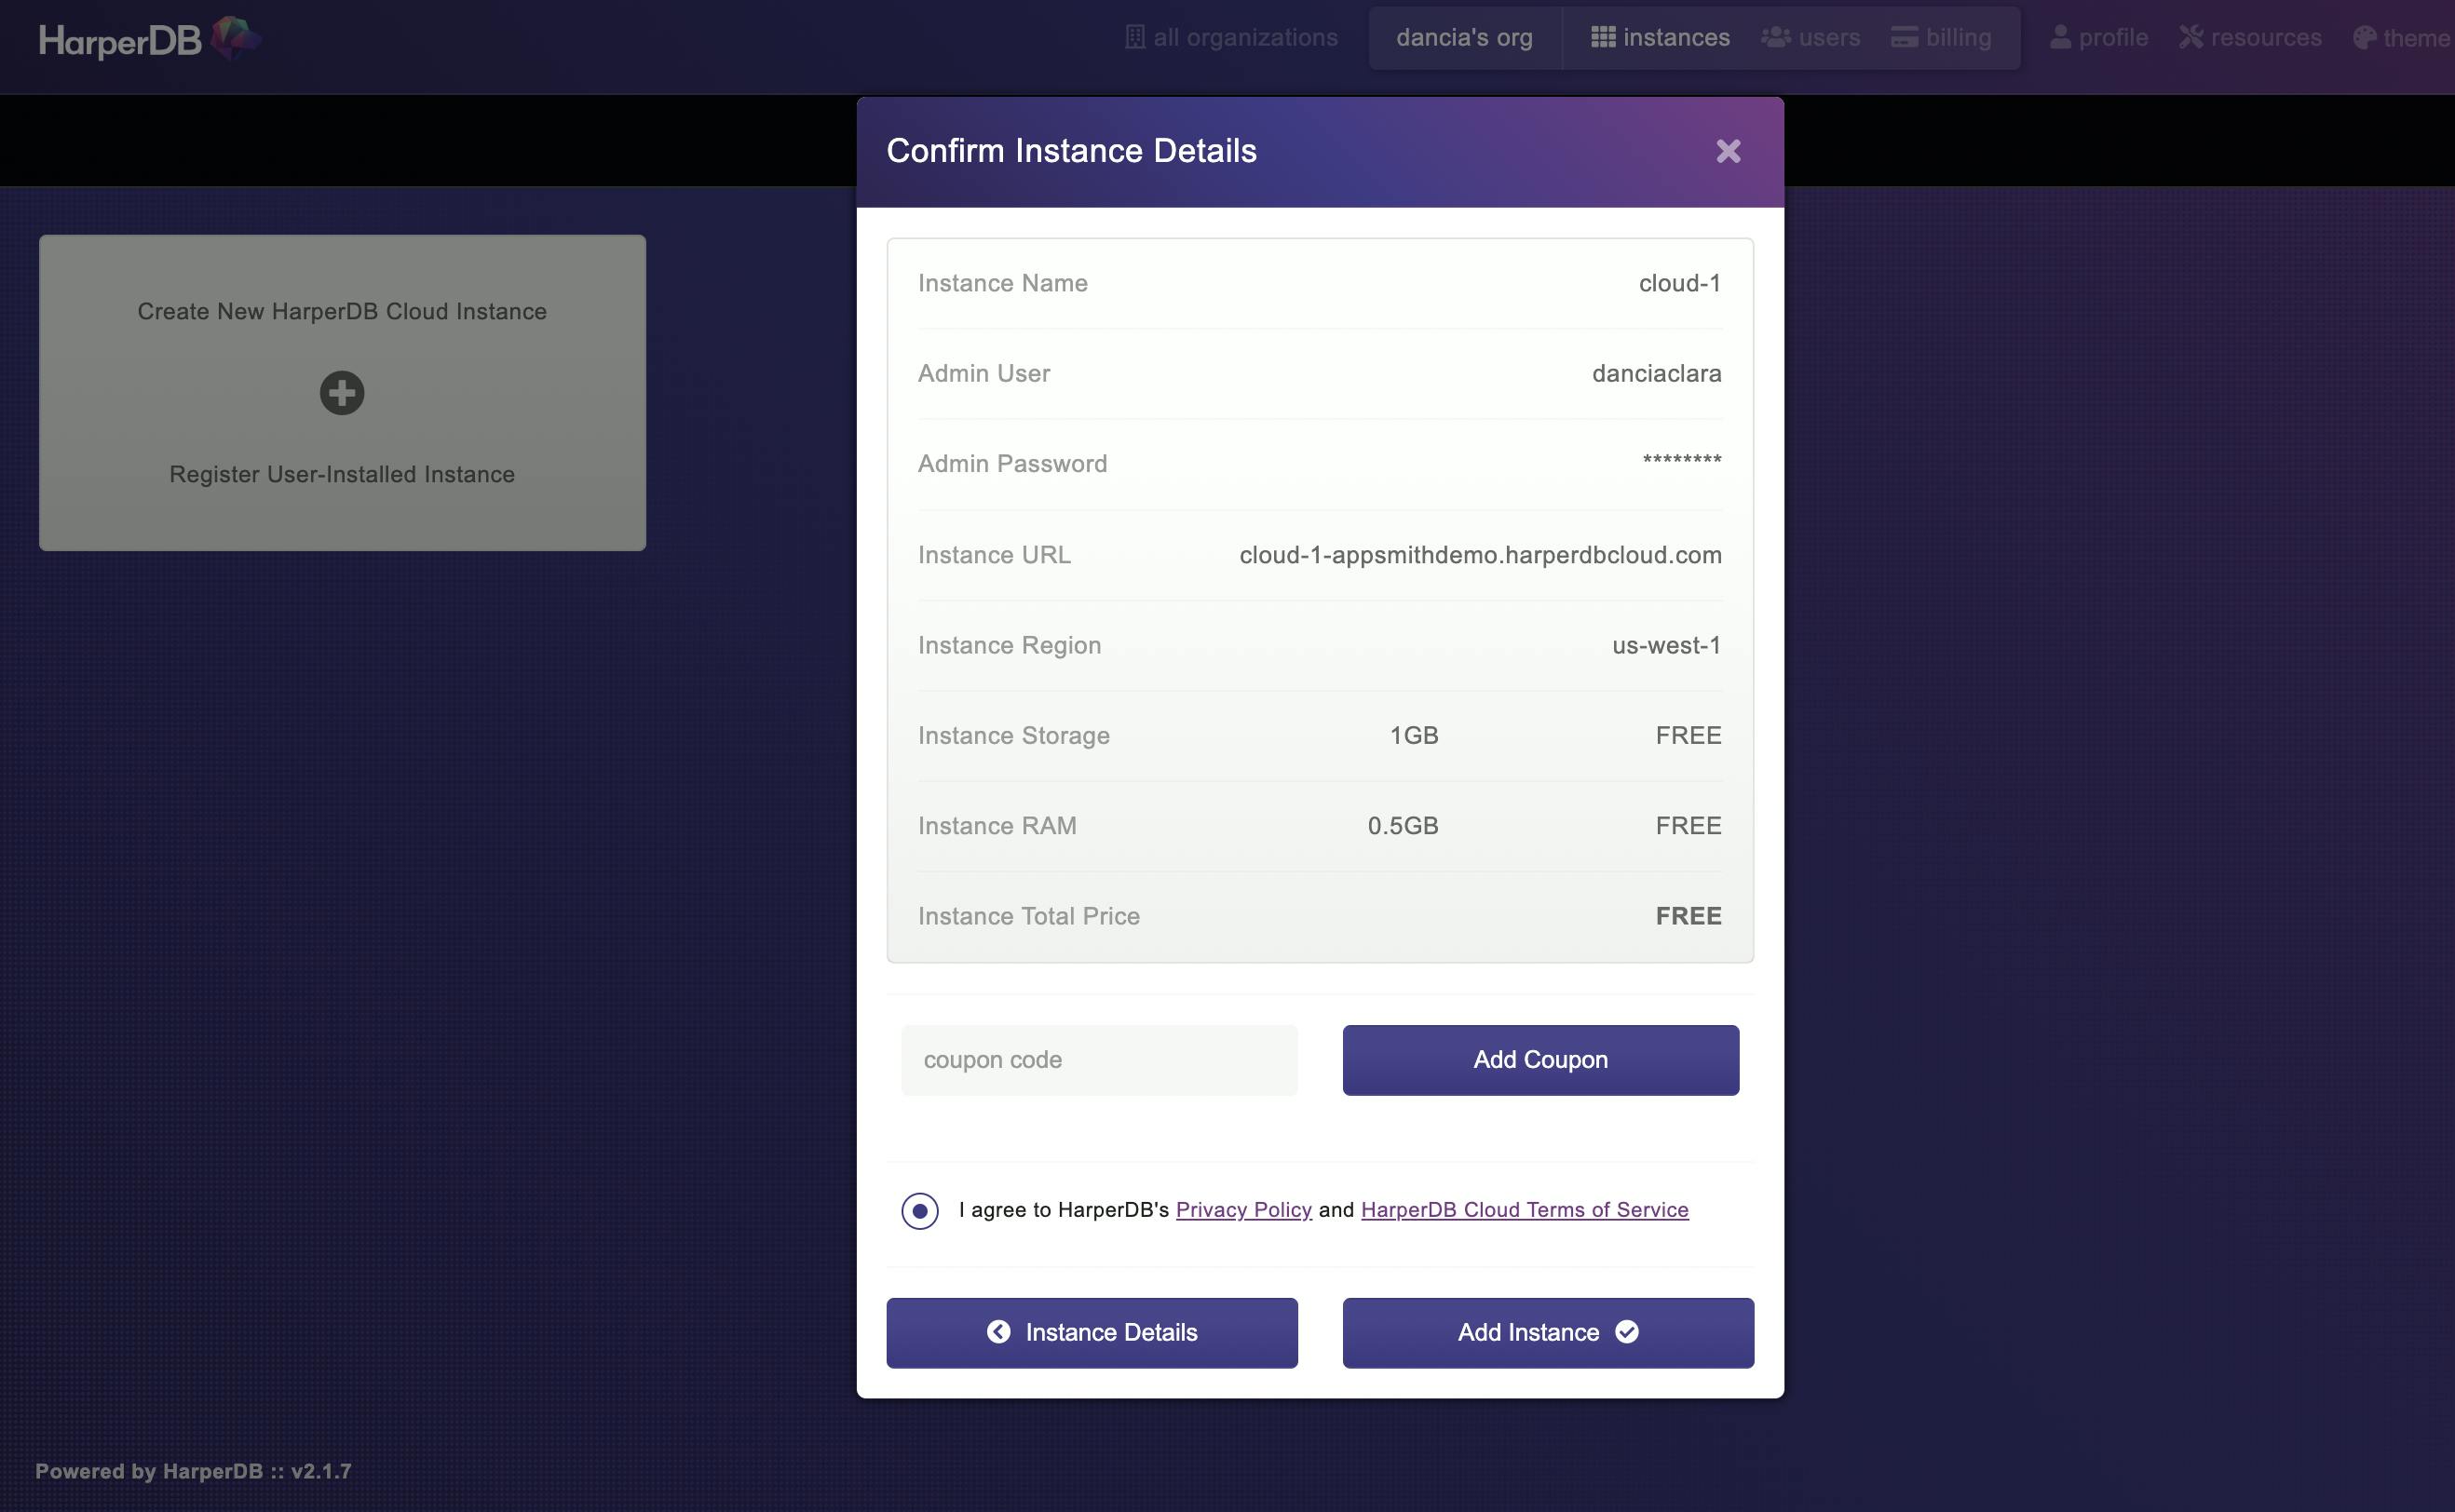
Click on the Add Instance button
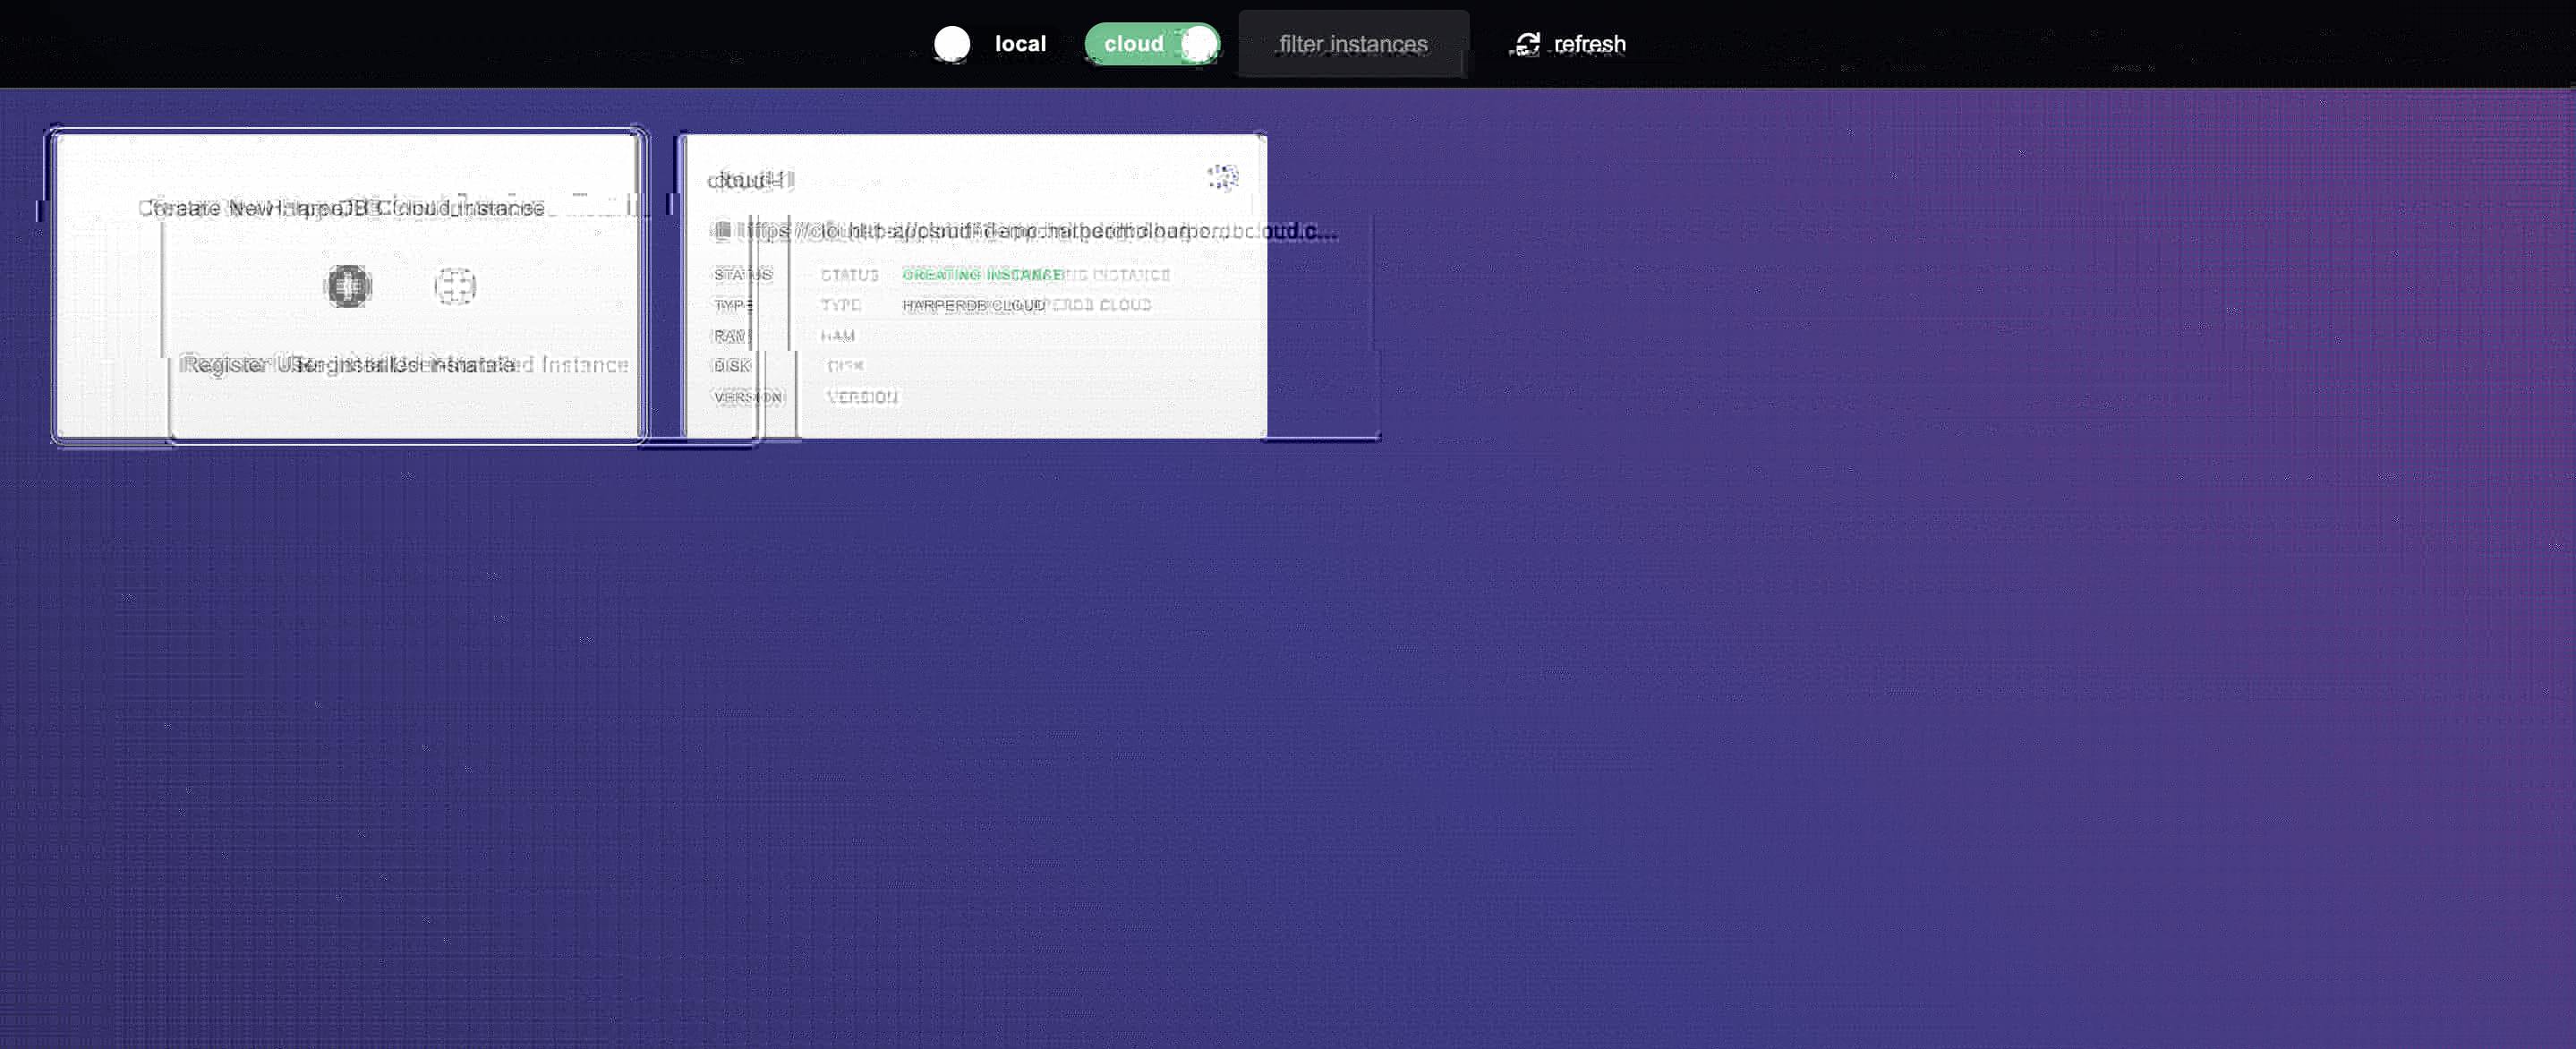
This will begin creating your database cloud instance on HarperDB. Your instance will be up and running in no time.
Step 2: Create the Database (Schema)
- Create a schema called Movies
- Next, create tables for Customer, Film and Rentals with id as the hash attr. The hash attr in HarperDB is equivalent to a primary key.

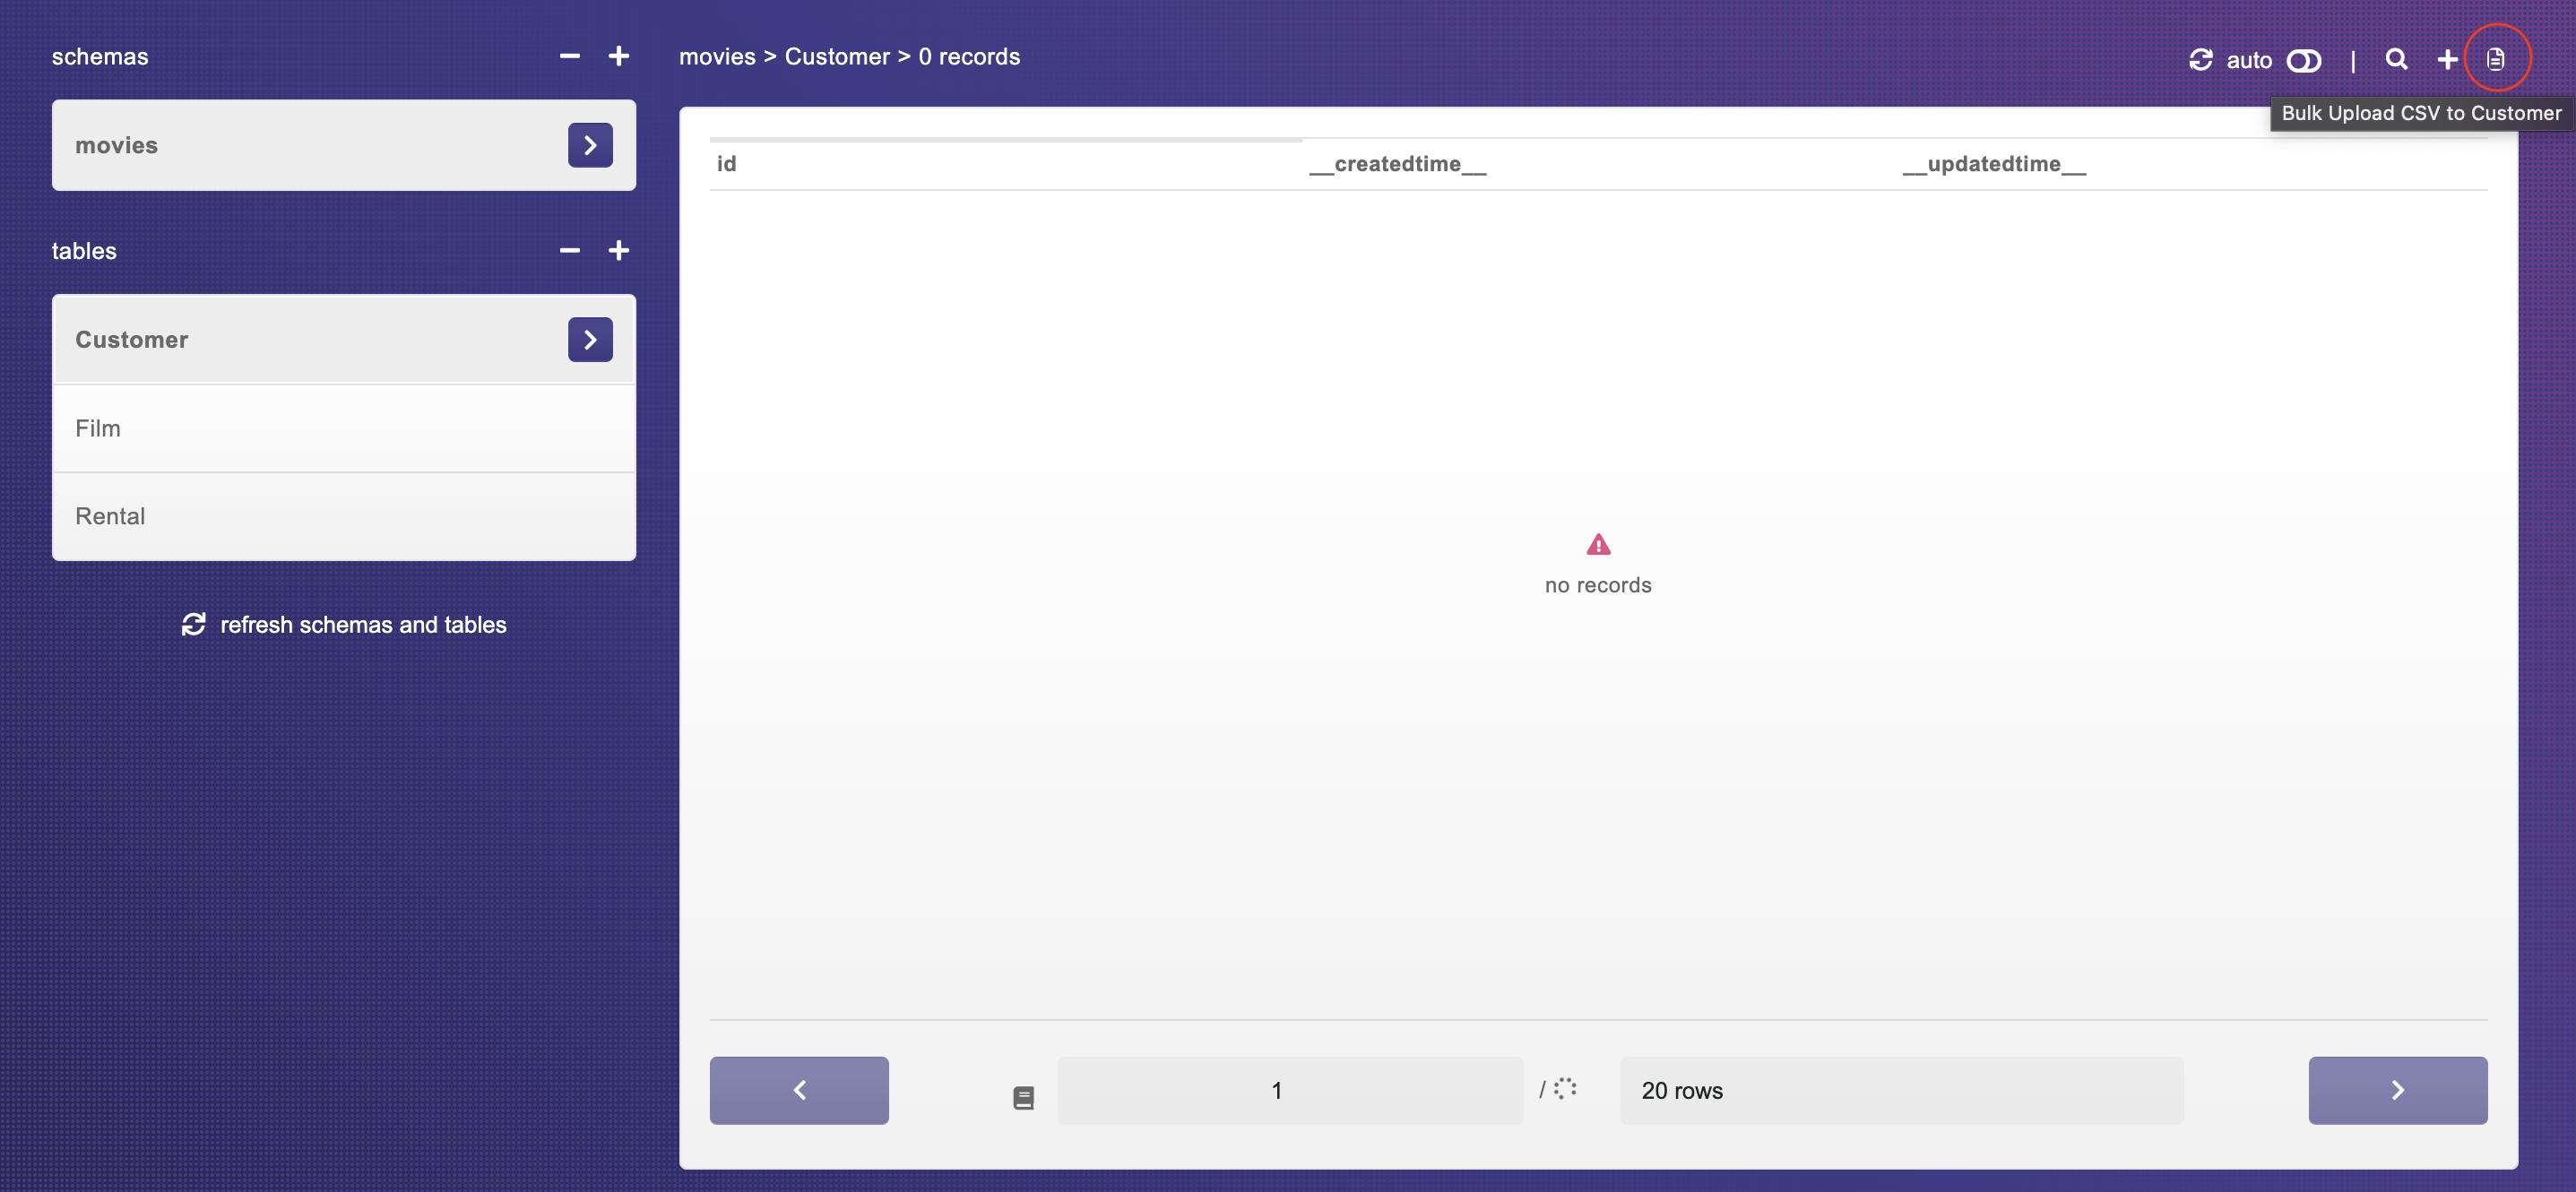
Use the Upload CSV feature of HarperDB to populate data into the three tables. You can find sample data here.
Step 3: Create Roles and Users on HarperDB
Click on the roles tab and create two users named admin_user and rental_user under Standard Roles. admin_user will have all privileges on the three tables so update all the permissions to true
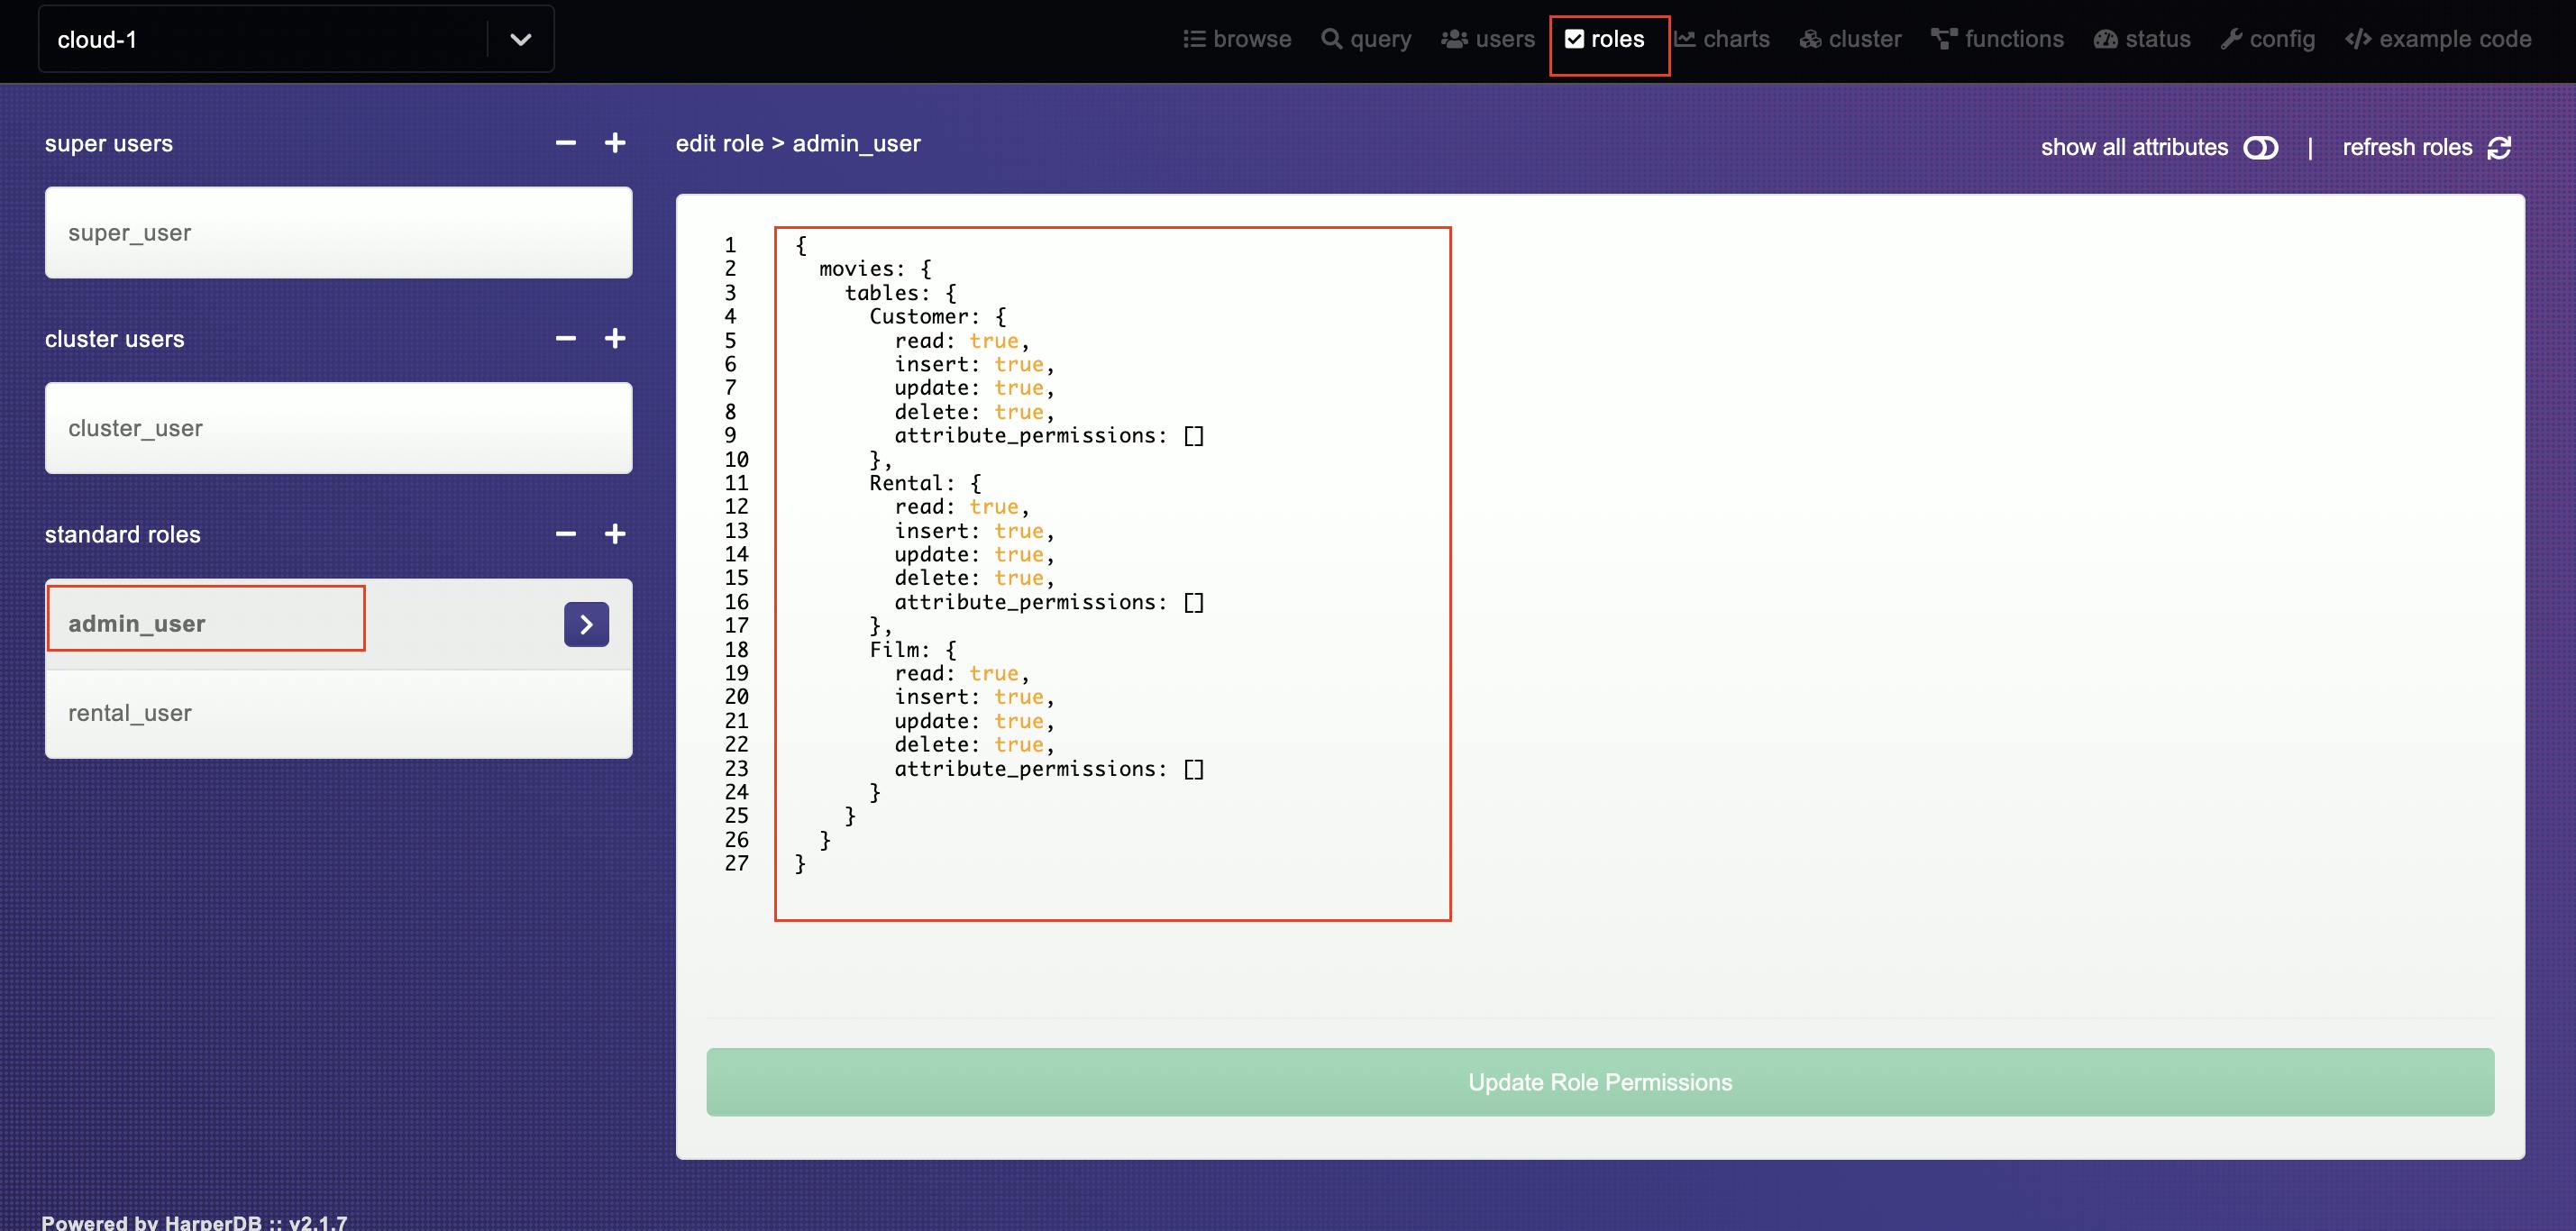
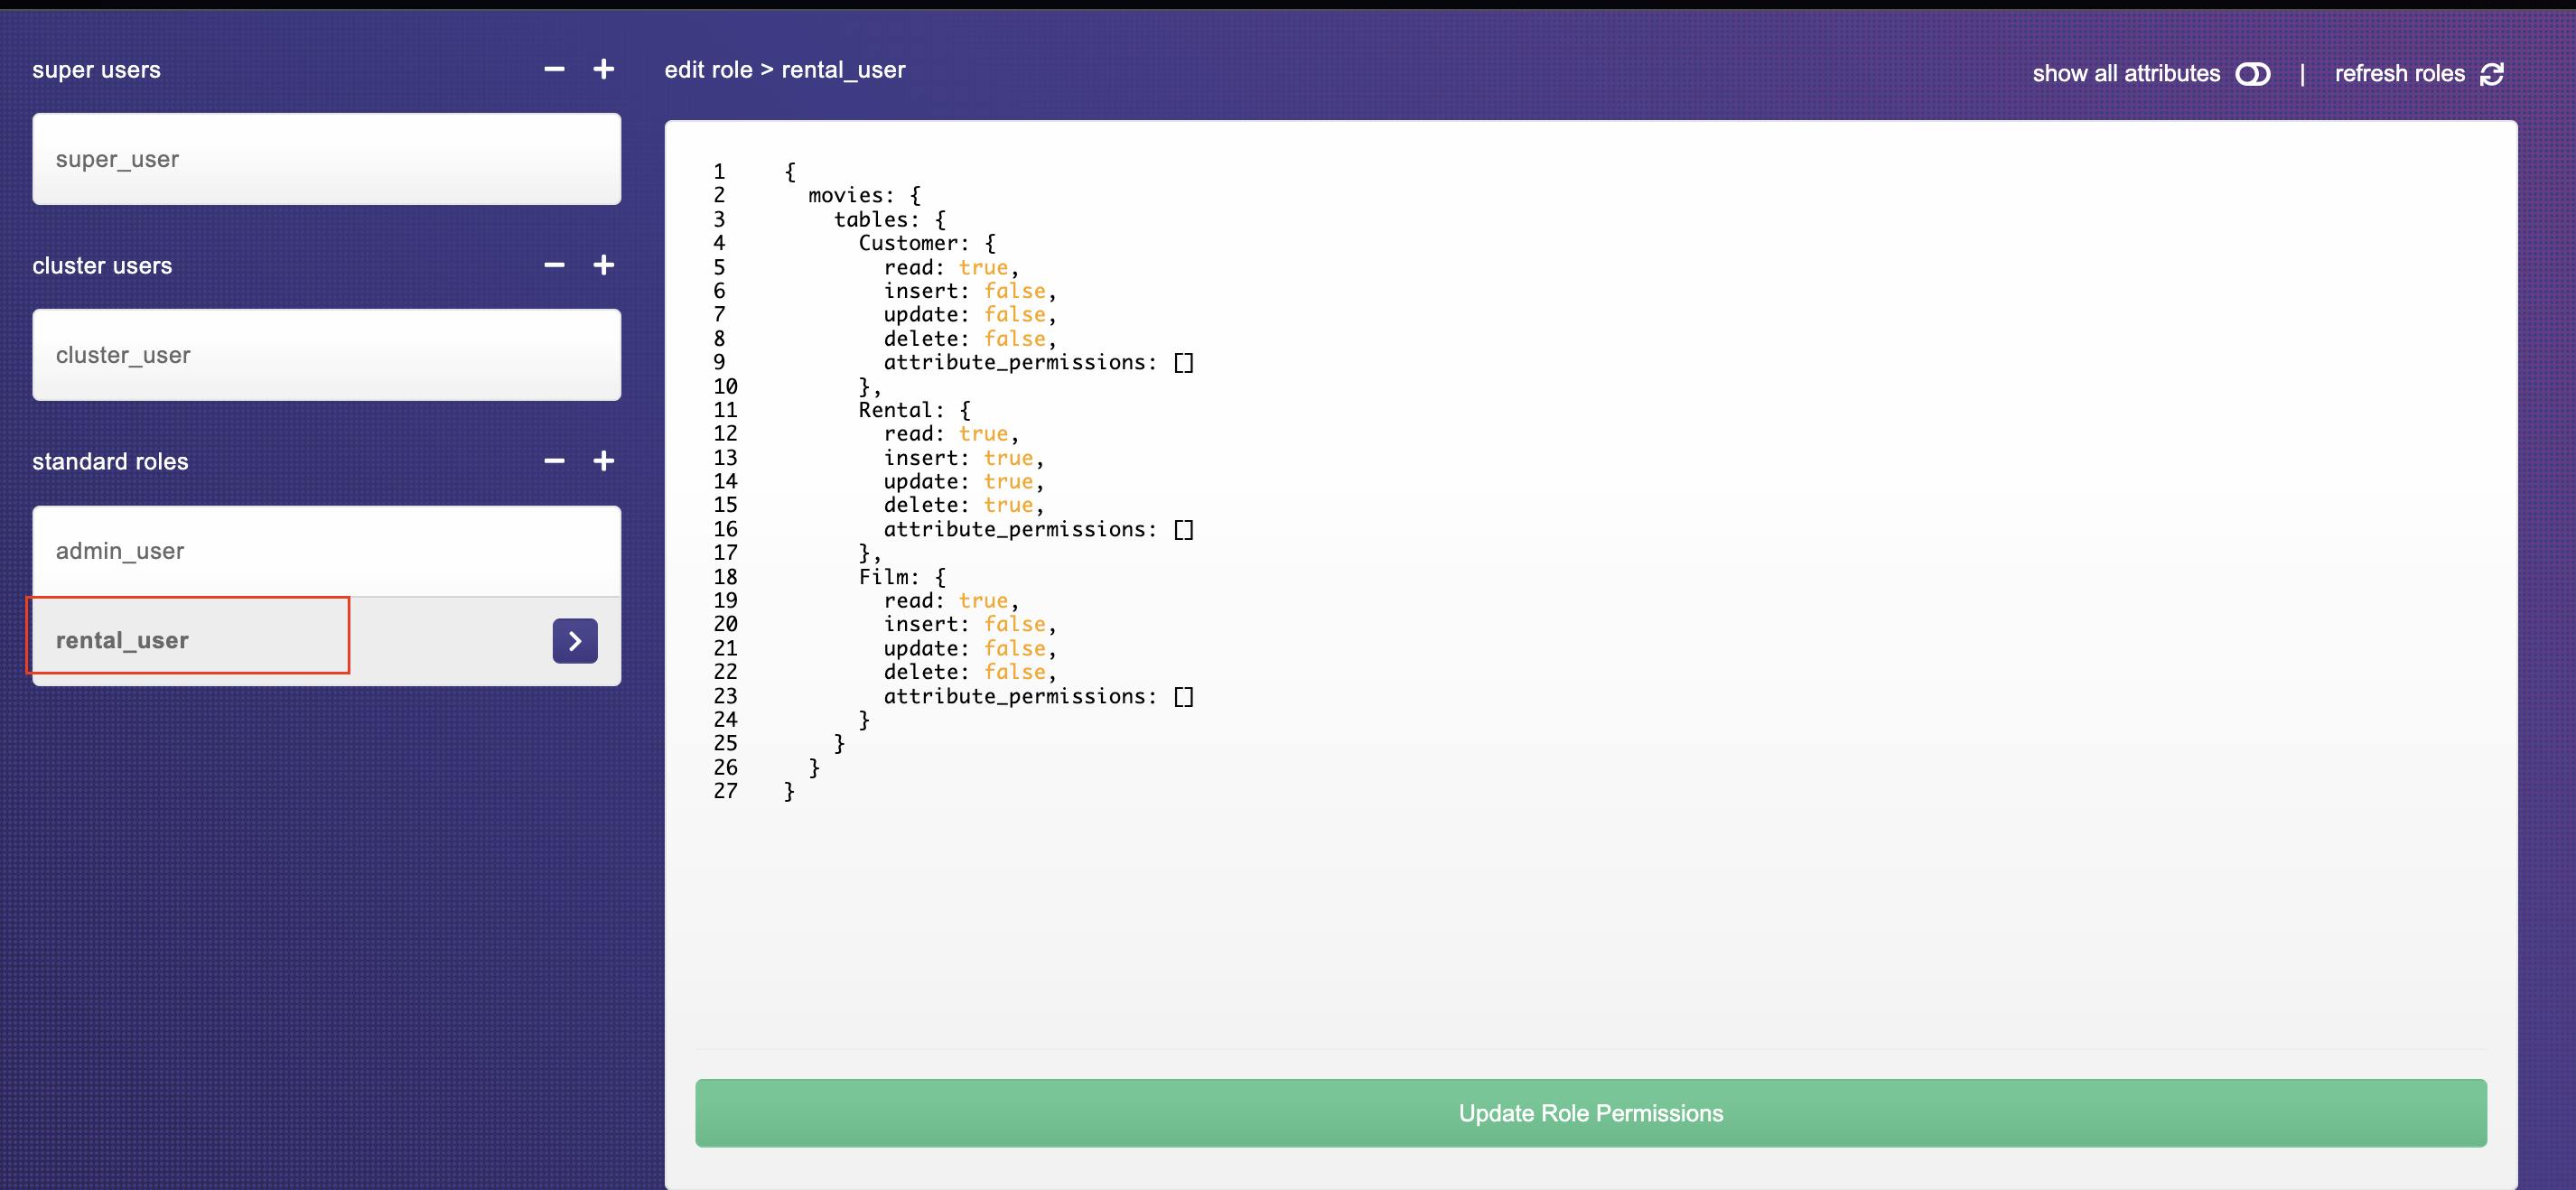
rental_user will have all permissions on the Rental table and only the read permission on the Customer and Film tables
Under the users tab, create a user named assistant with the role of rental_user.
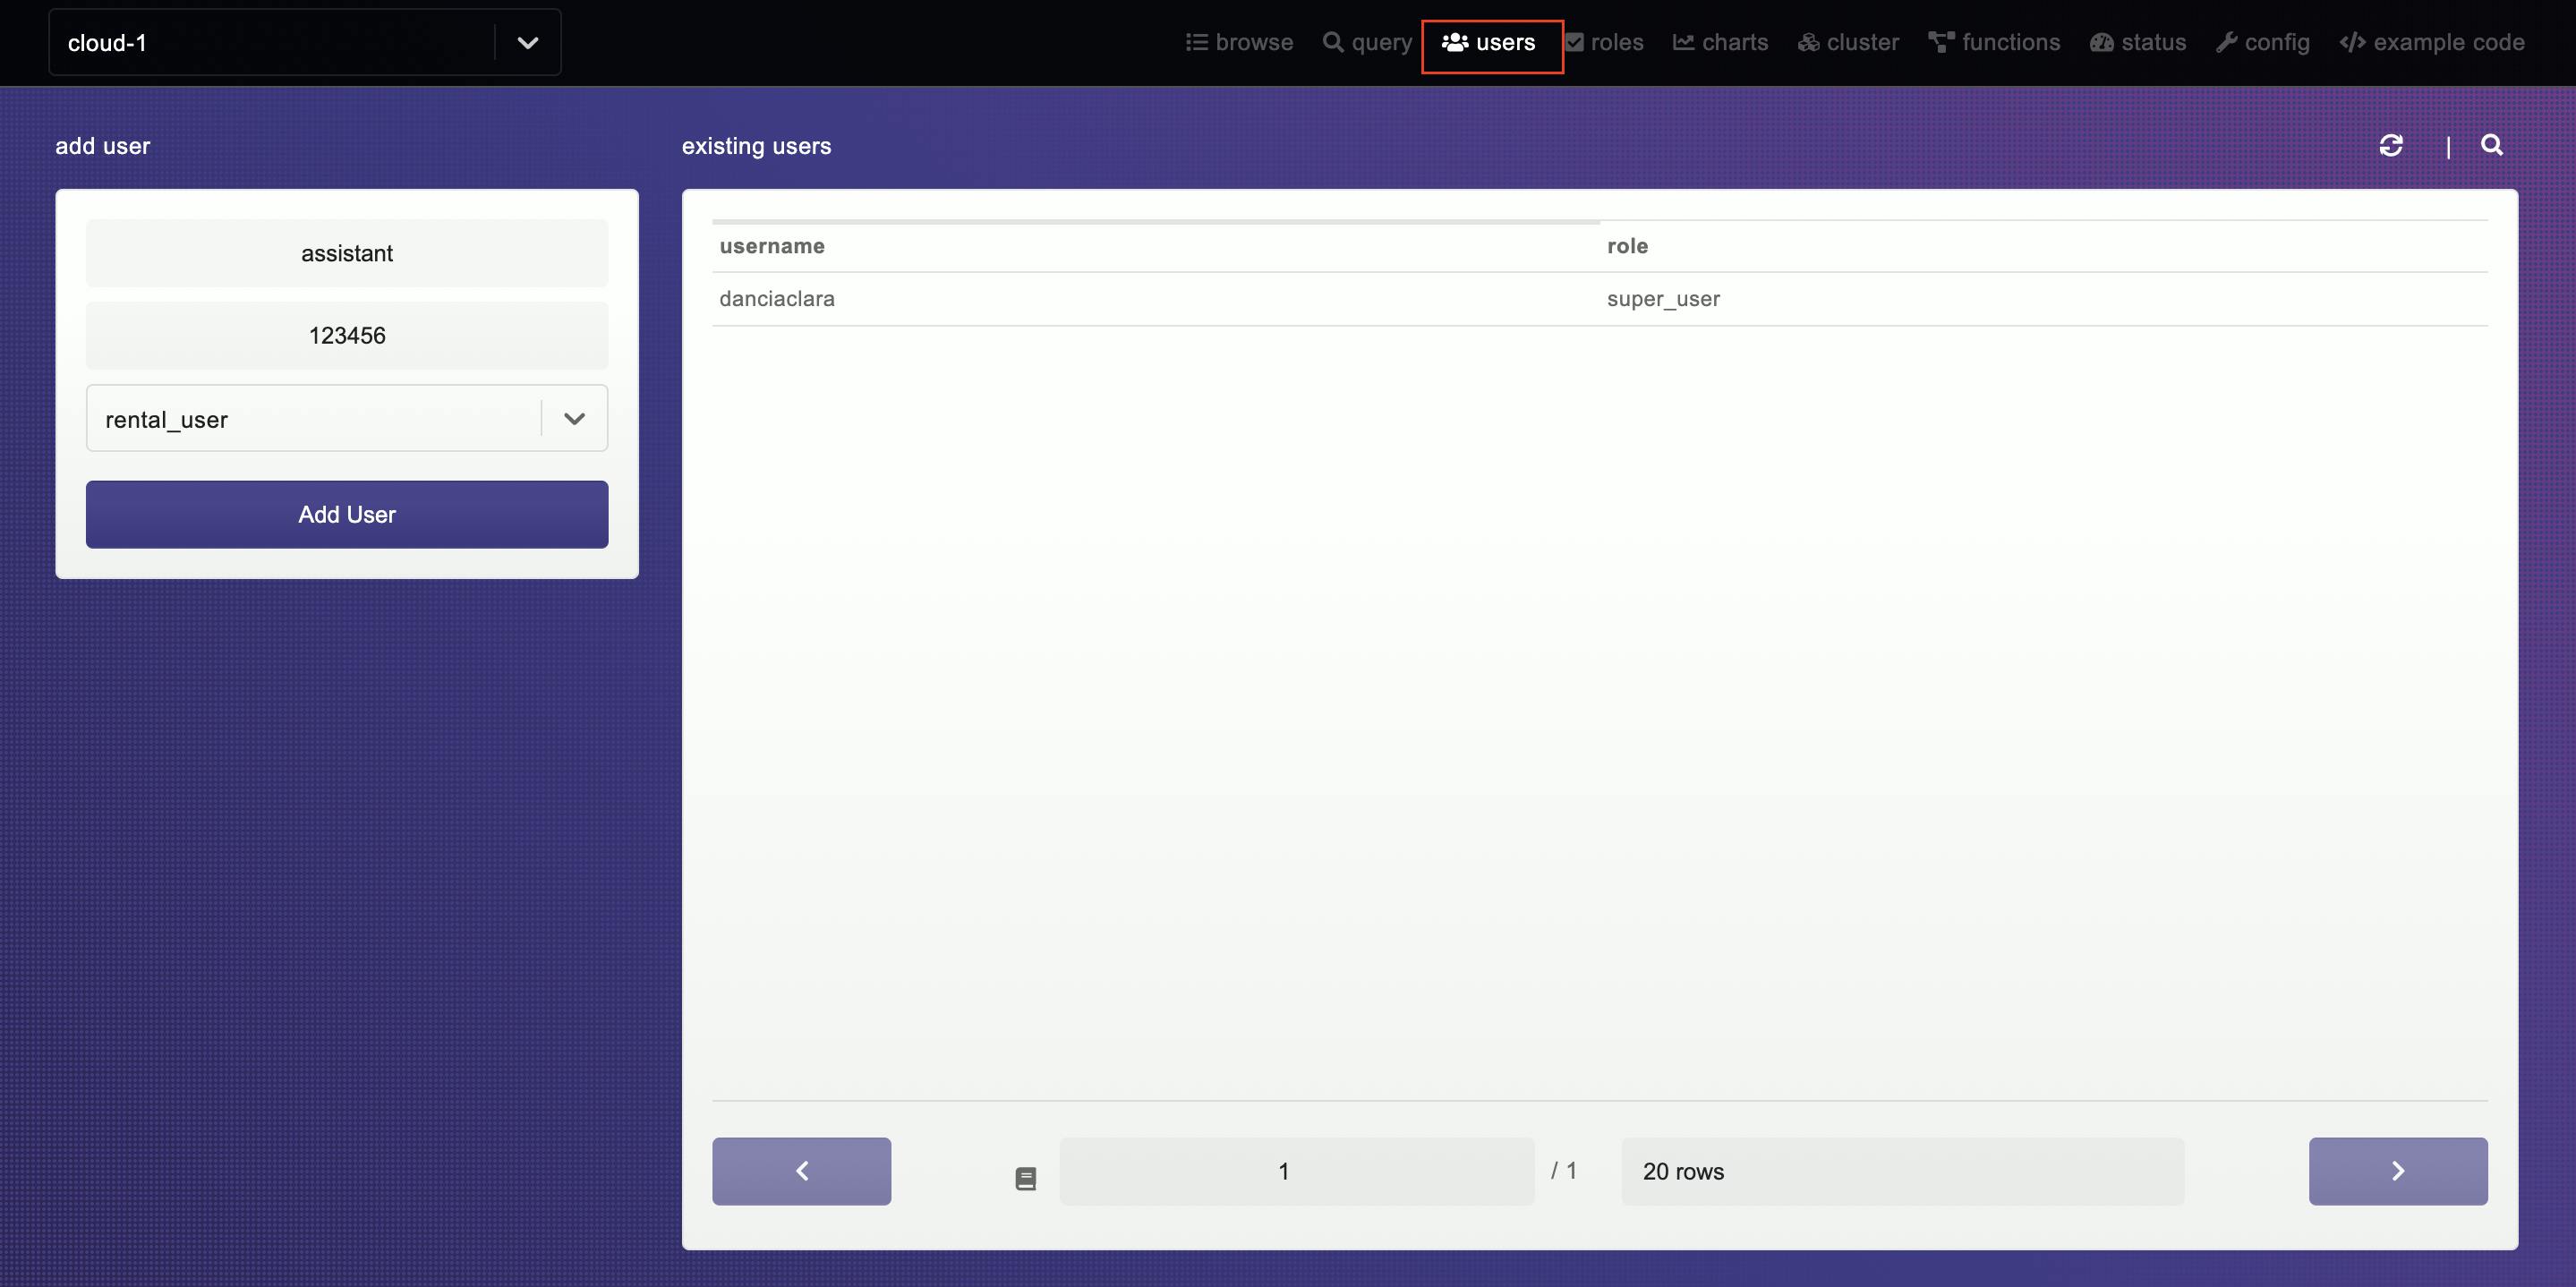
Similarly, create a user named manager with the role of admin_user
And just like that, the backend setup is complete.
Step 4: Build UI on Appsmith
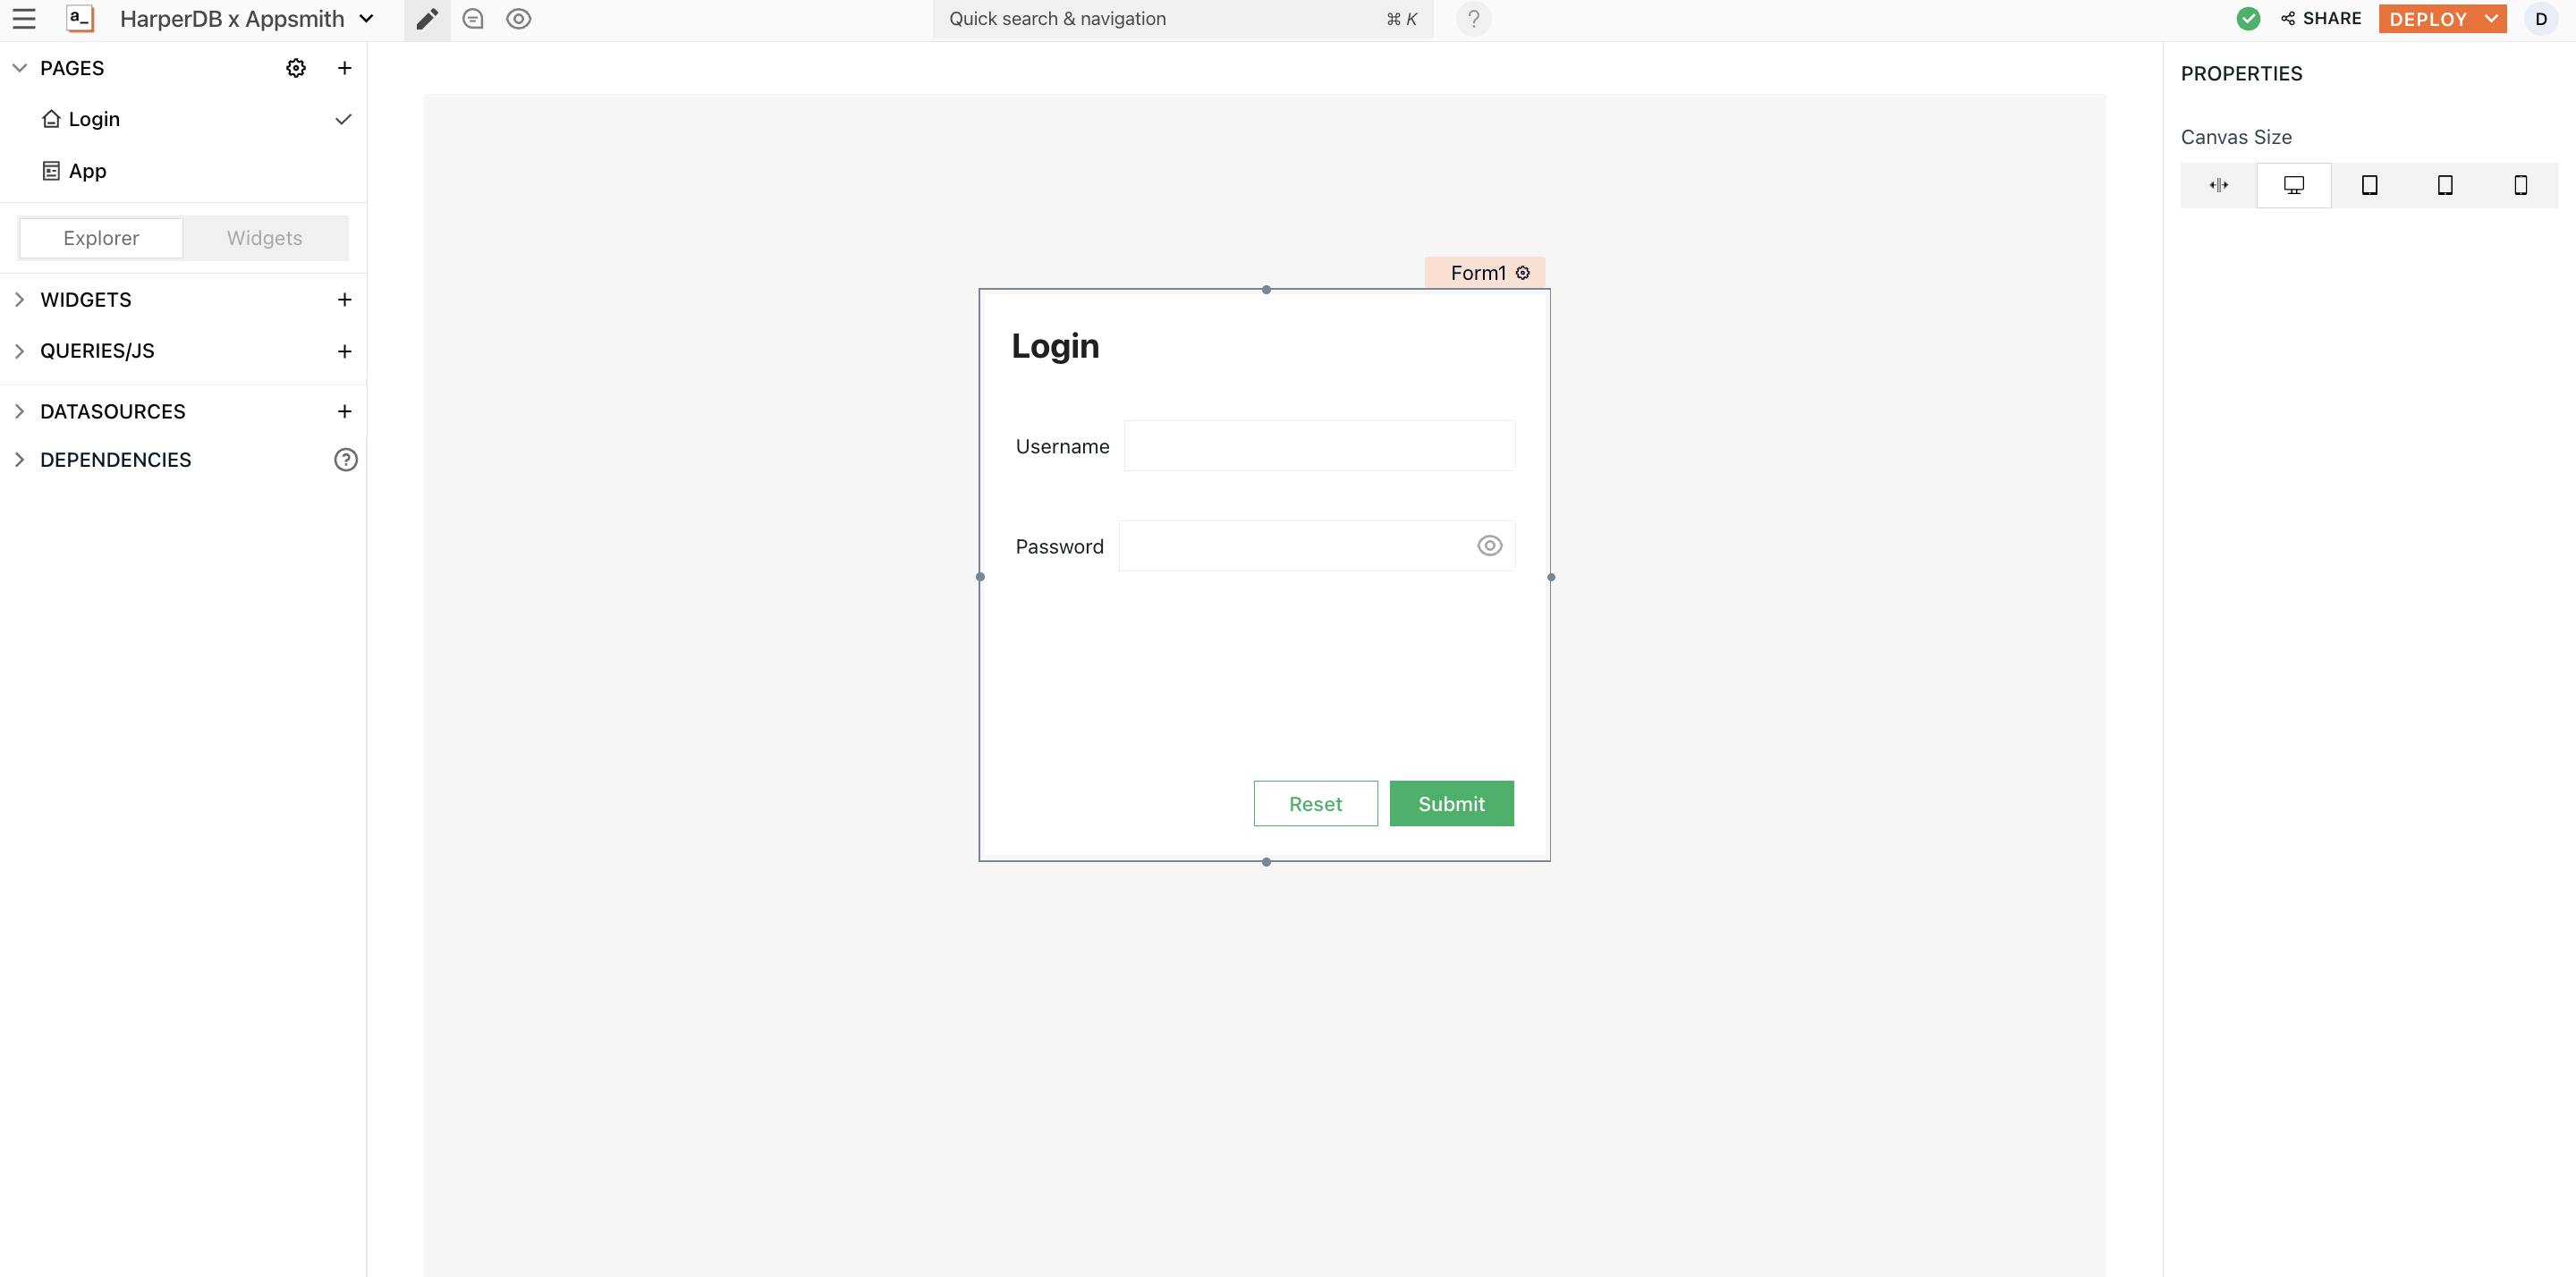
- On Appsmith, on the Entity Explorer pane, go to PAGES→ Page1 . Rename the page to Login. Drag and drop a Form widget onto the canvas. Add input widgets for Username and Password as shown below. For the Password input widget, choose Password as the Data Type so that the characters entered are masked.
- Create a second page called Rental Inventory which will be the page that the user will be redirected to after login.
- Drag and drop a Tab widget onto the canvas and add three tabs called Rental, Film, and Customer
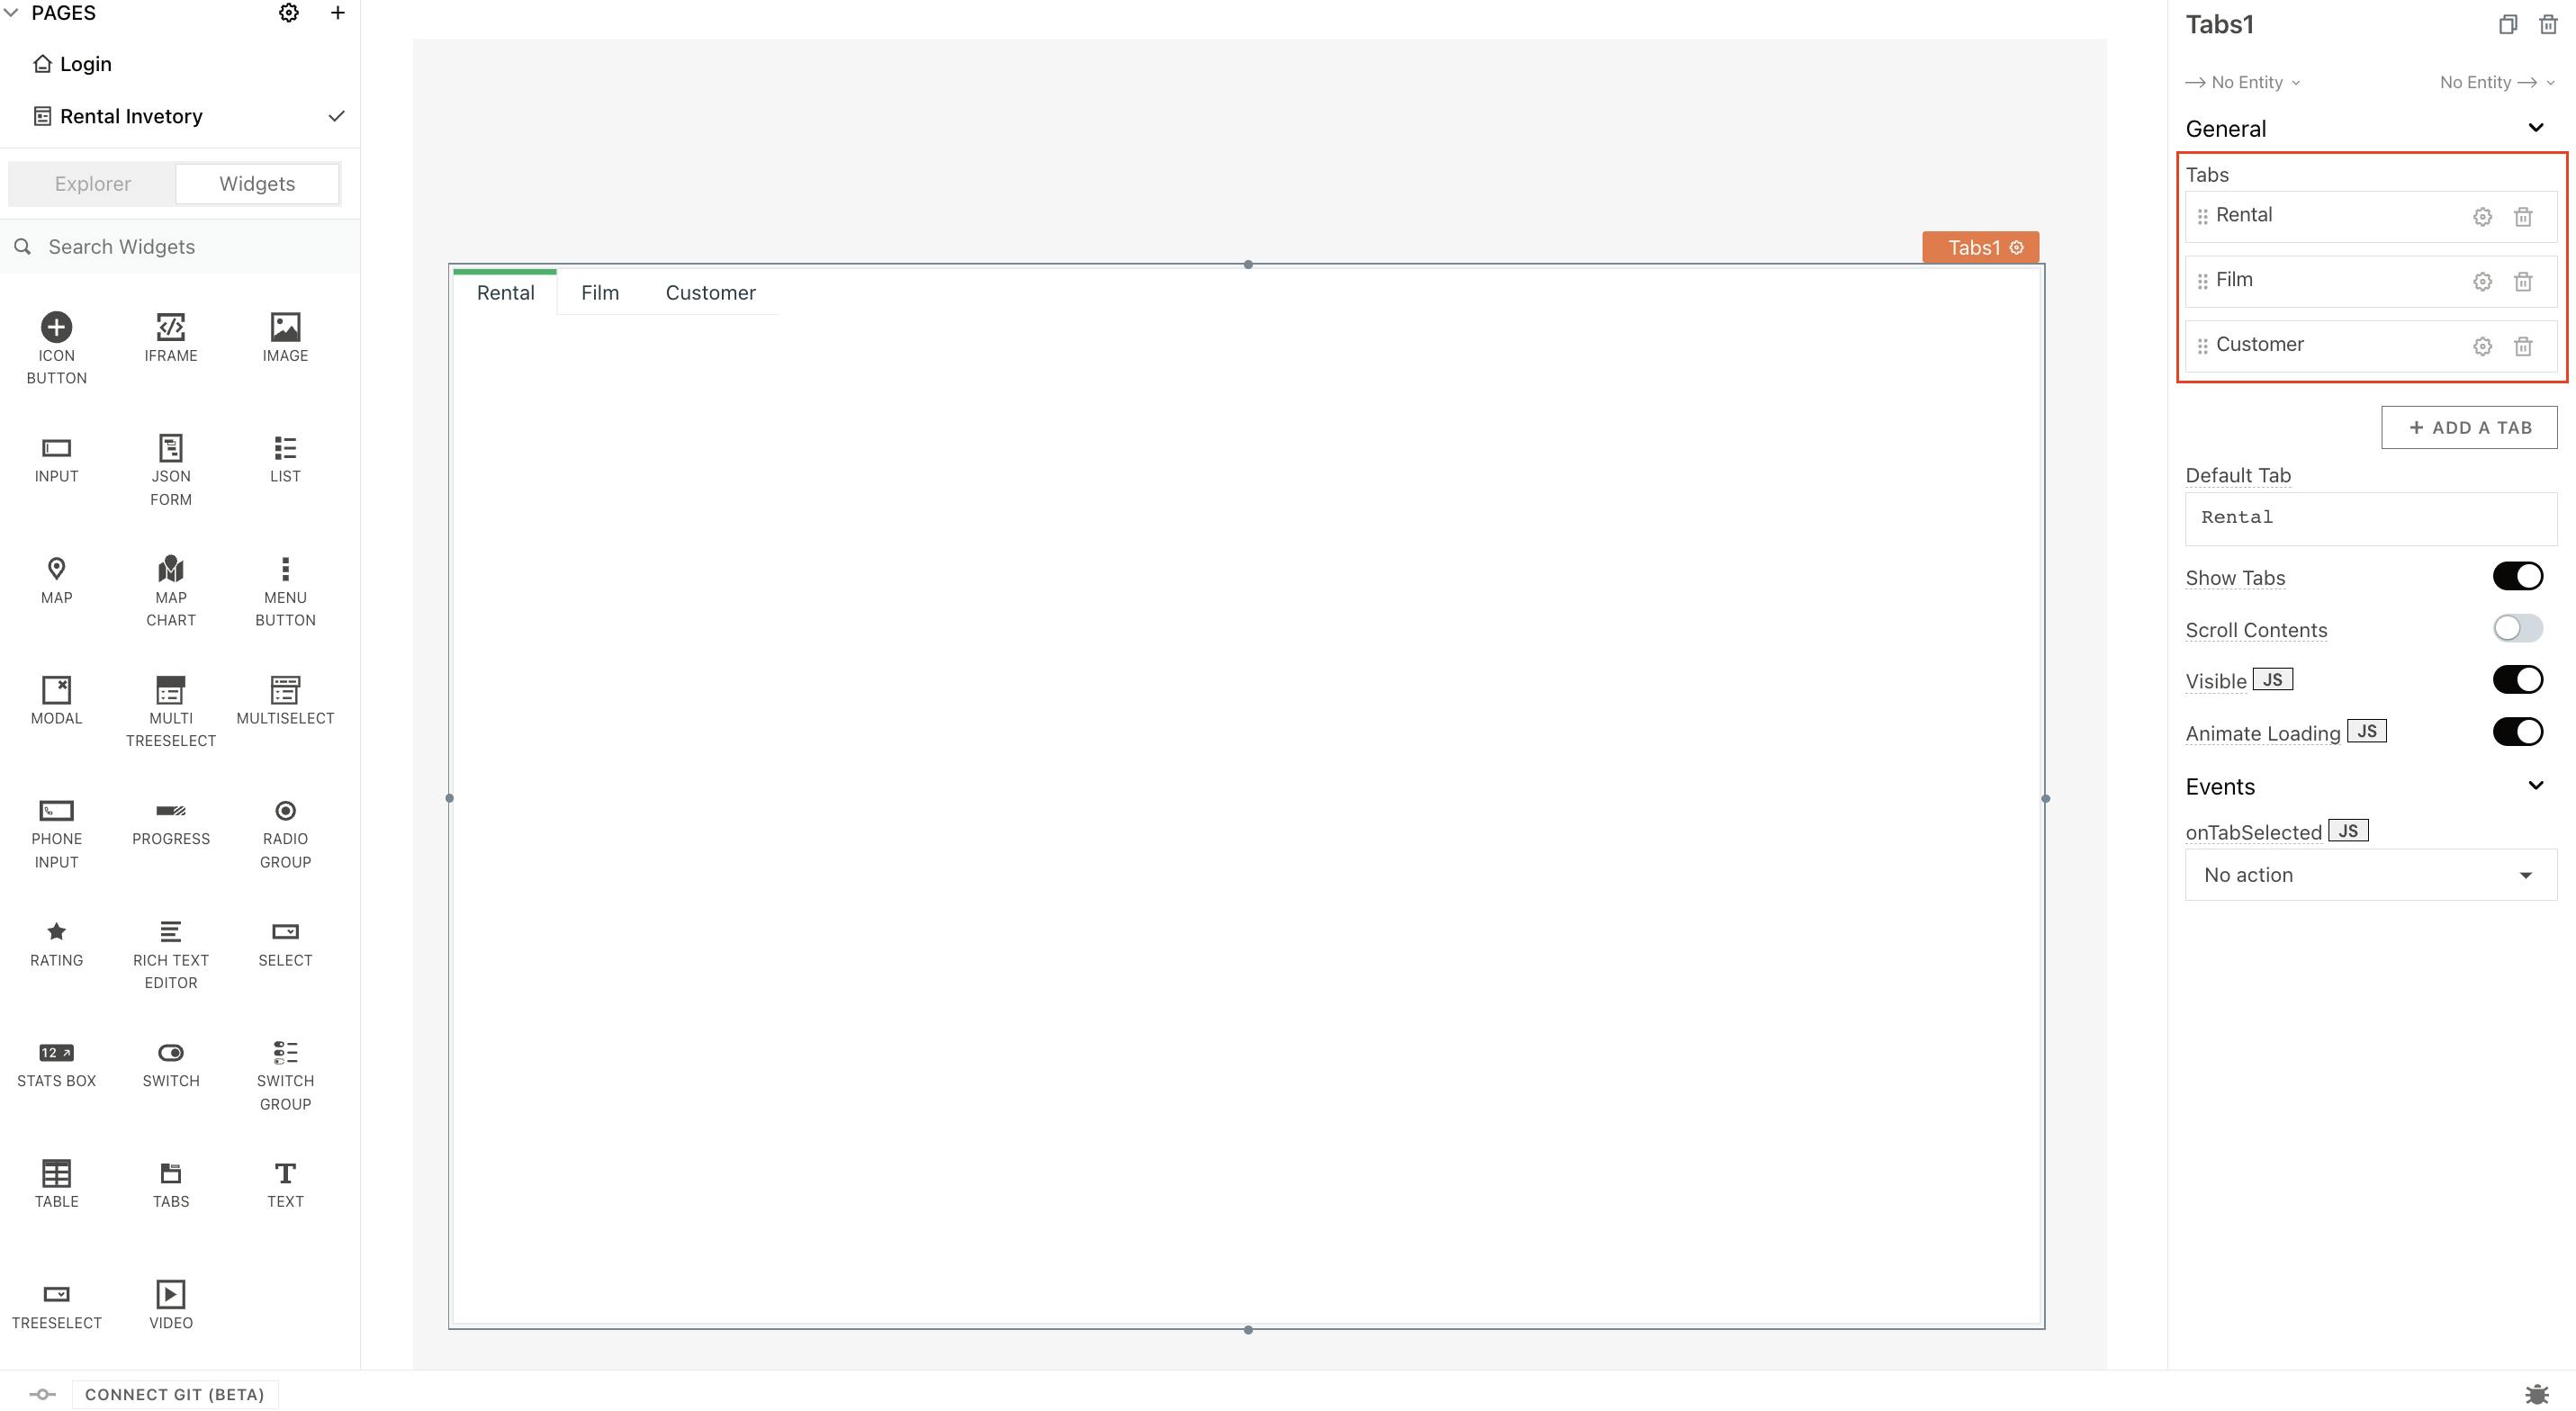
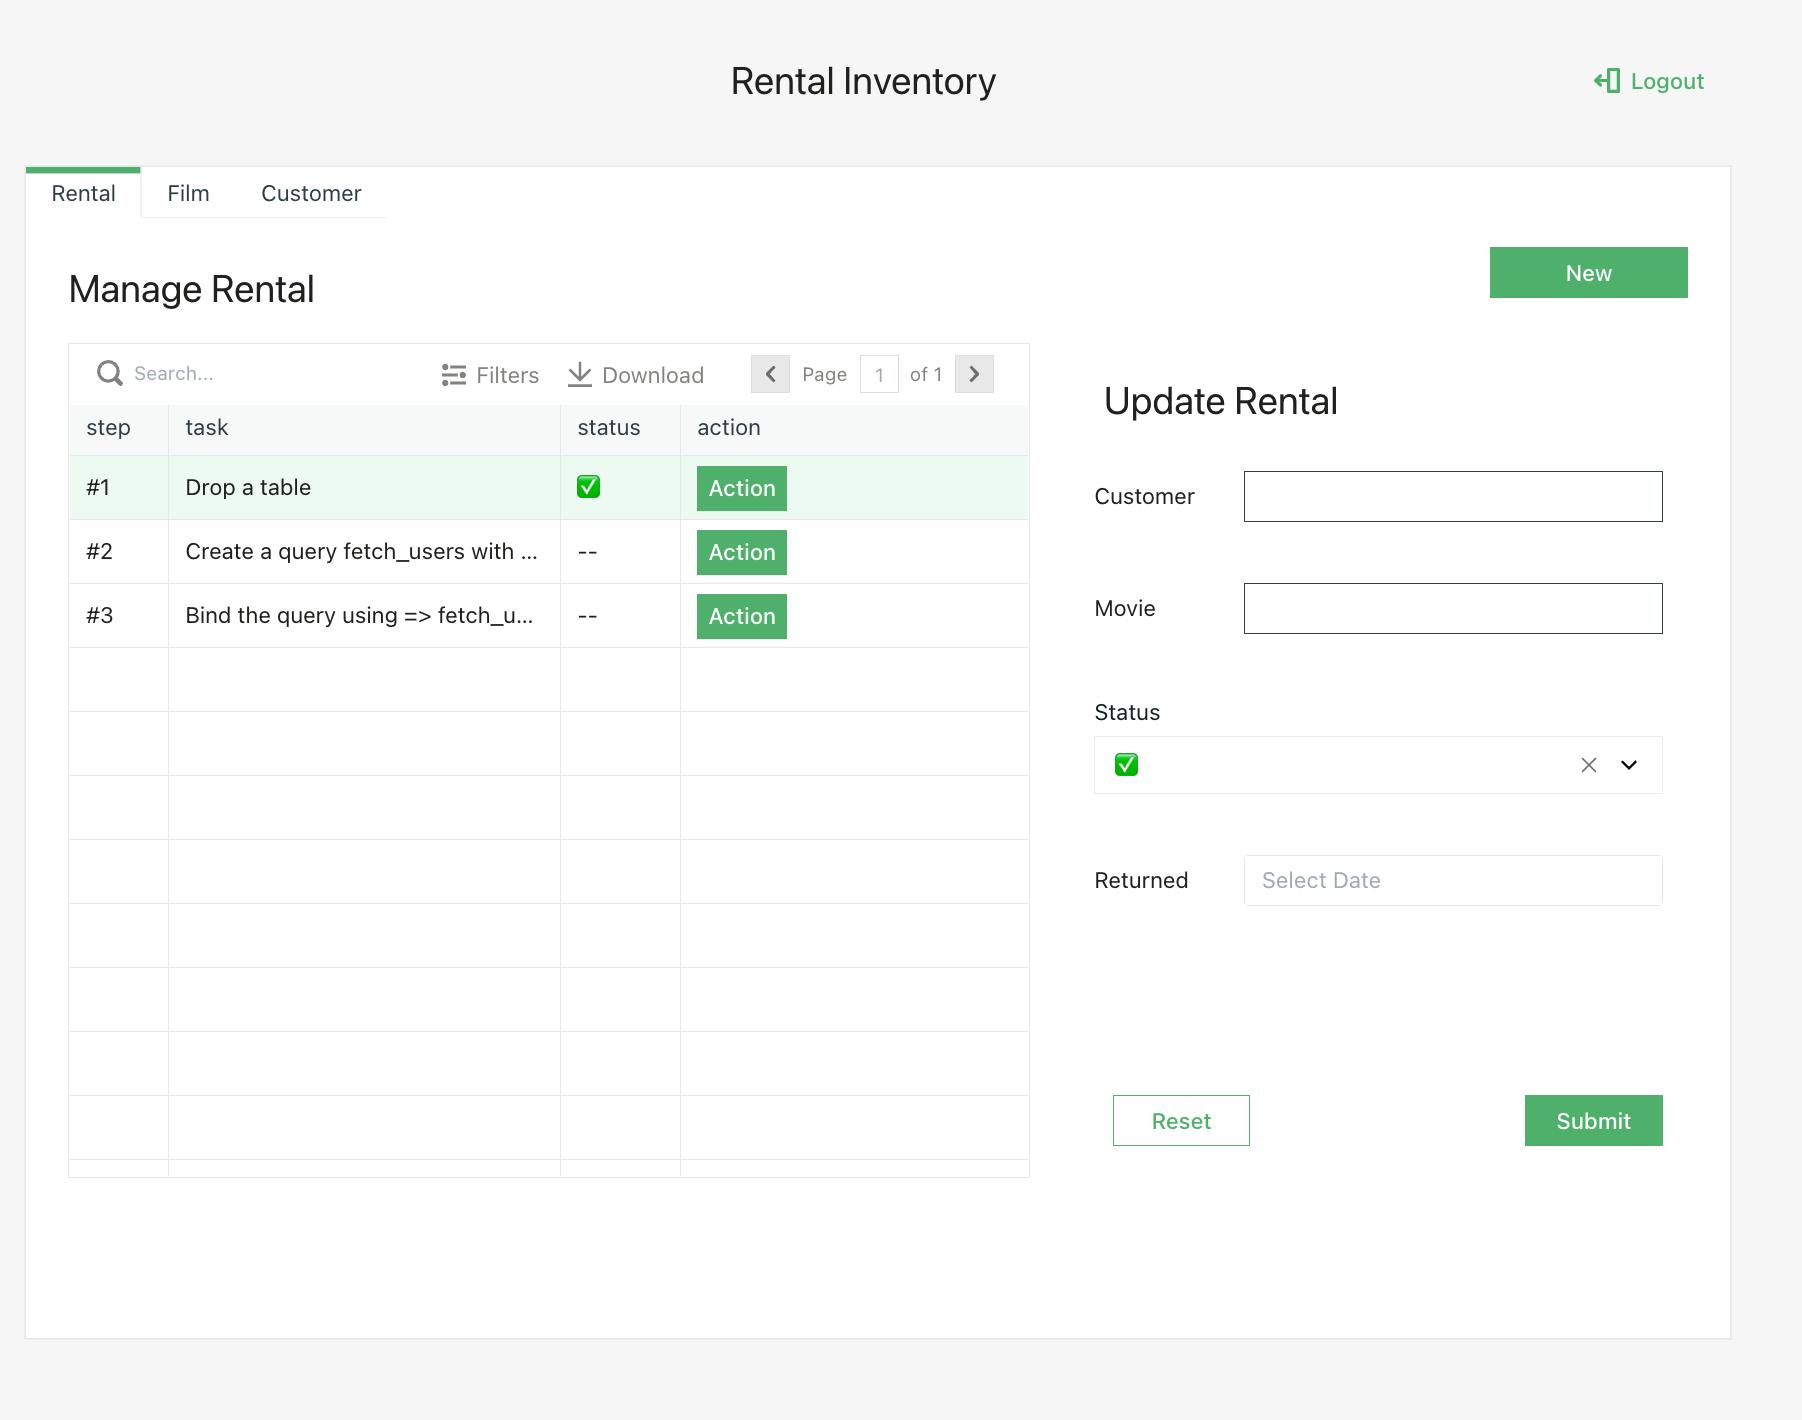
- On the Rental tab, add a Table widget and a Form widget to its right which will populate the details of the selected rental record that can be updated. On the Update Rental form, Customer and Movie are Text widgets, Status is a Select Widget, and Returned is a Datepicker Widget.
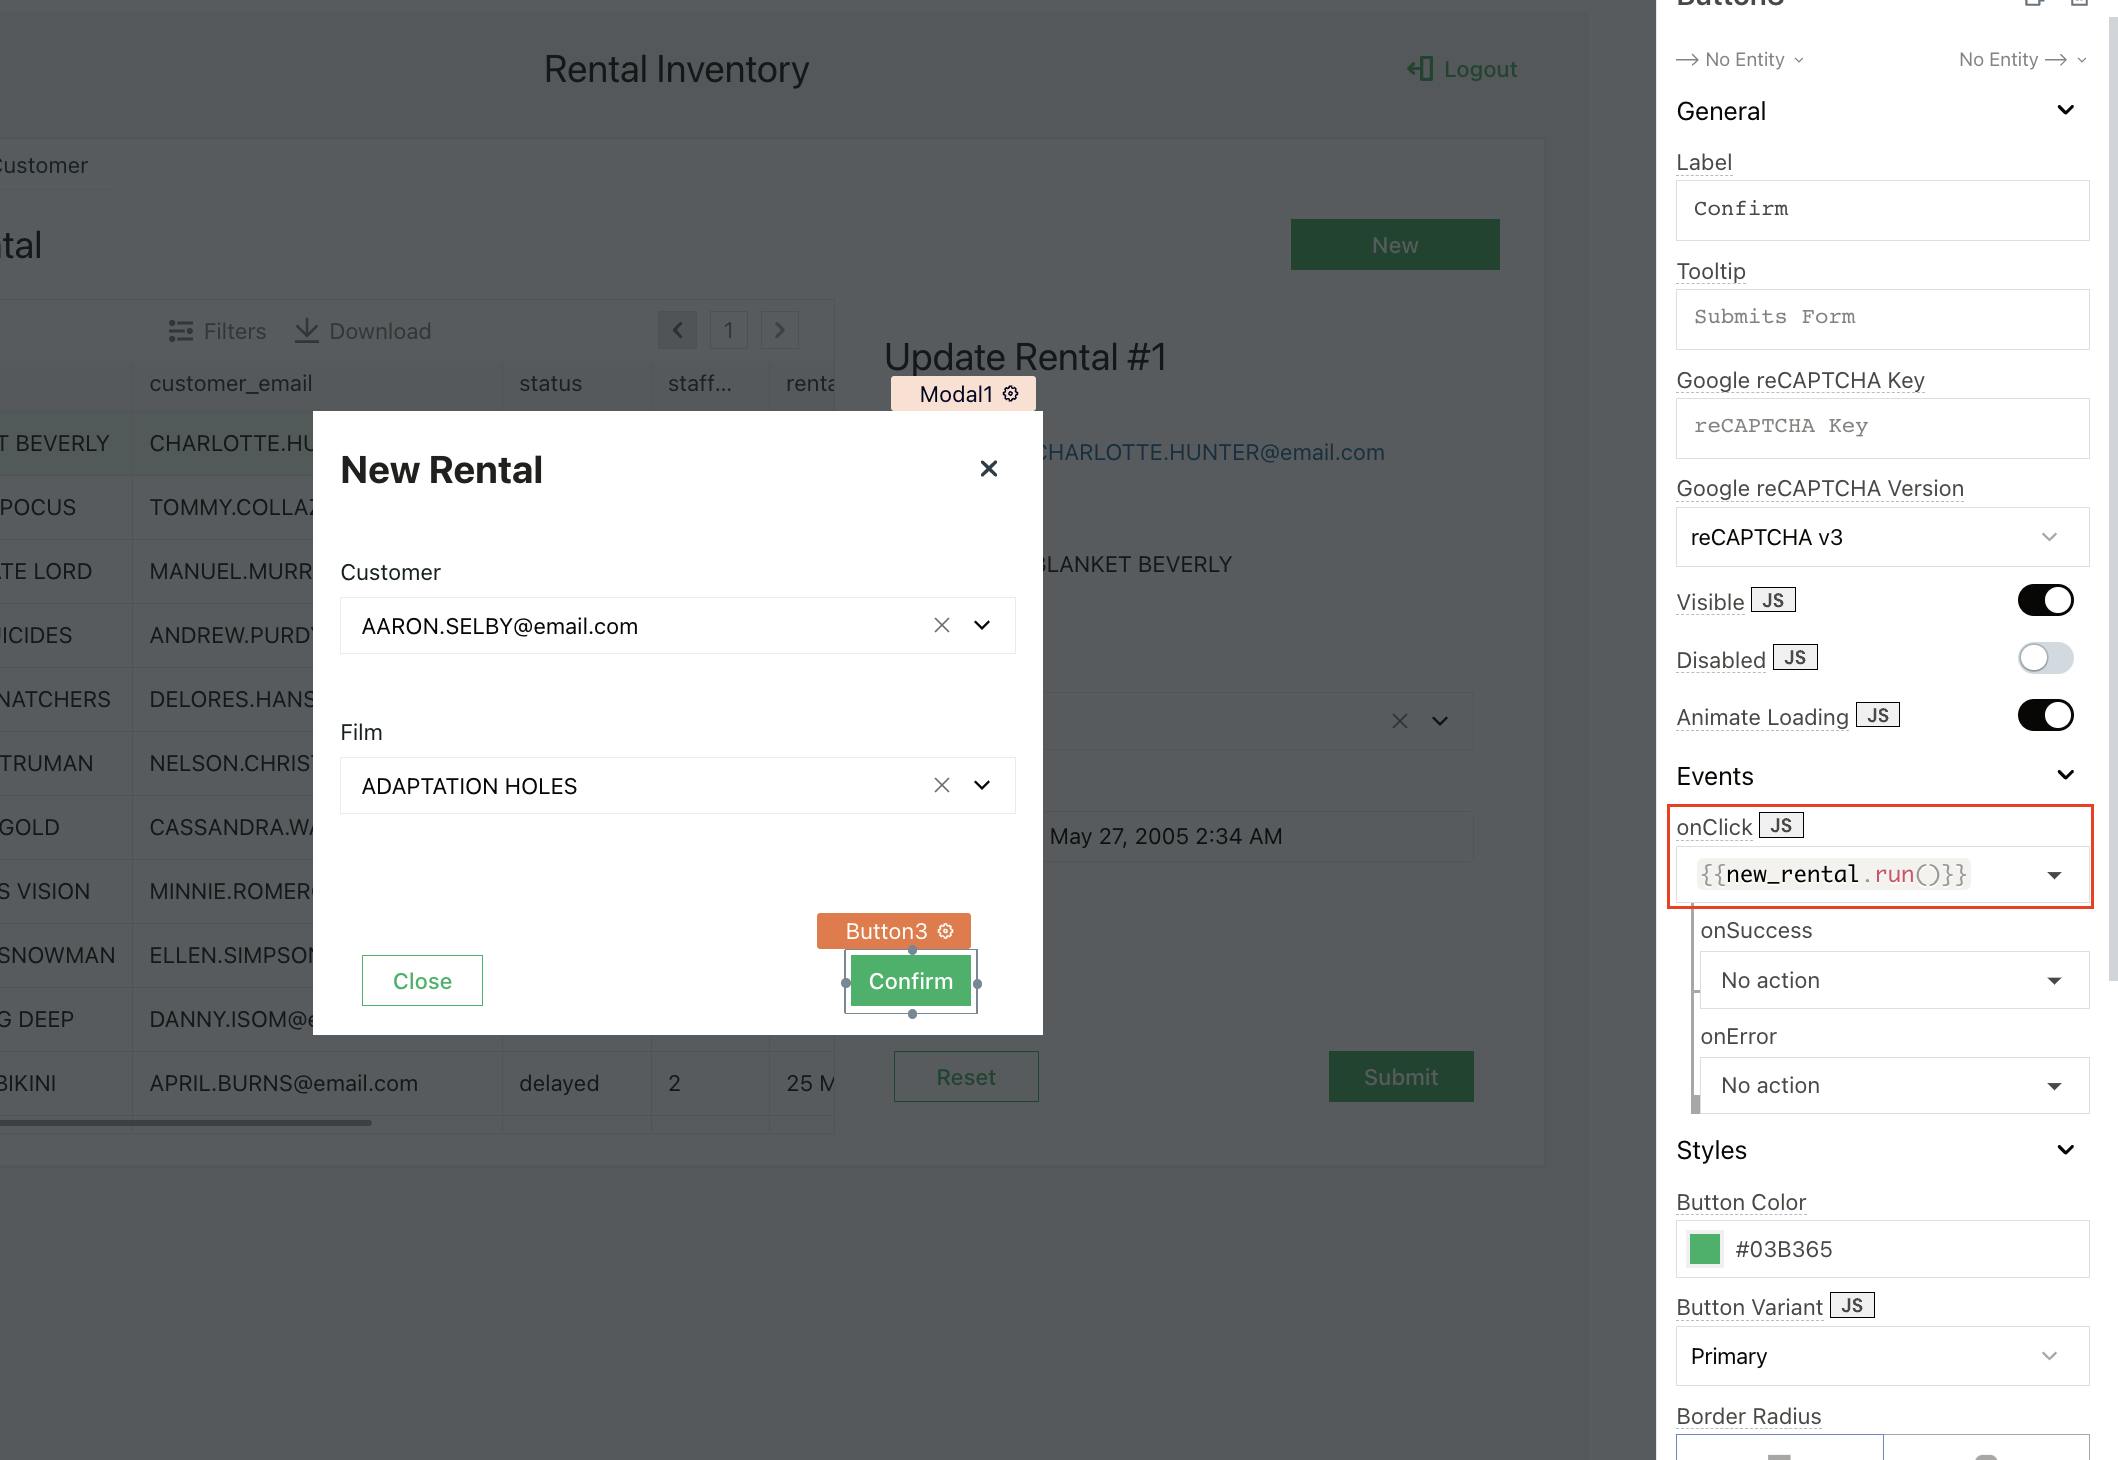
- Add a modal widget onto the canvas to create a form for adding new rentals. Customer (
rentalCustEmail) and Film (filmTitle) are select widgets
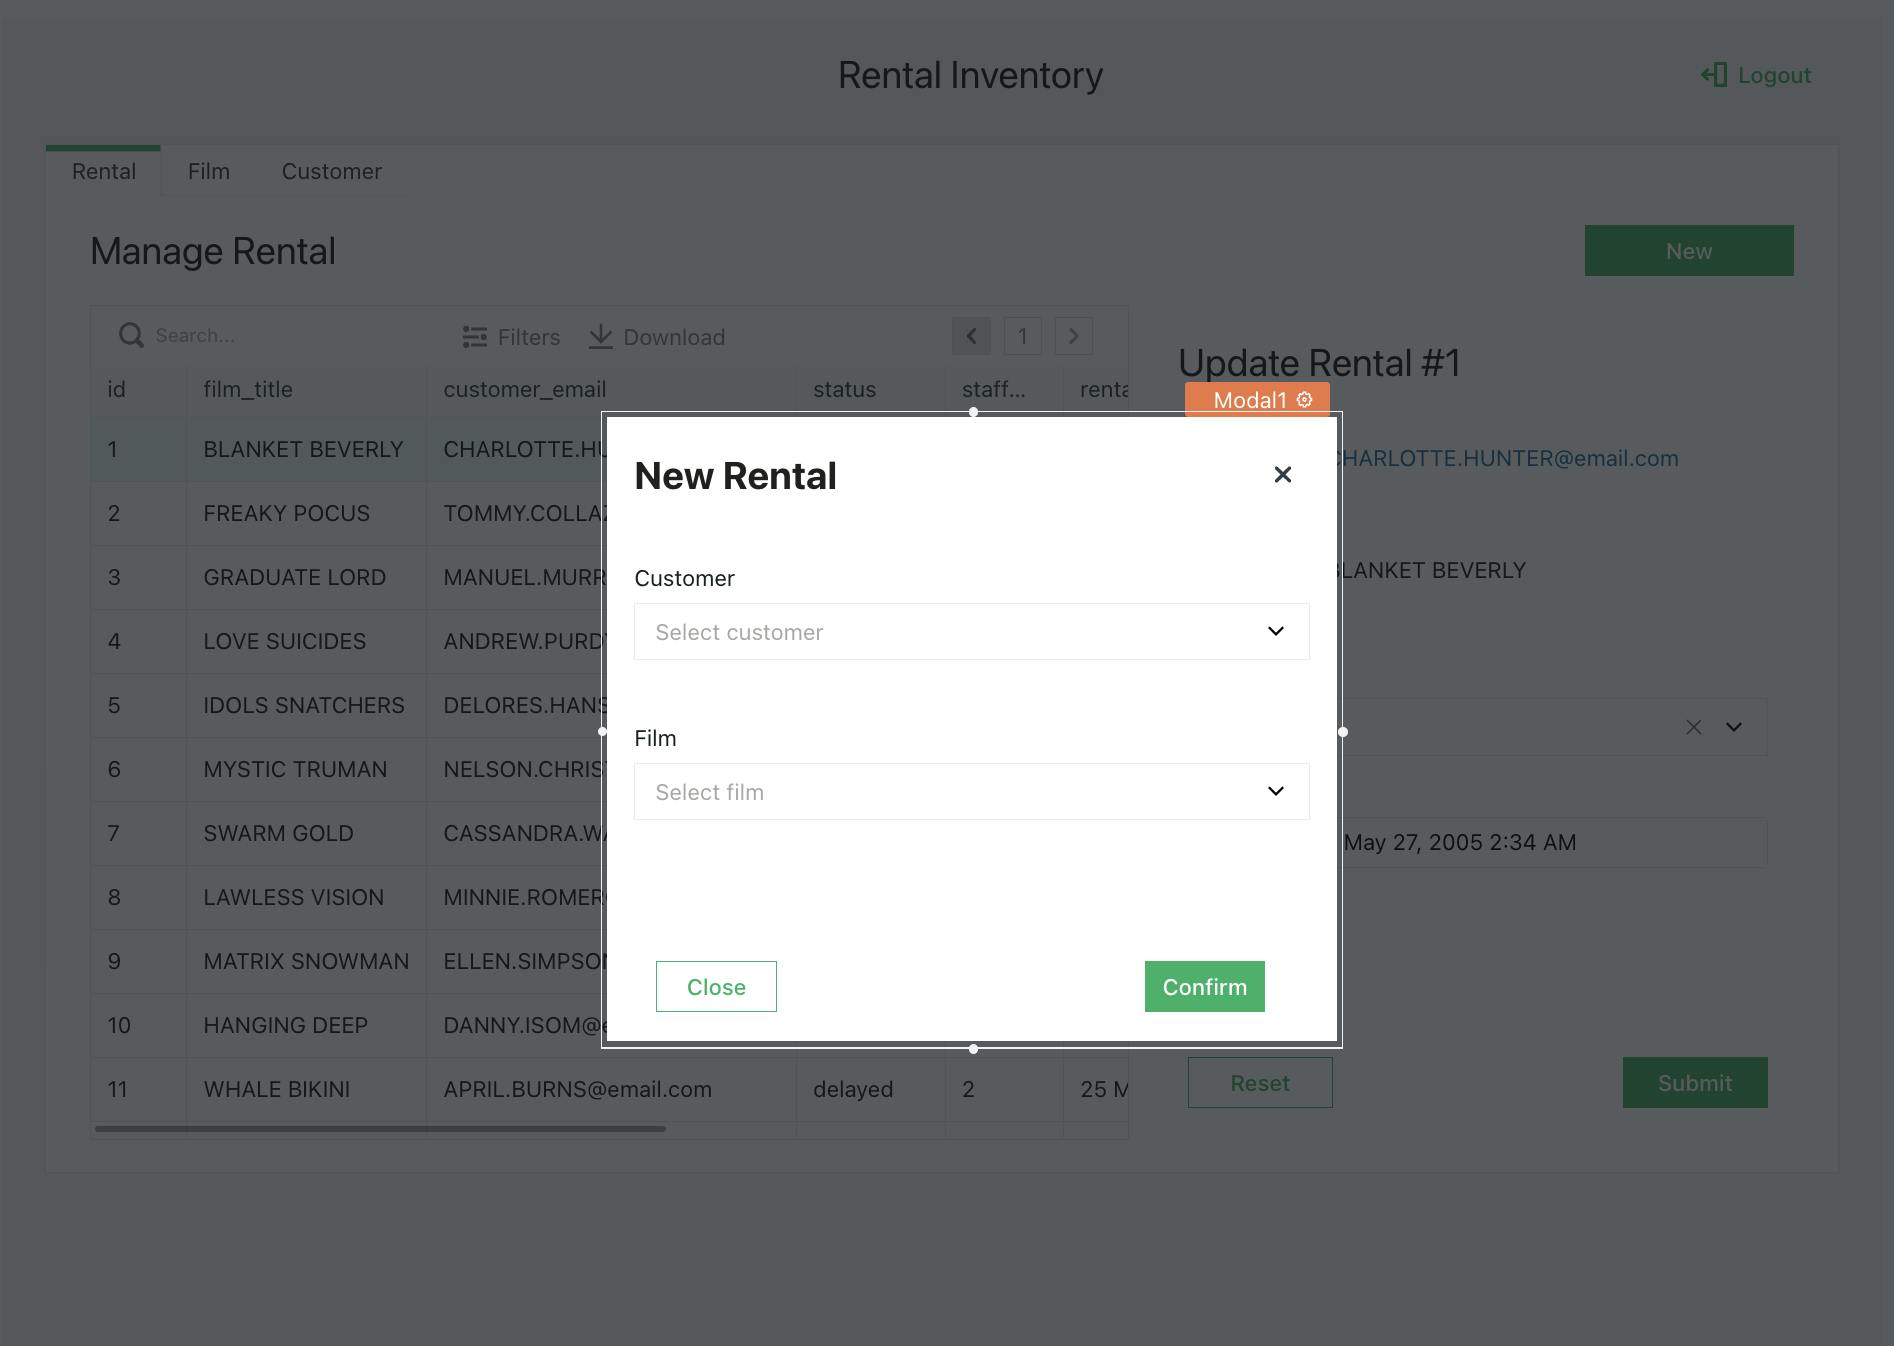
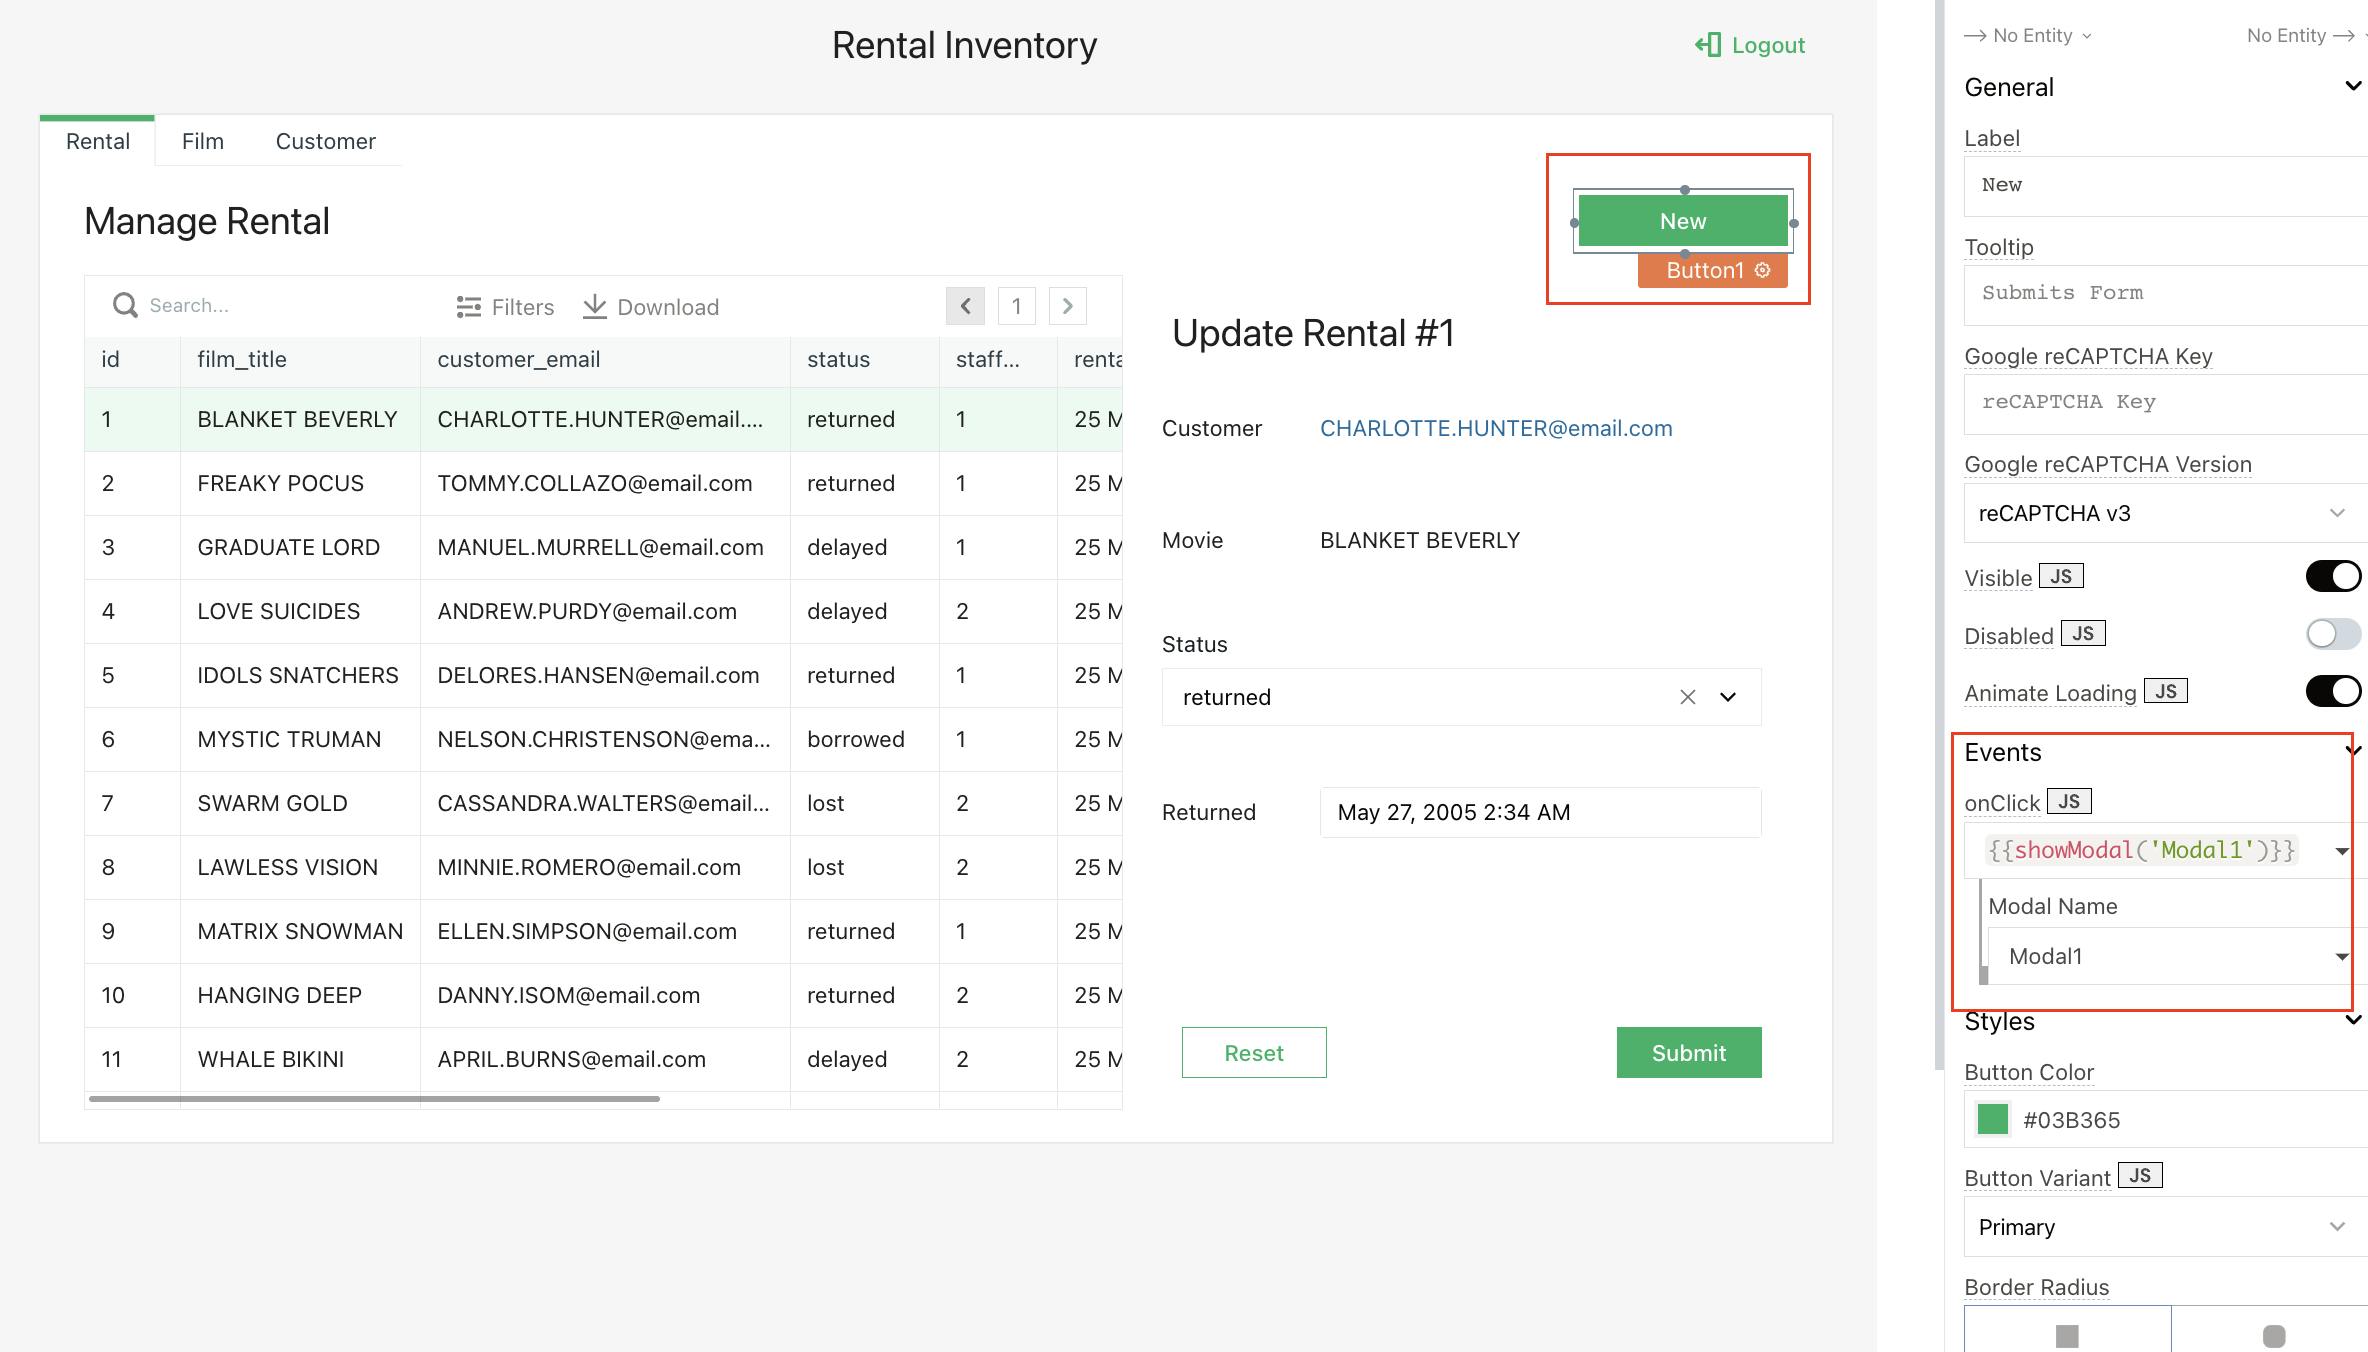
- Set this modal to open on the
onClickevent of the New button
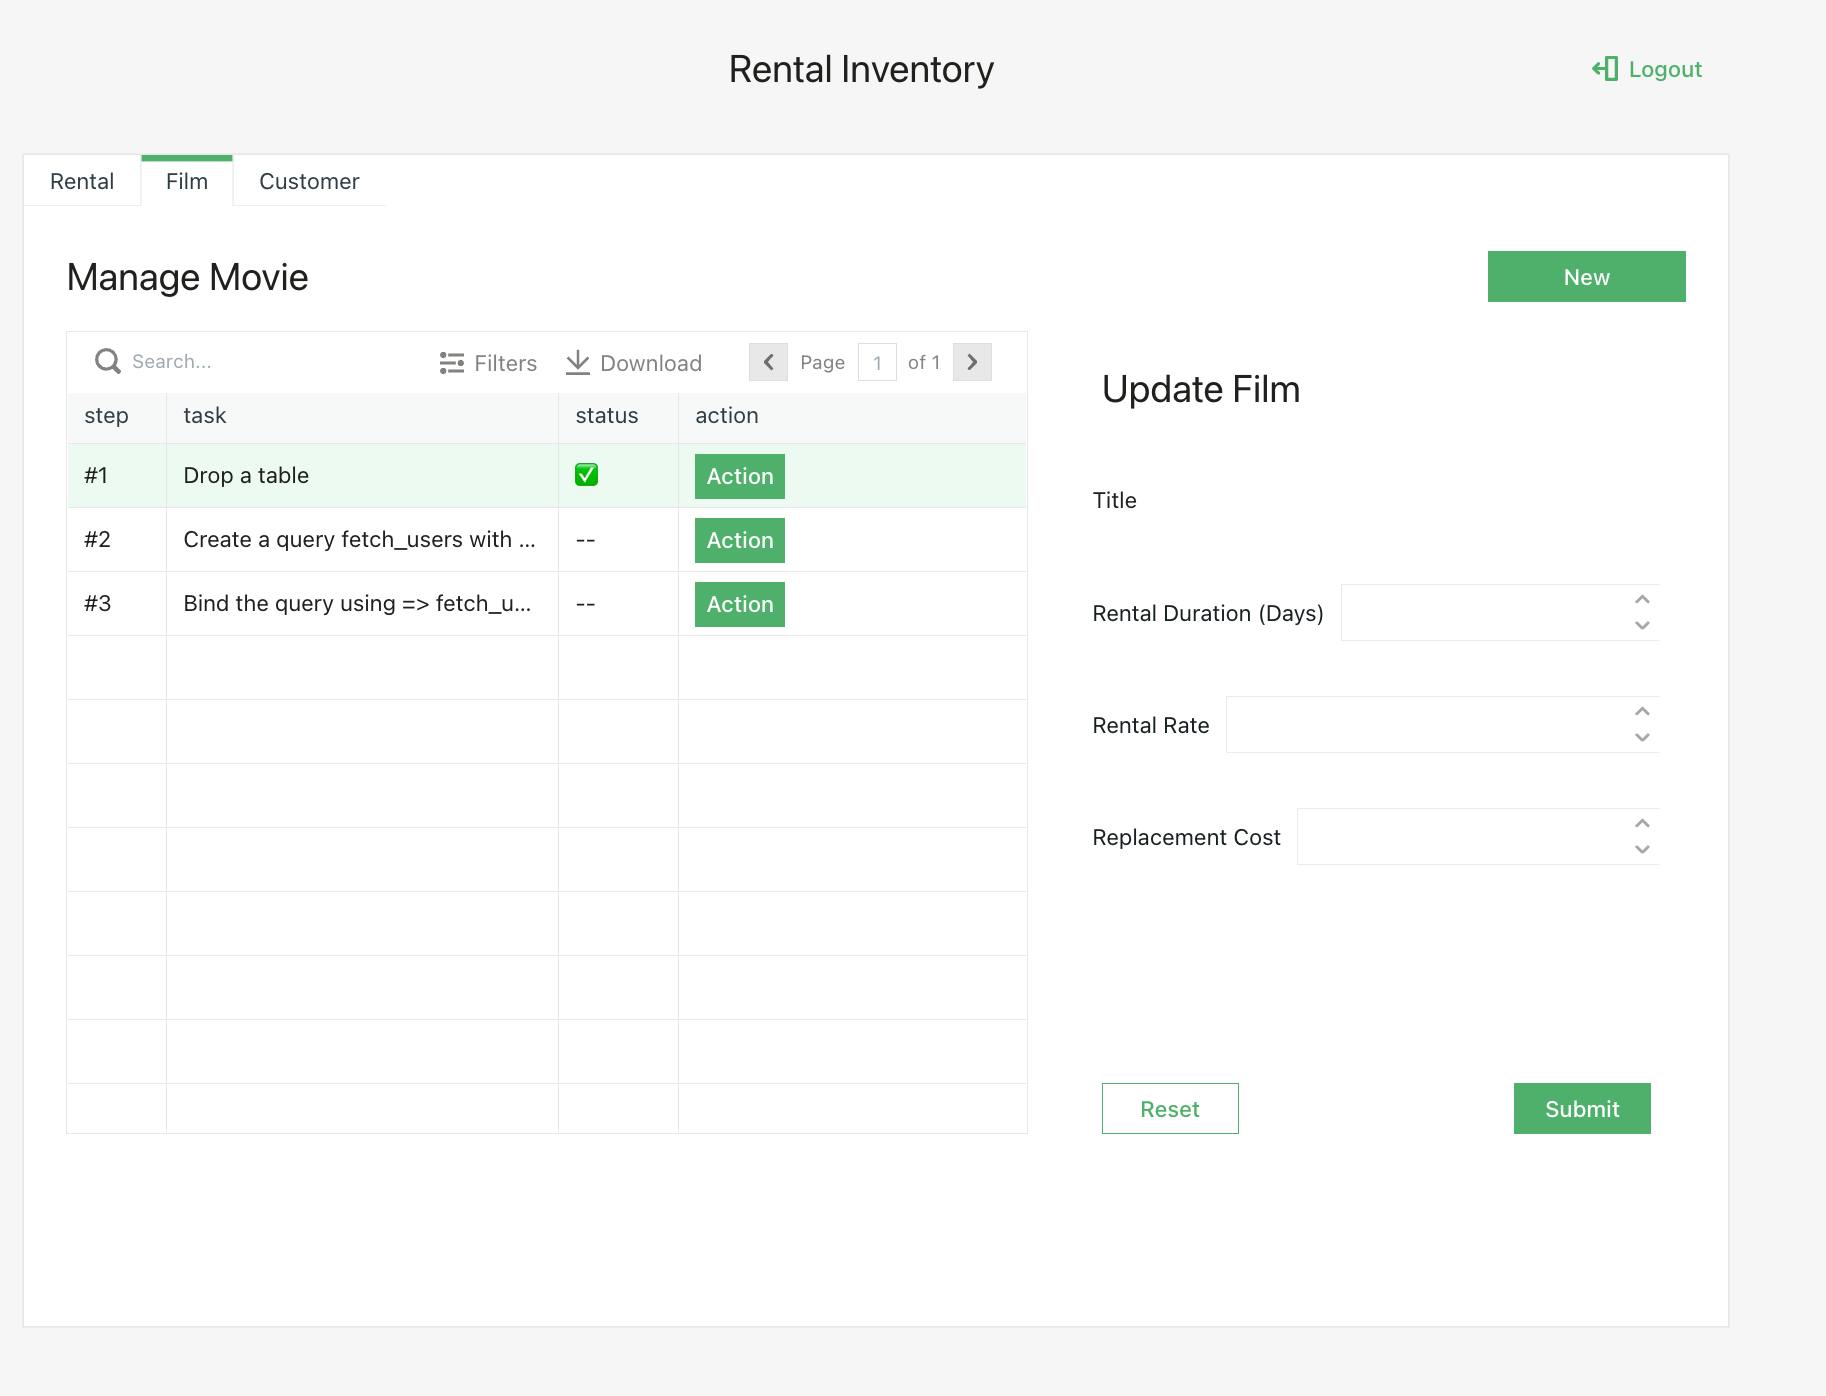
- Create the same layout for the Film Tab. The title is Text widget, Rental Duration, Rental Rate, and Replacement Cost are all Input widgets of Number Datatype.
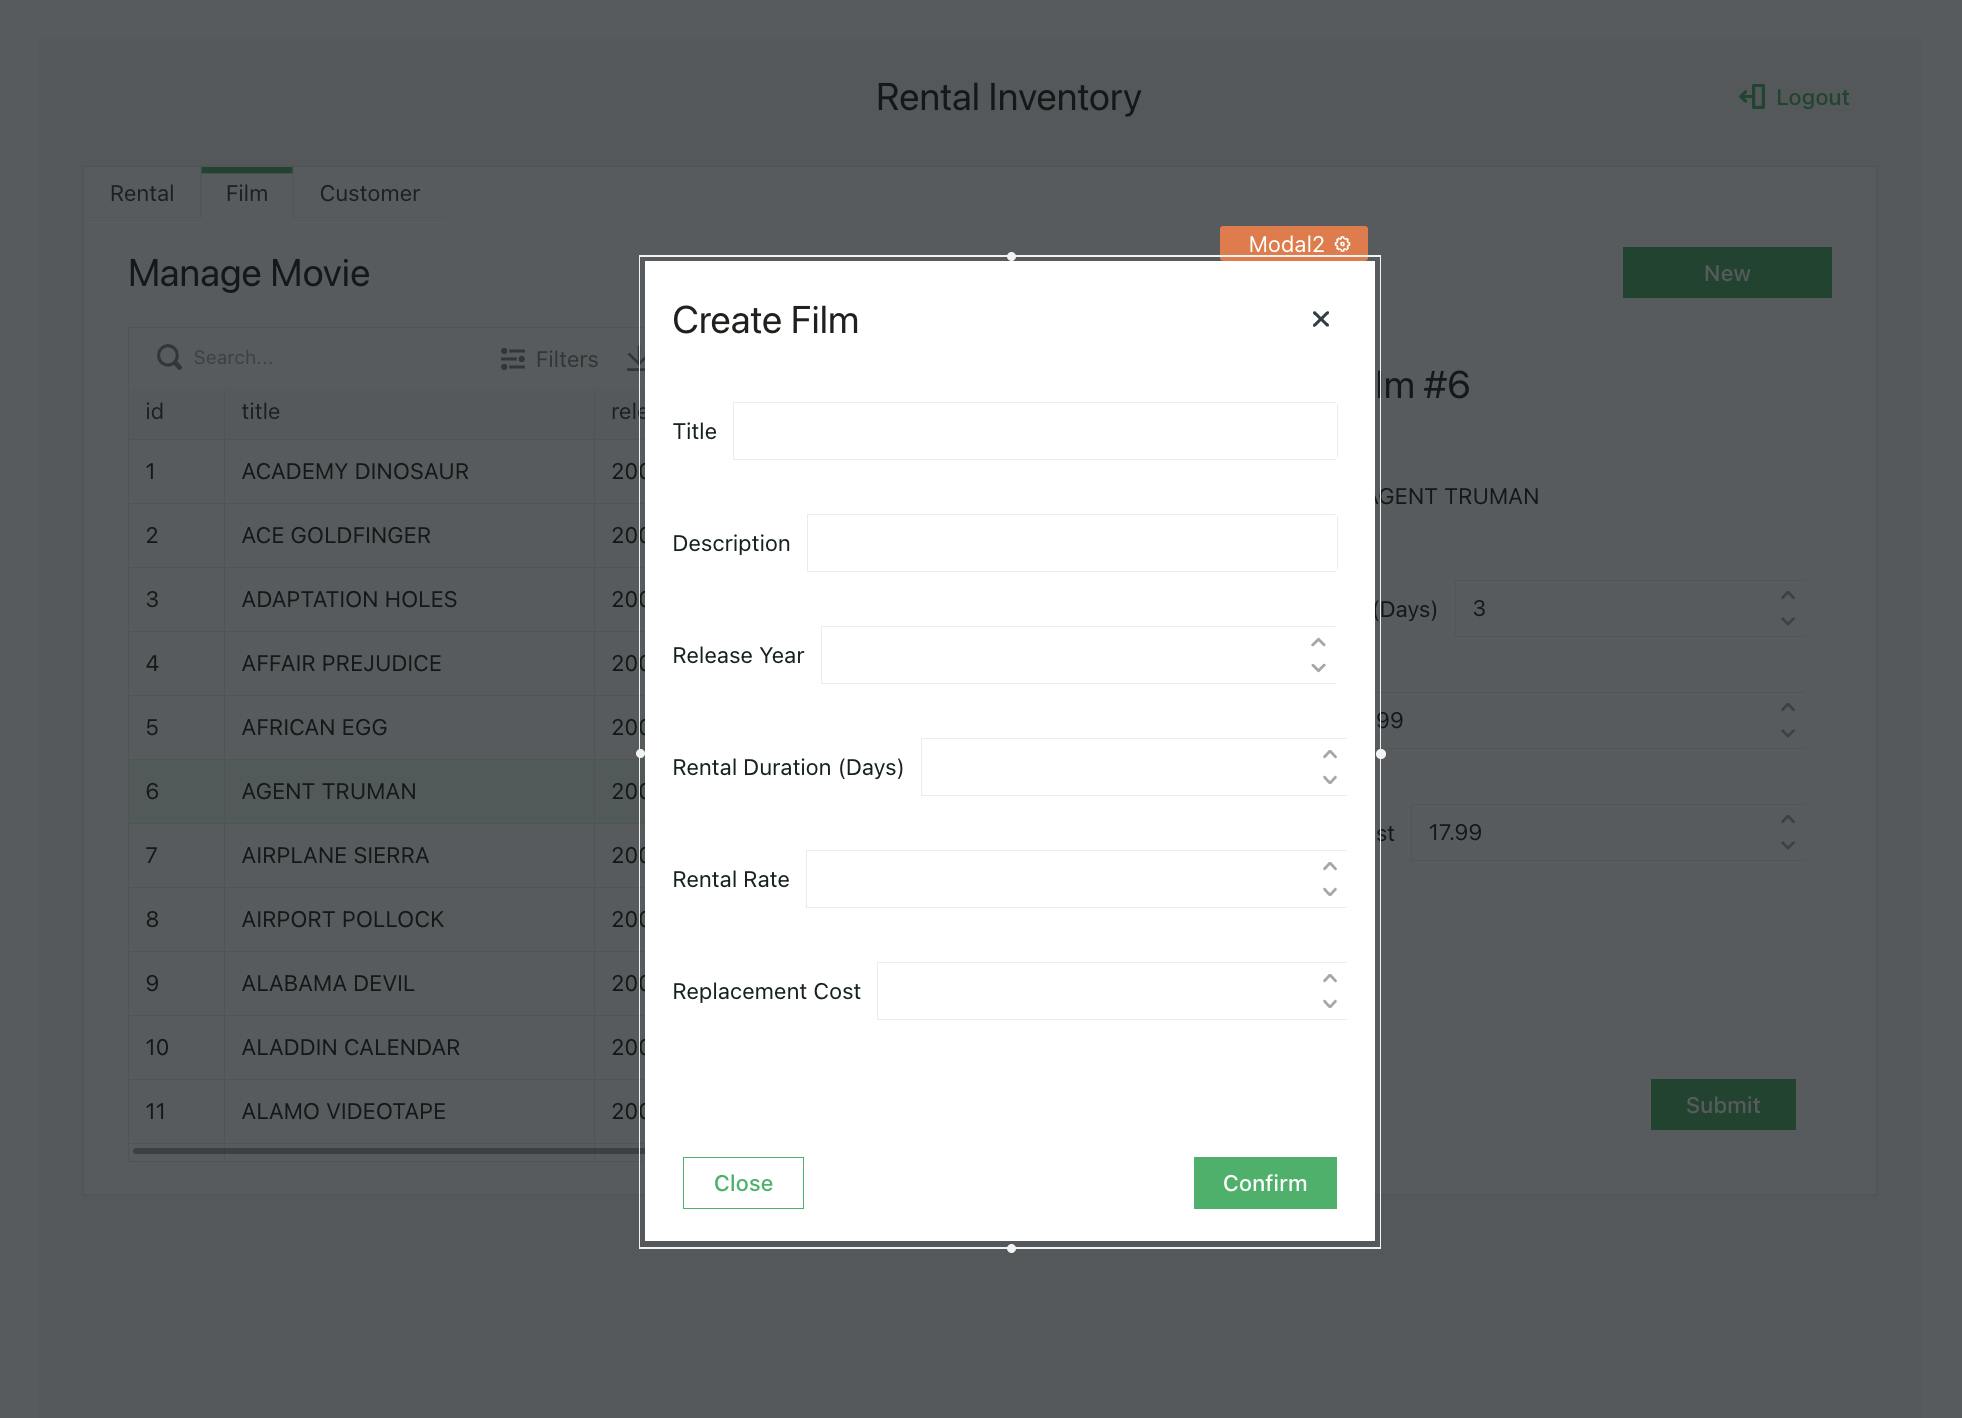
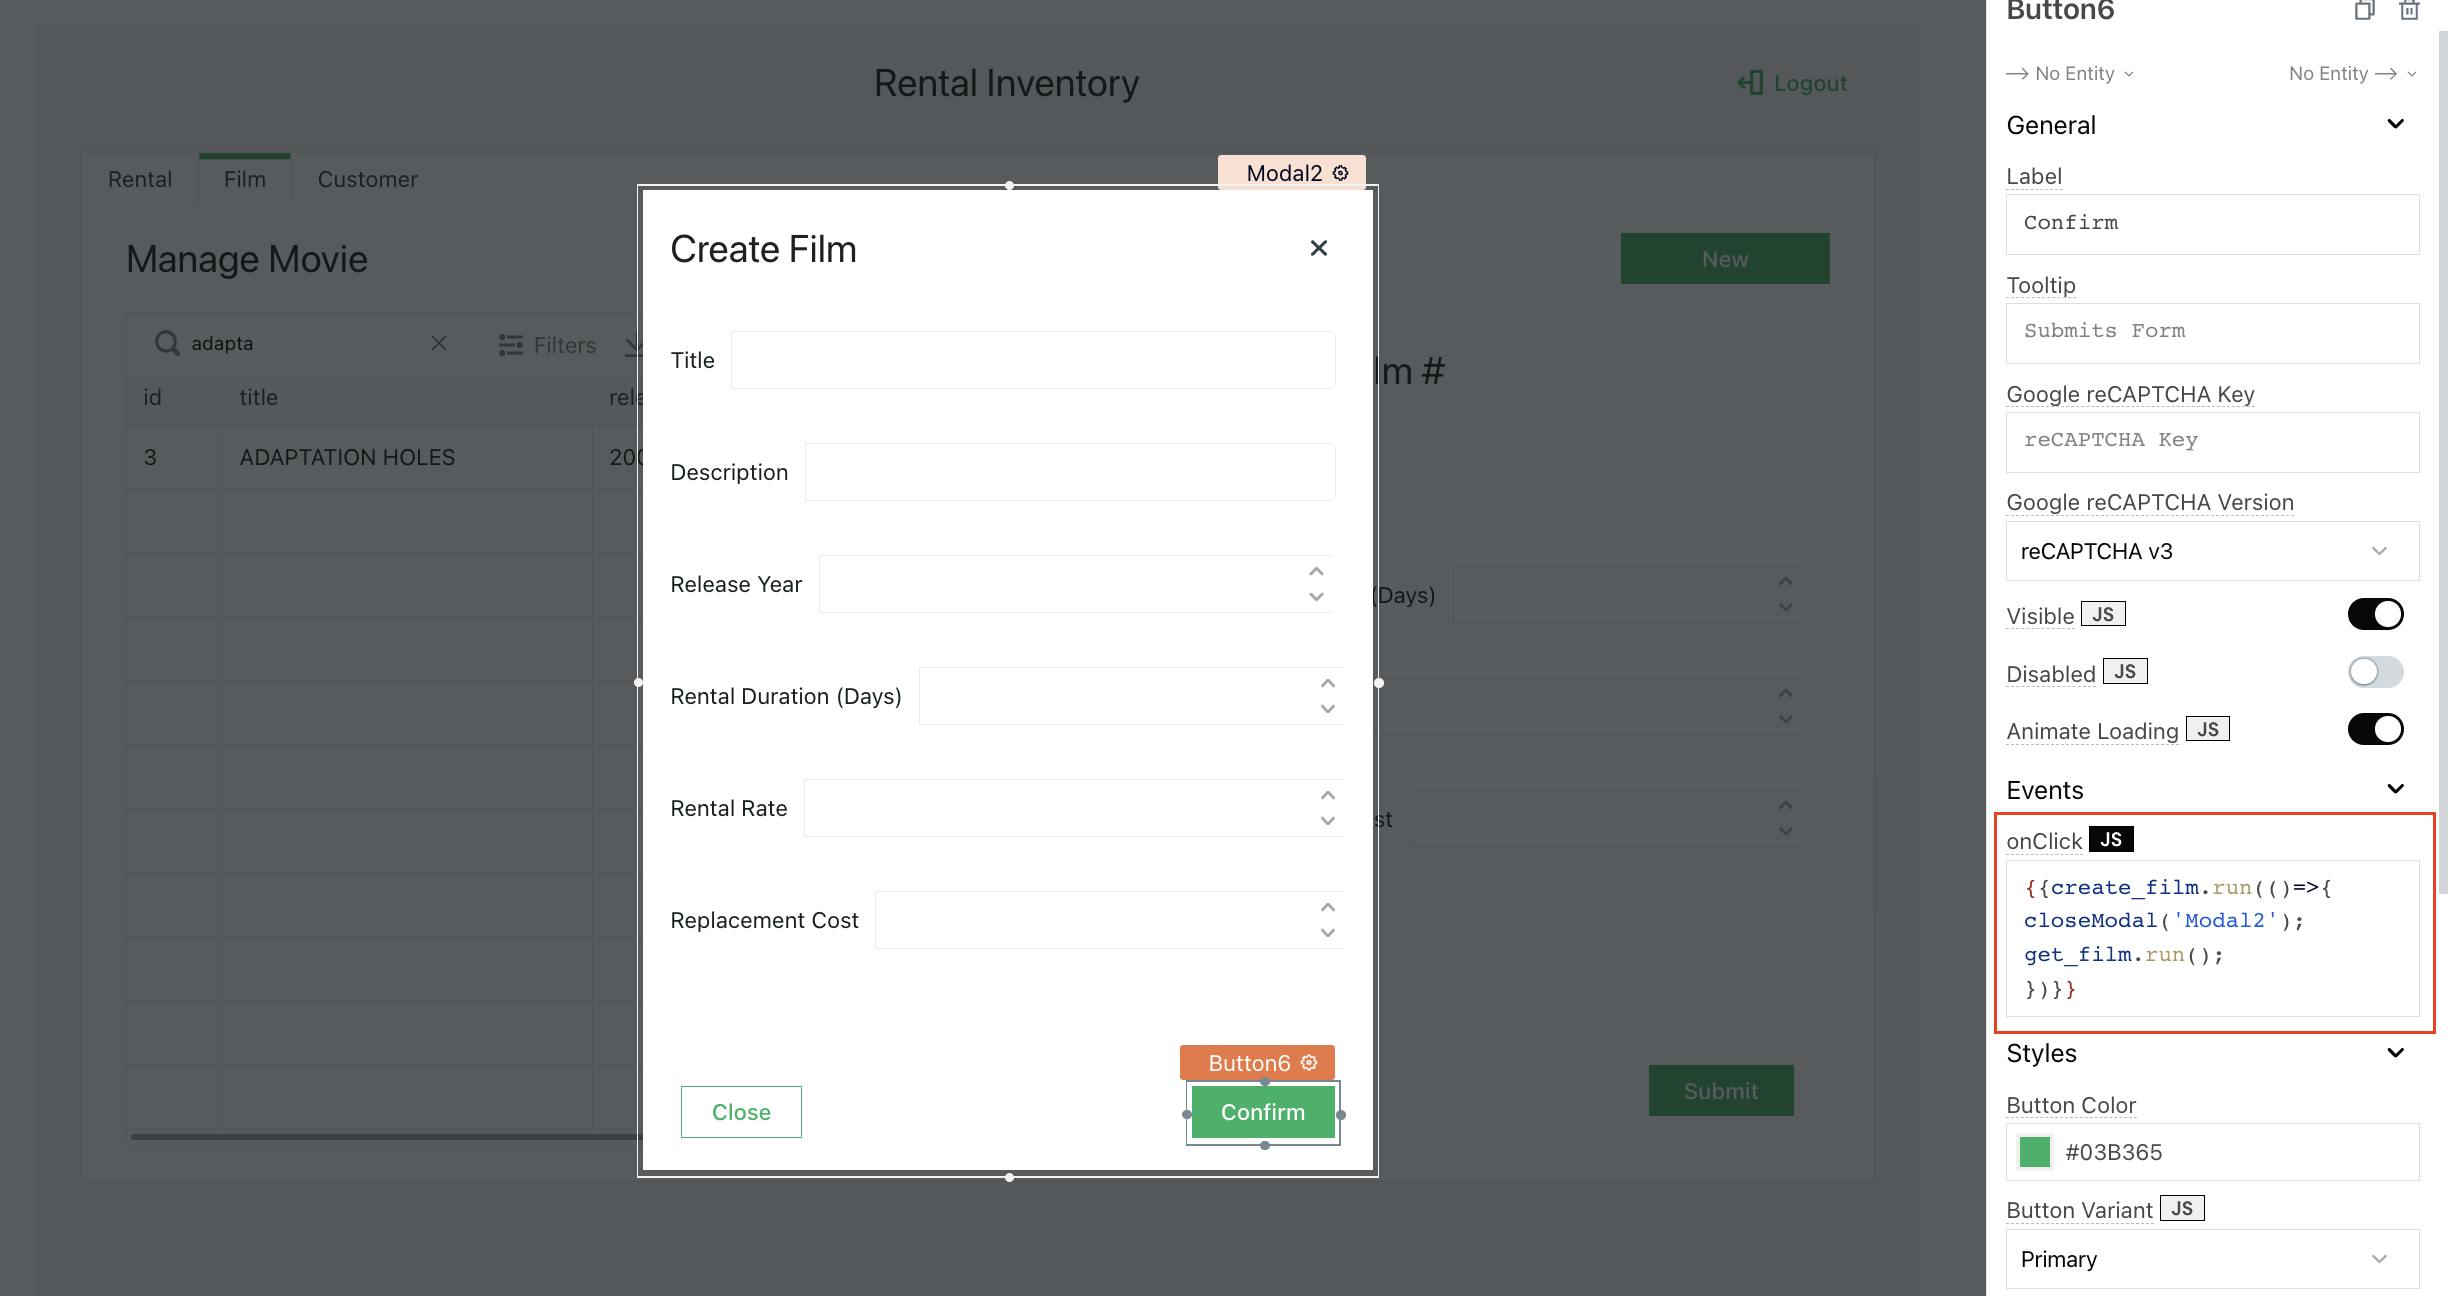
- Drop a Modal widget on the canvas and create a form to add new movies to the collection. Title and Description are Input widgets of Data Type property set to Text and and the remaining are input widgets of Data Type property set to Number. Set this modal to open on the onClick event of the New button on the Film tab
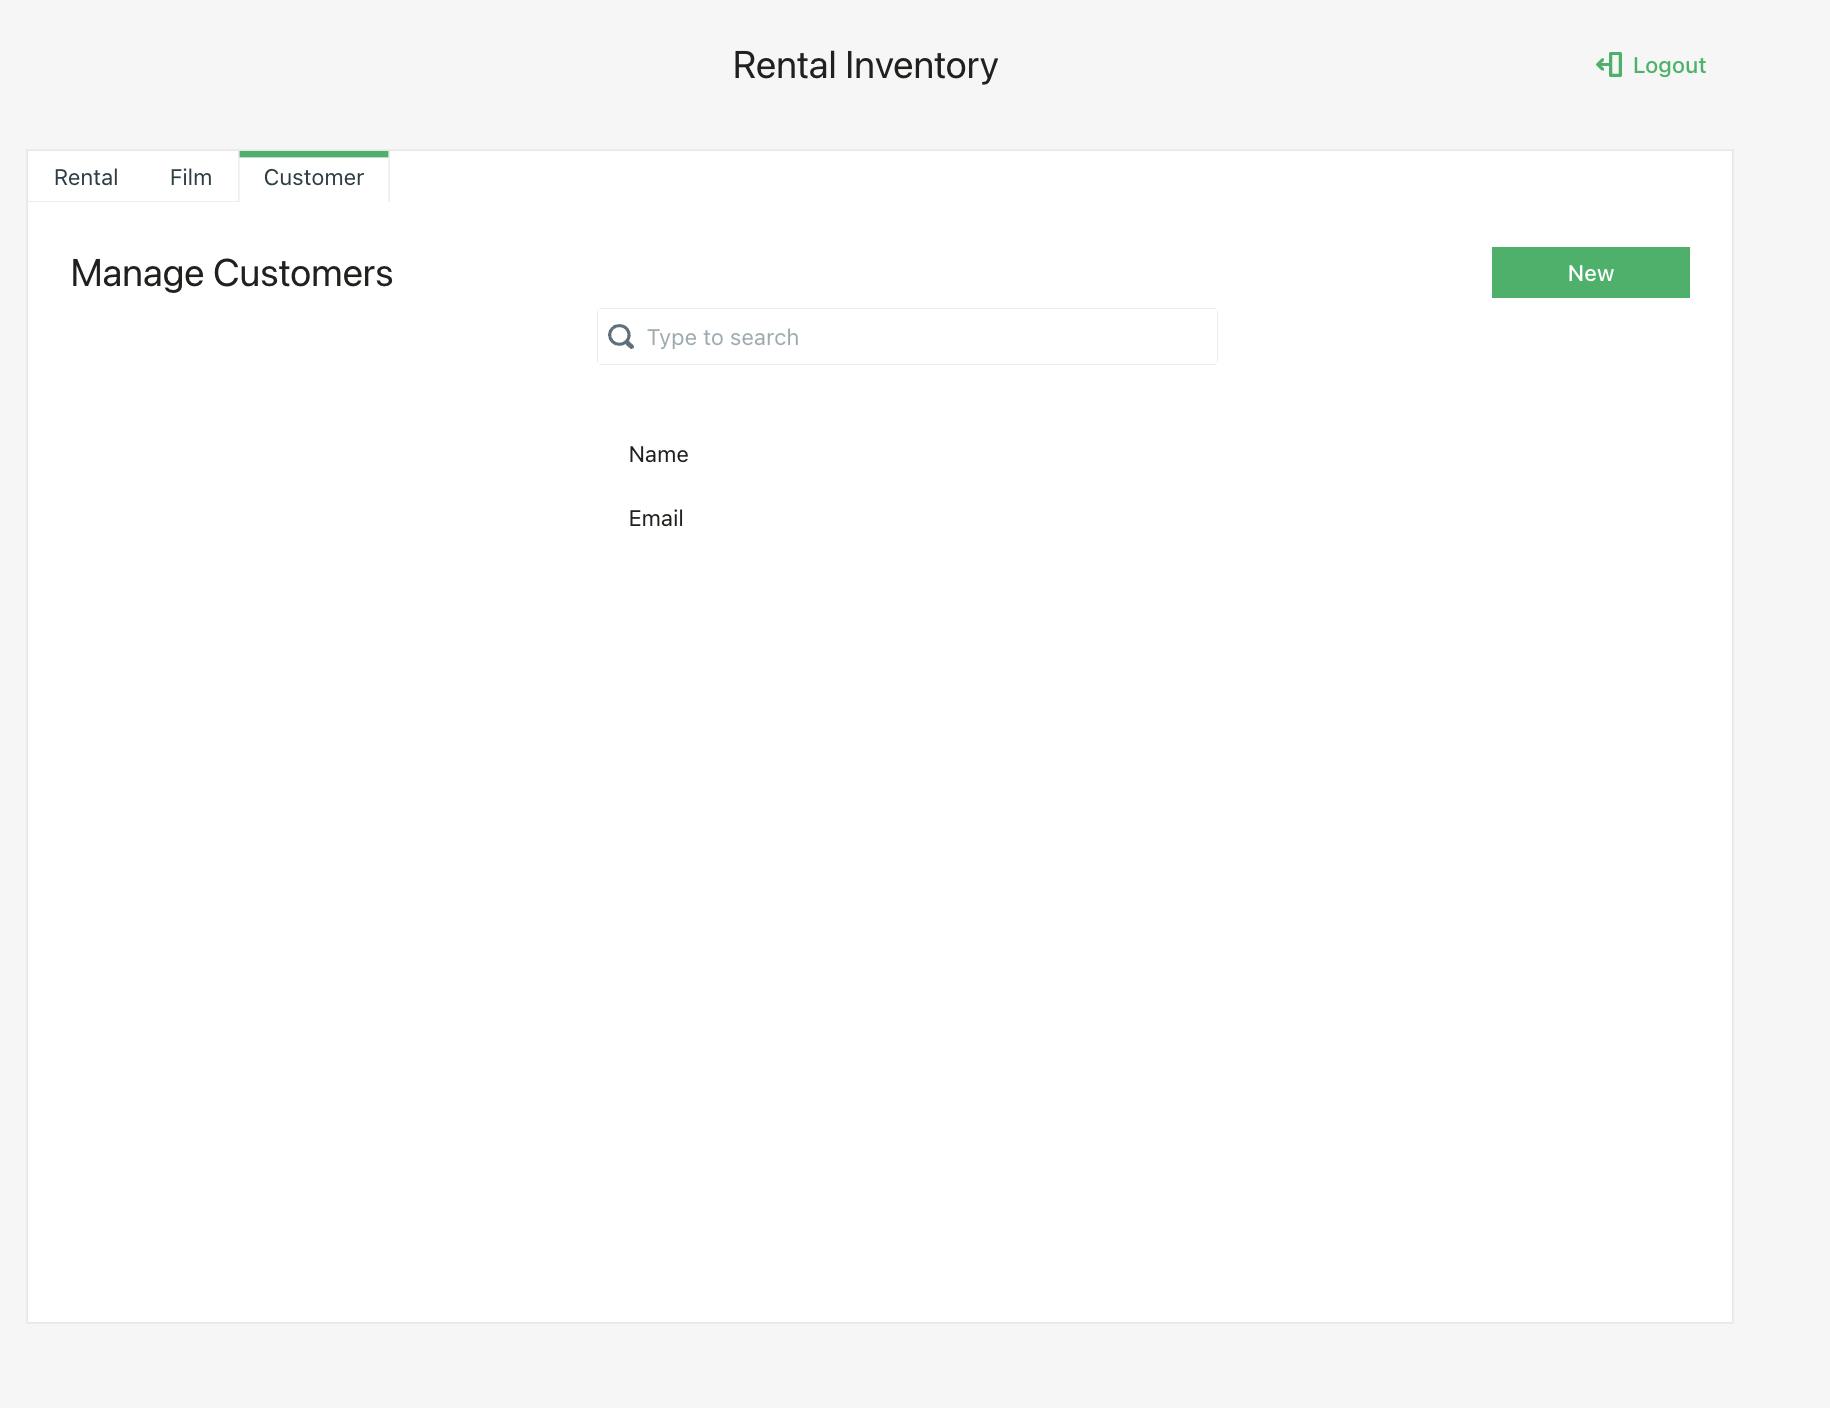
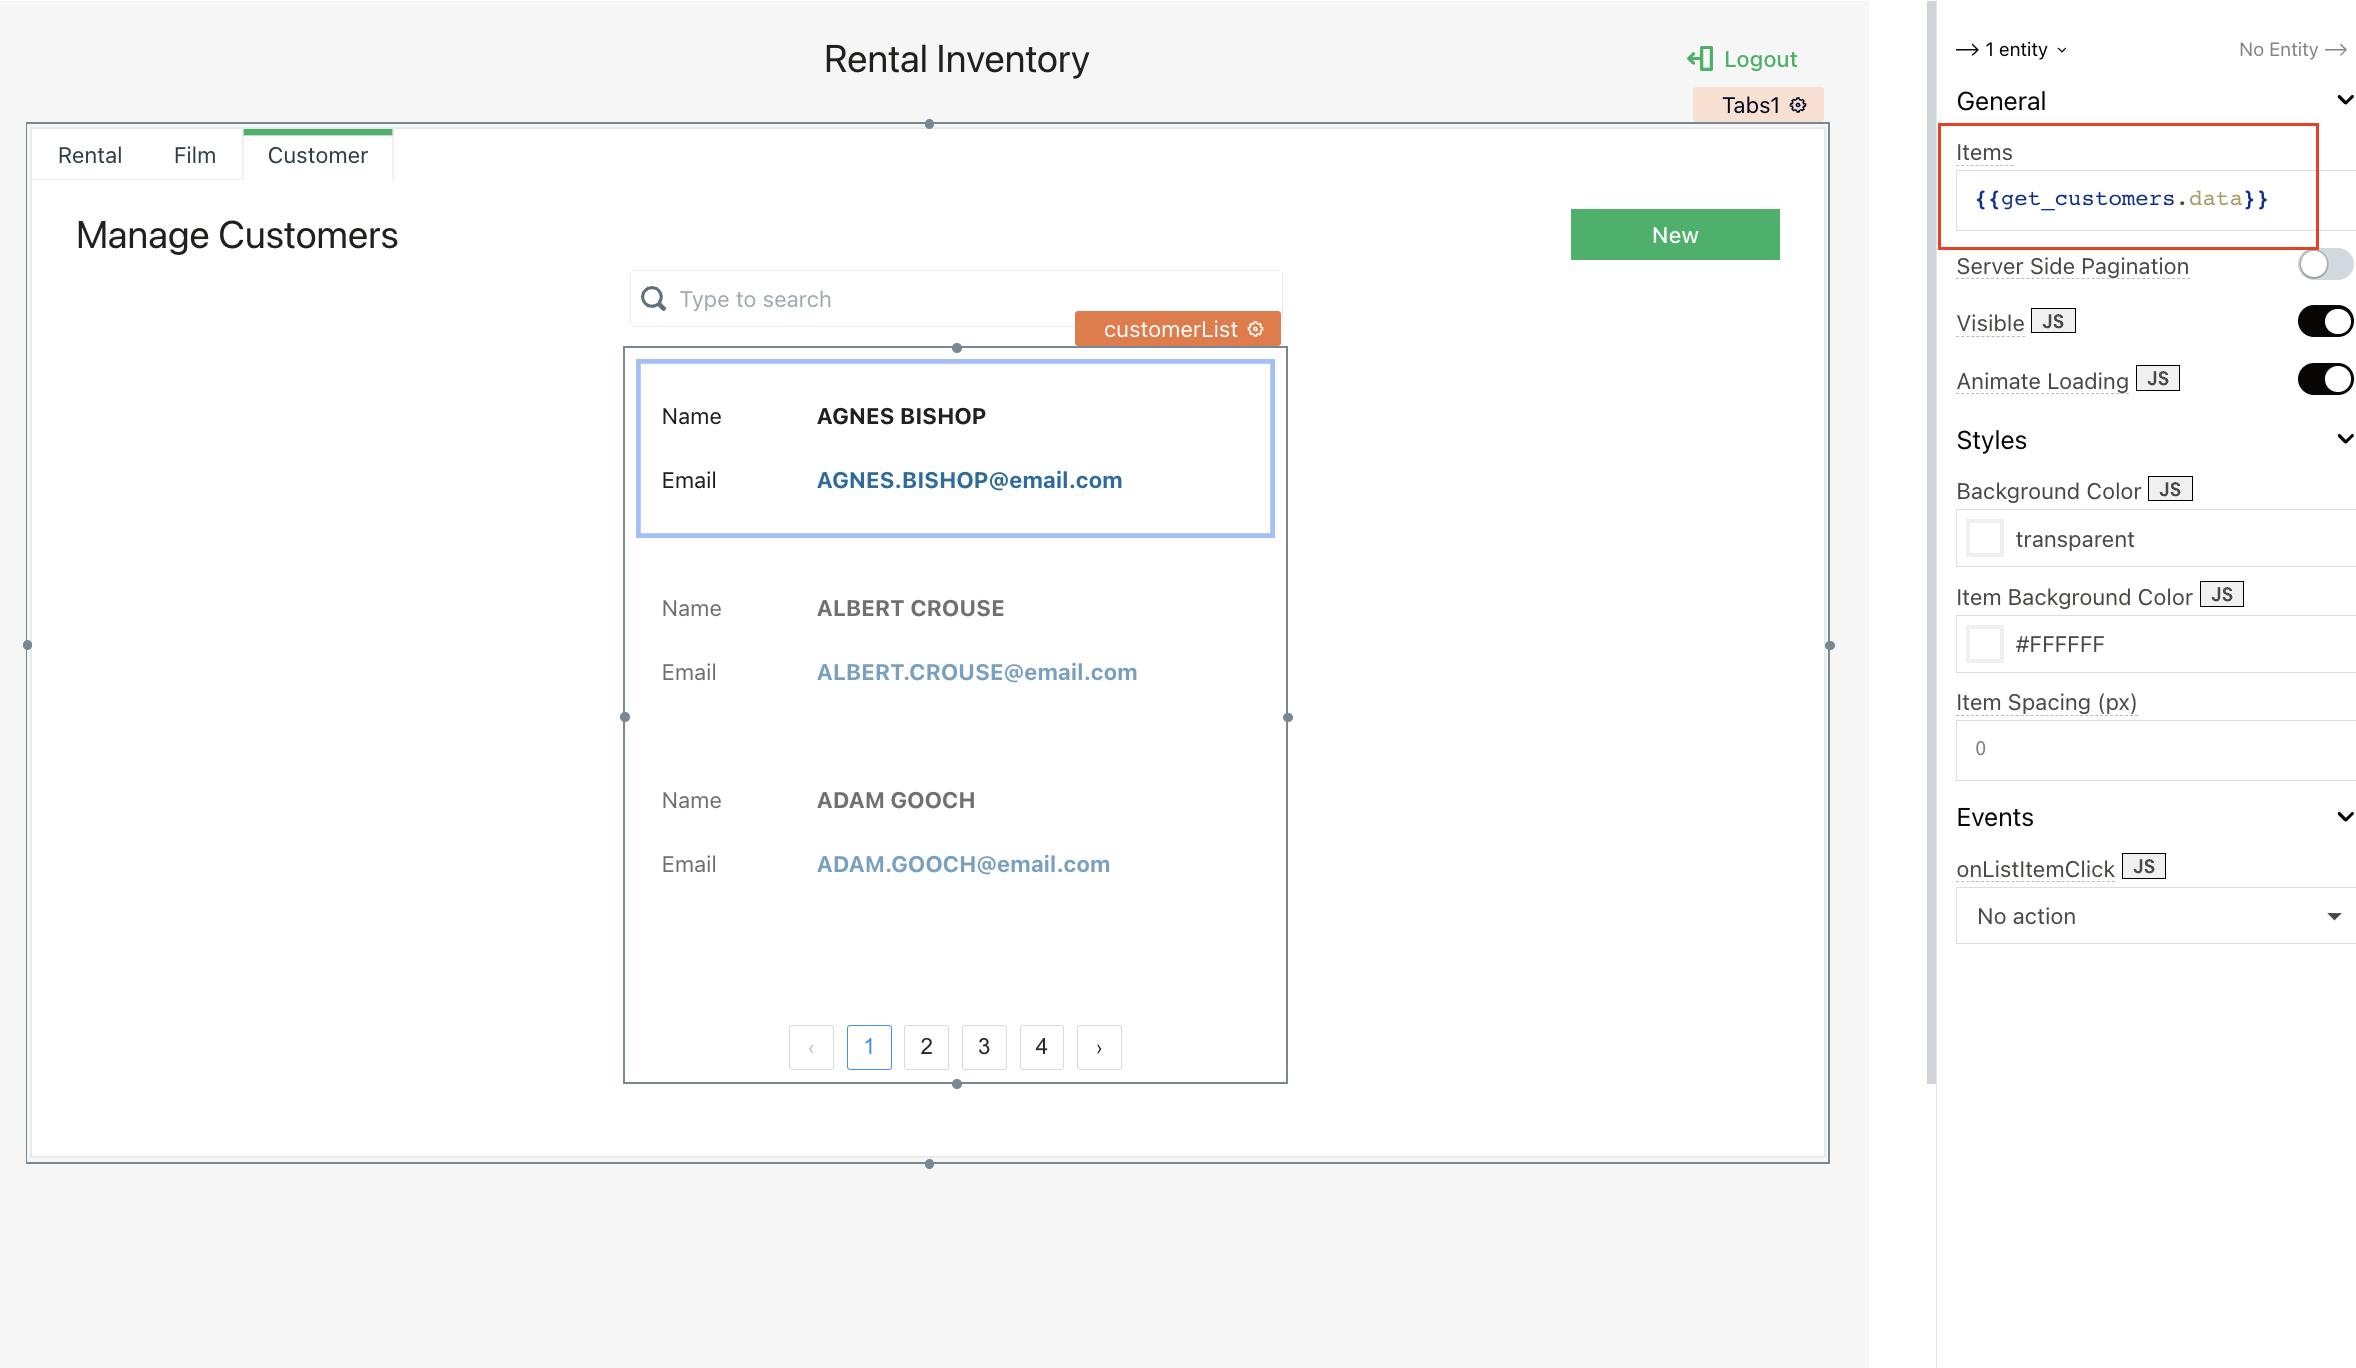
- Lastly, add widgets to the Customer tab as follows. Search is an input widget (Use the search icon under Icon Options and add “Type to search” under Placeholder in the property pane) and
customerListis a List widget with two input widgets for Name and Email.
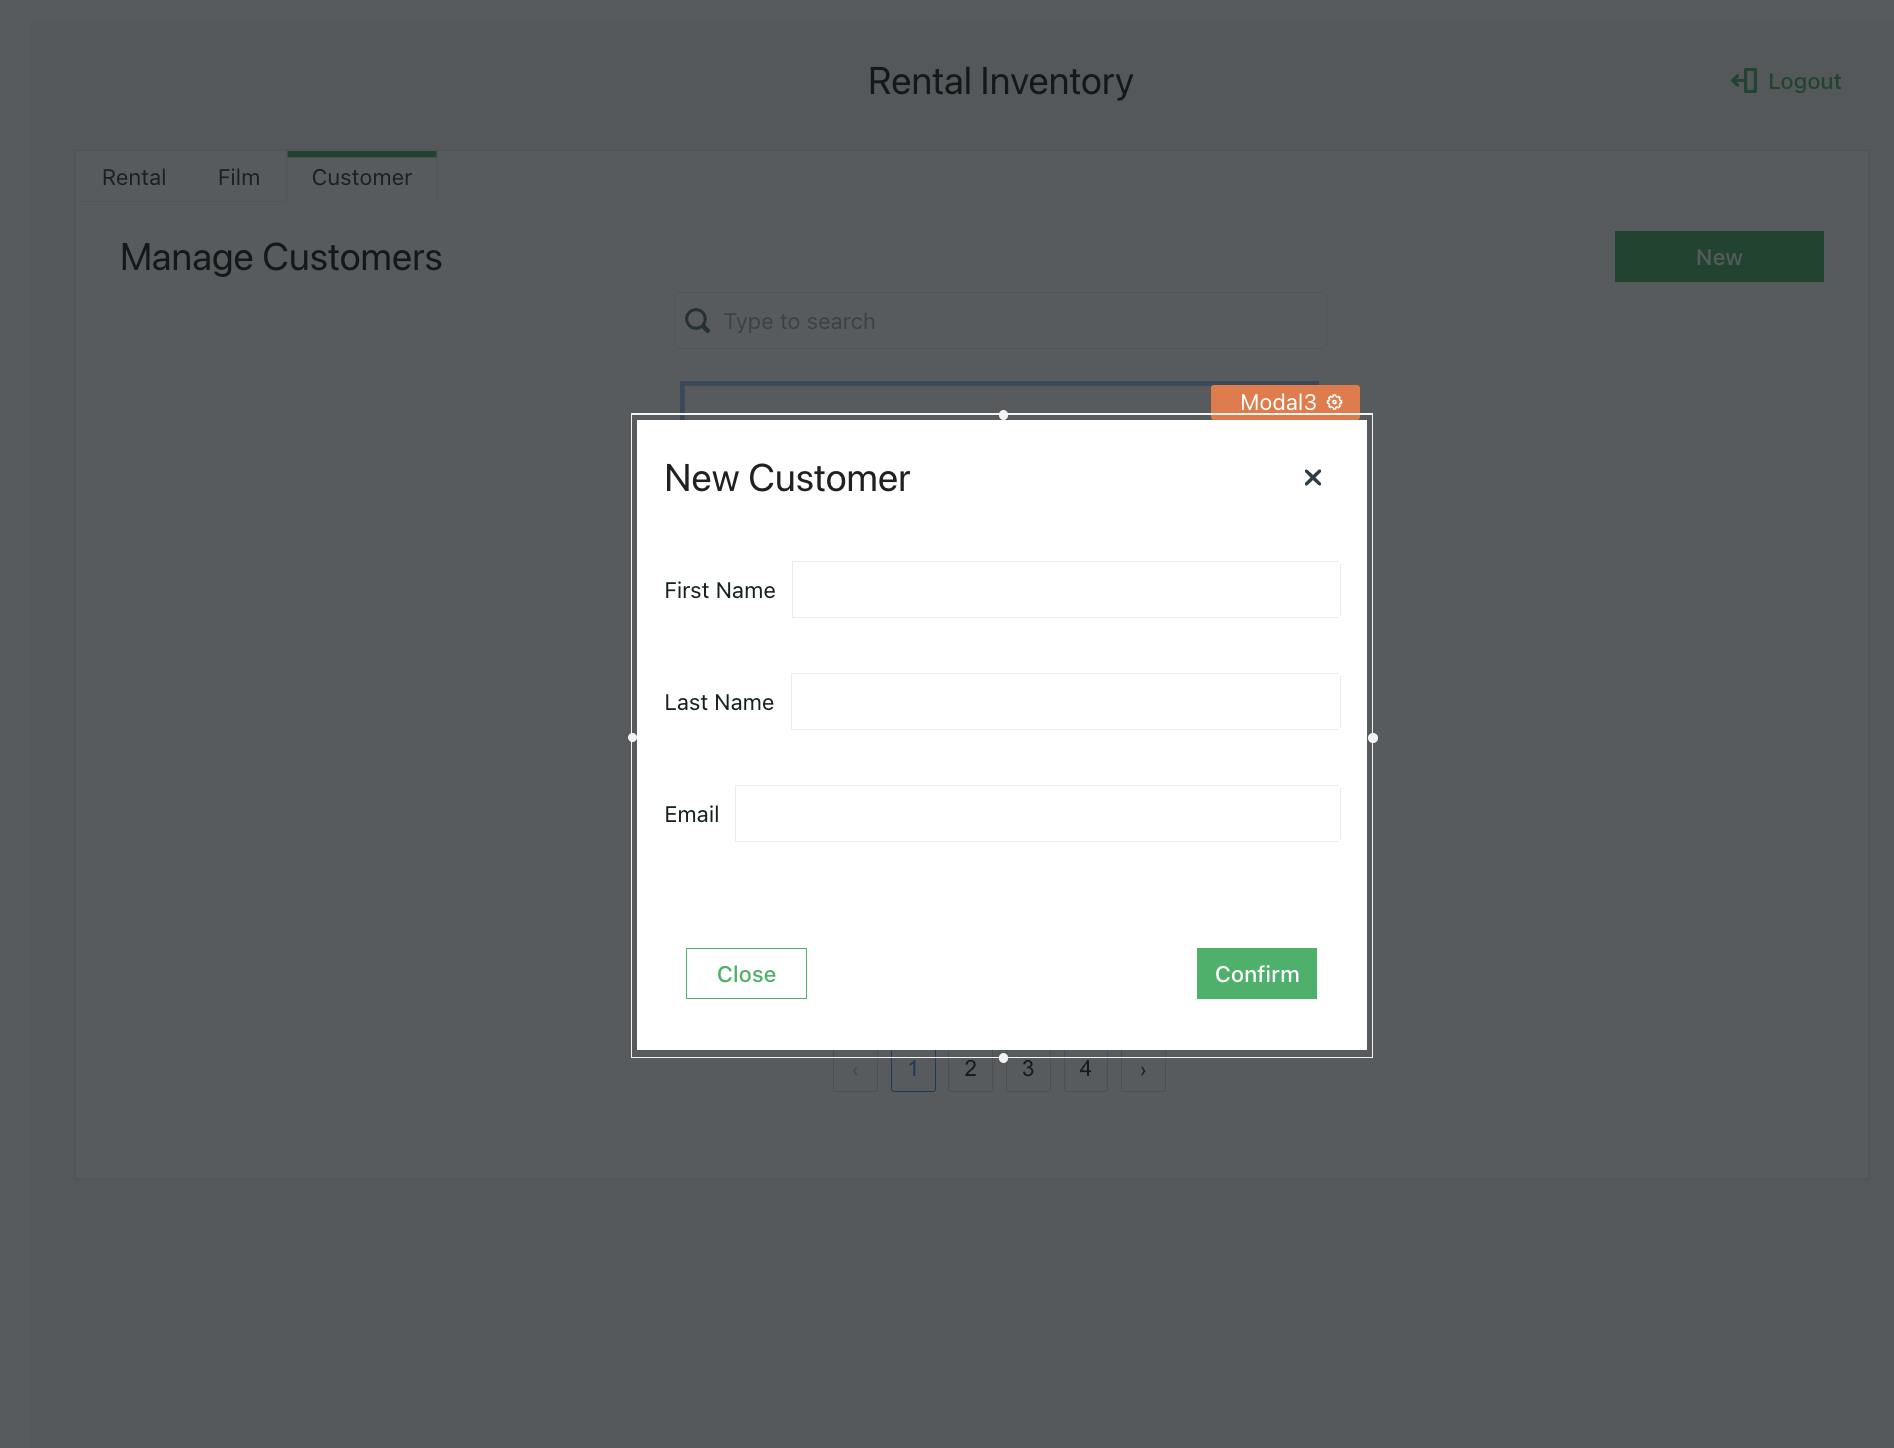
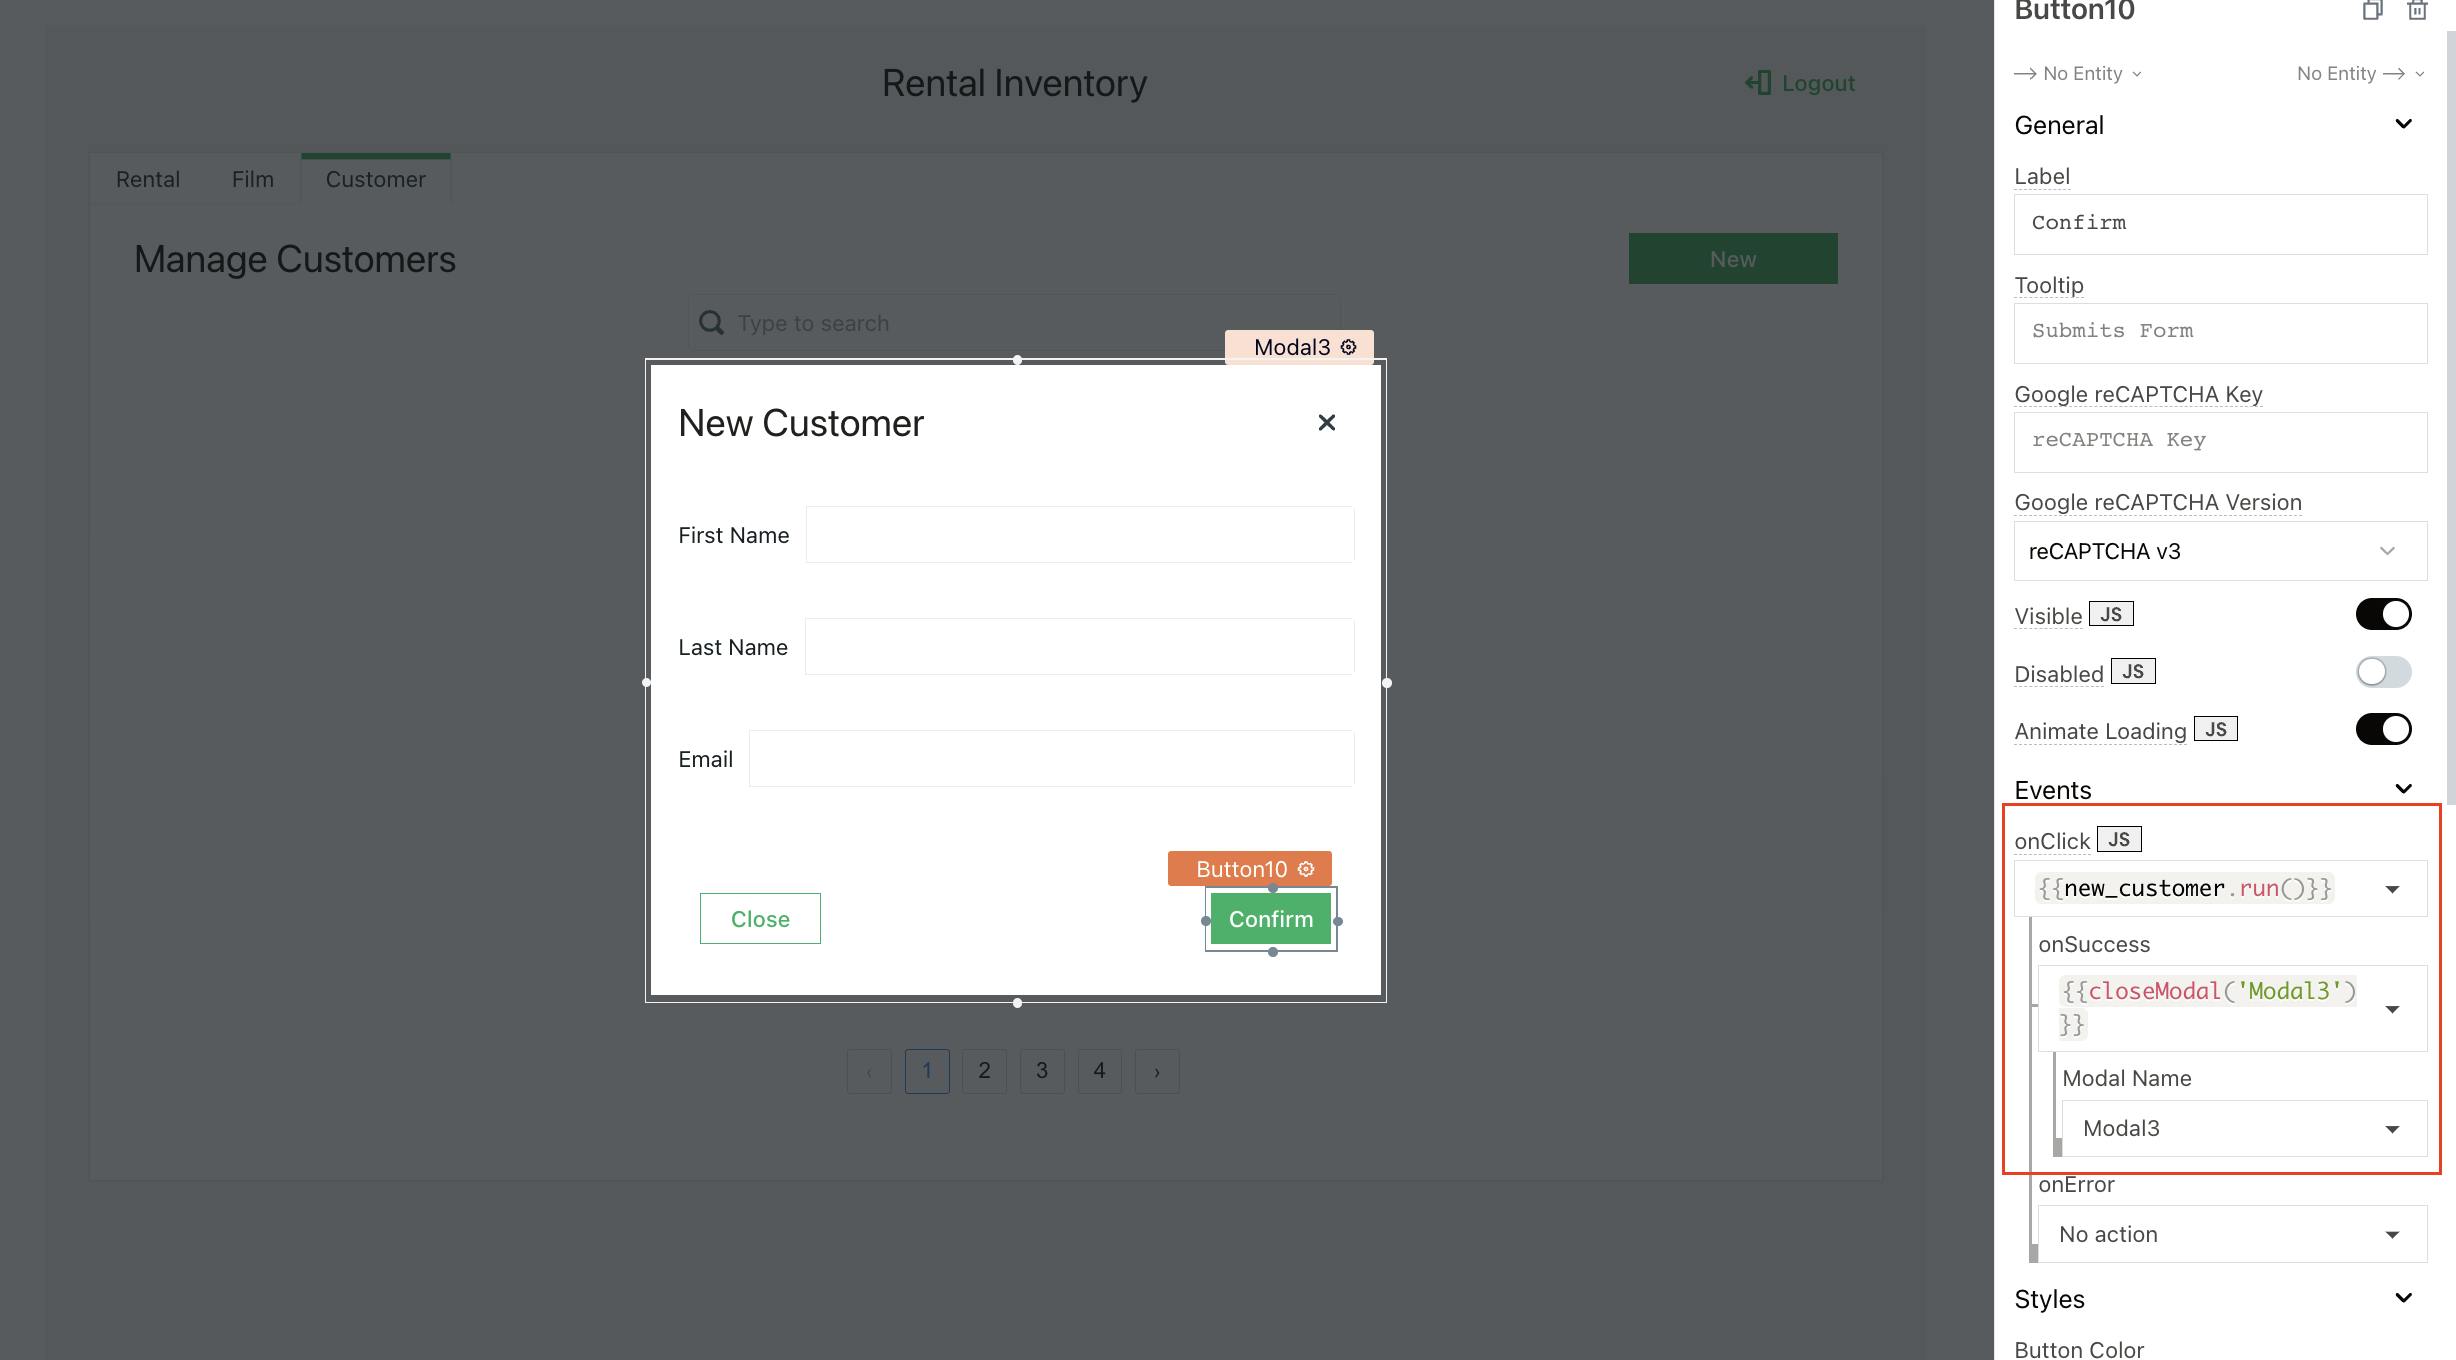
- Drop a Modal widget on the canvas and create a form to add new customers to the database. All are input widgets. Set this modal to open on the onClick event of the New button on the Customer tab
Step 5: Configure the Login page
- The next step is to create a query to retrieve the JWT tokens when the correct credentials are entered in the login form.
- On the Login page, click on the + icon next to Queries/JS. Select New Blank API
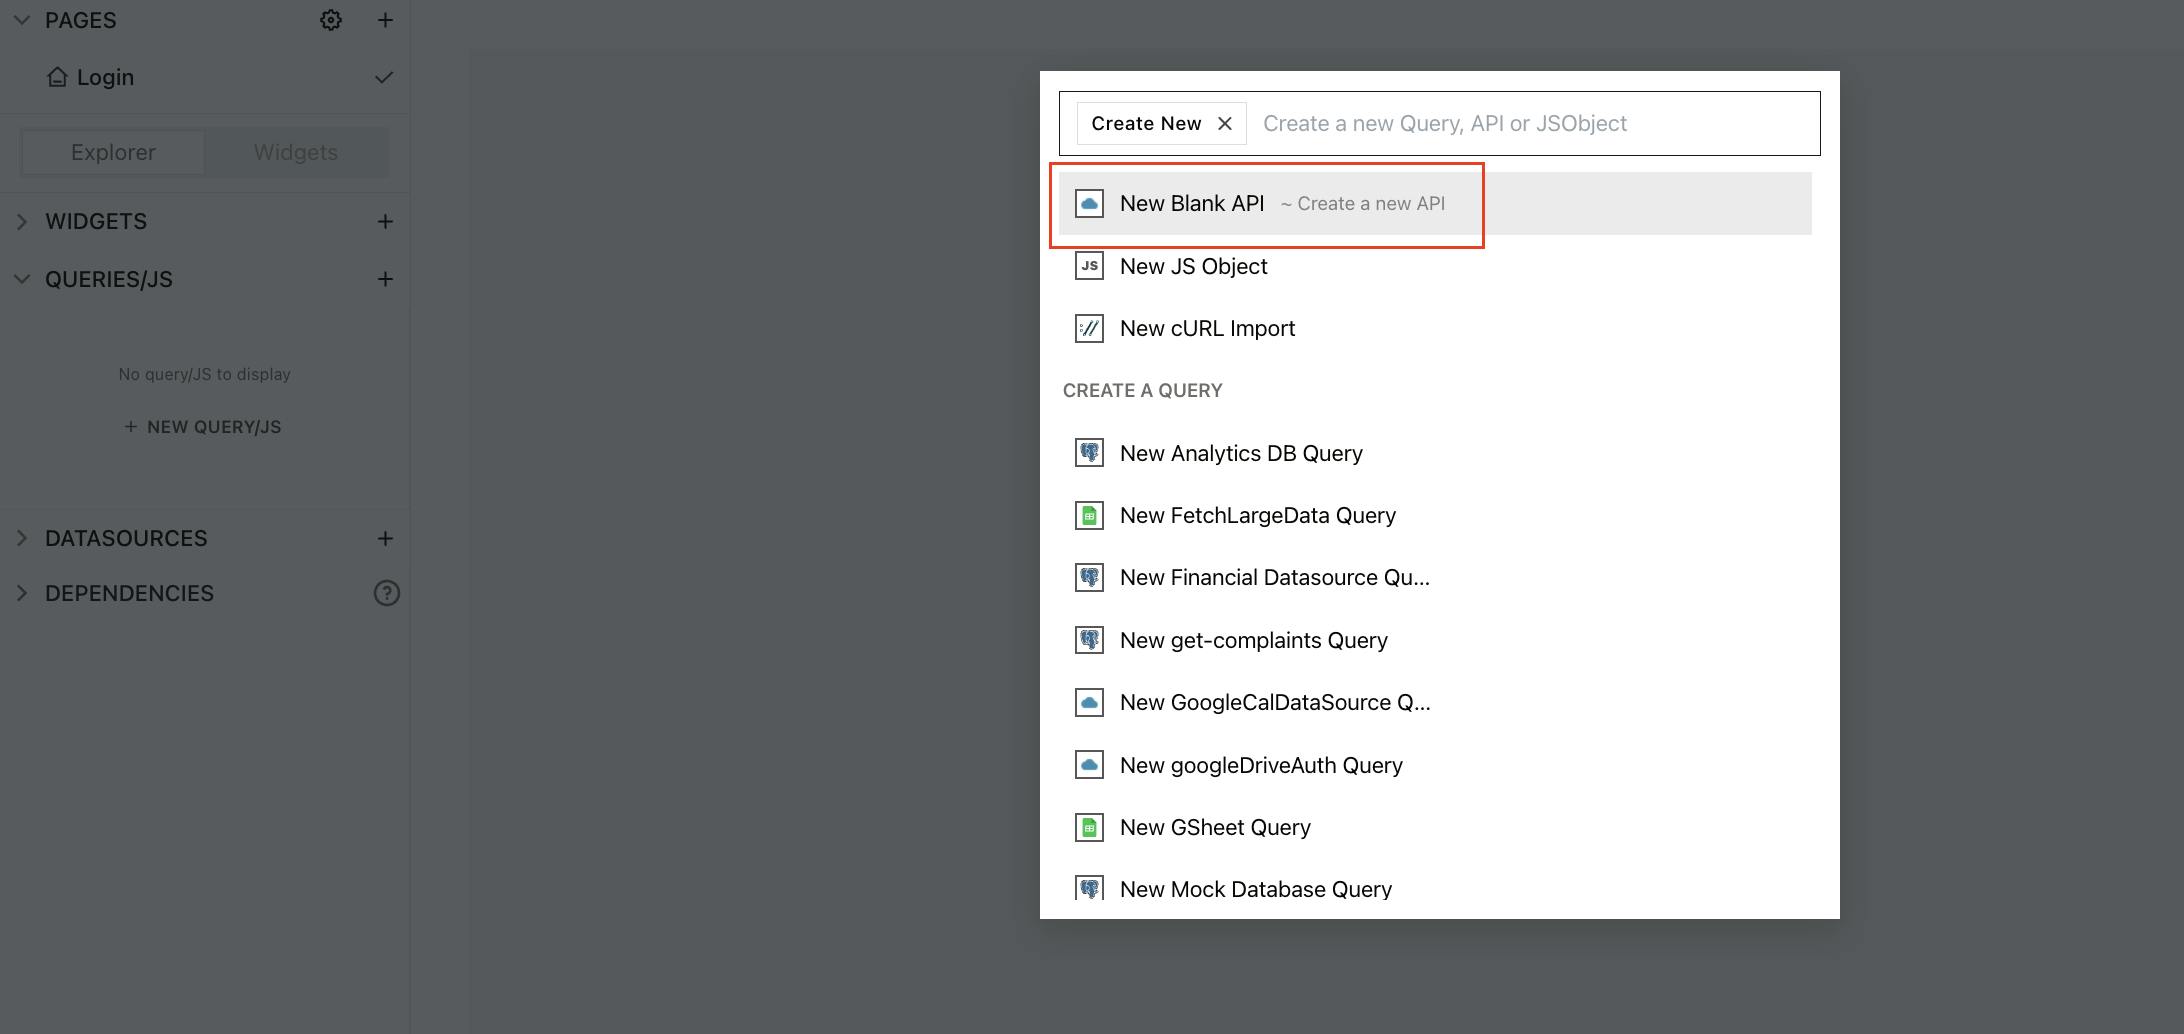
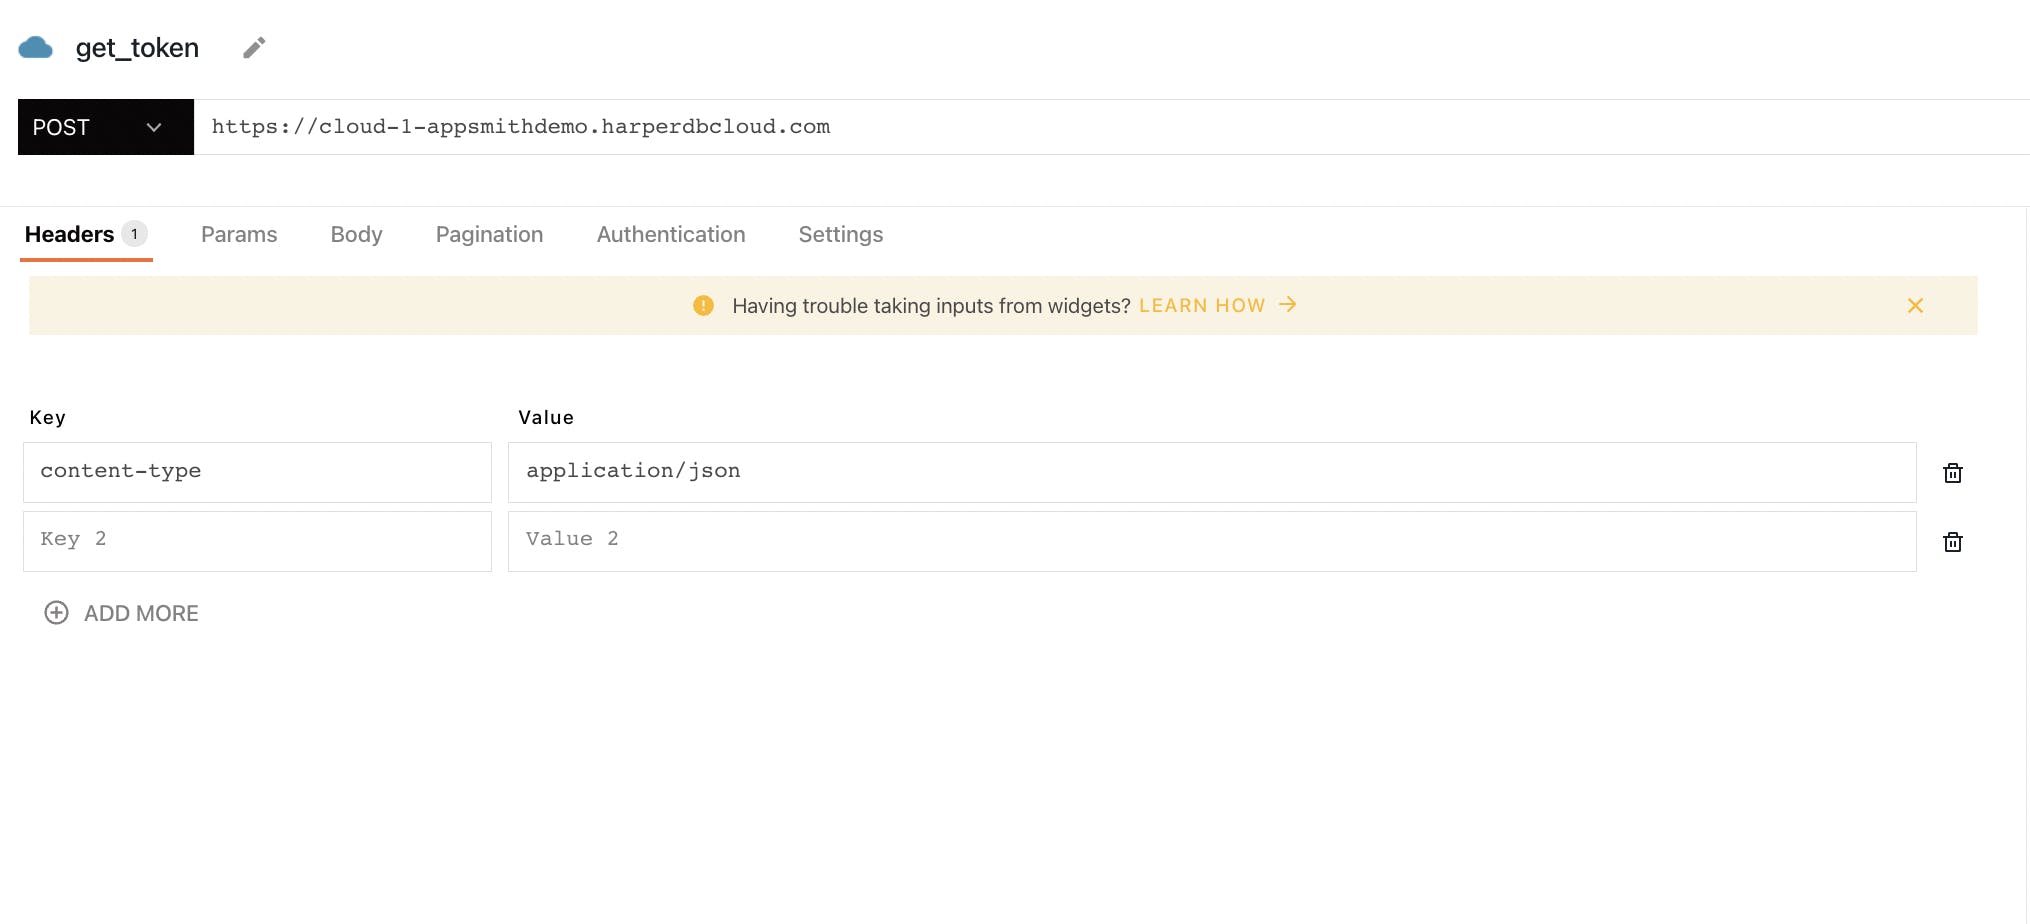
- On the API pane, rename Api1 to get_token and select the POST method. For the URL endpoint, enter the url of the HarperDB instance. You can copy paste this from your instance card on the HarperDB dashboard.
Under Headers, ensure that the content-type is application/json
- Under Body tab of the API pane, enter the following in Raw format. Notice here you are passing the username and password entered in the two input widgets on the form.
{
    "operation": "create_authentication_tokens",
    "username": "{{Input1.text}}",
    "password": "{{Input2.text}}"
}
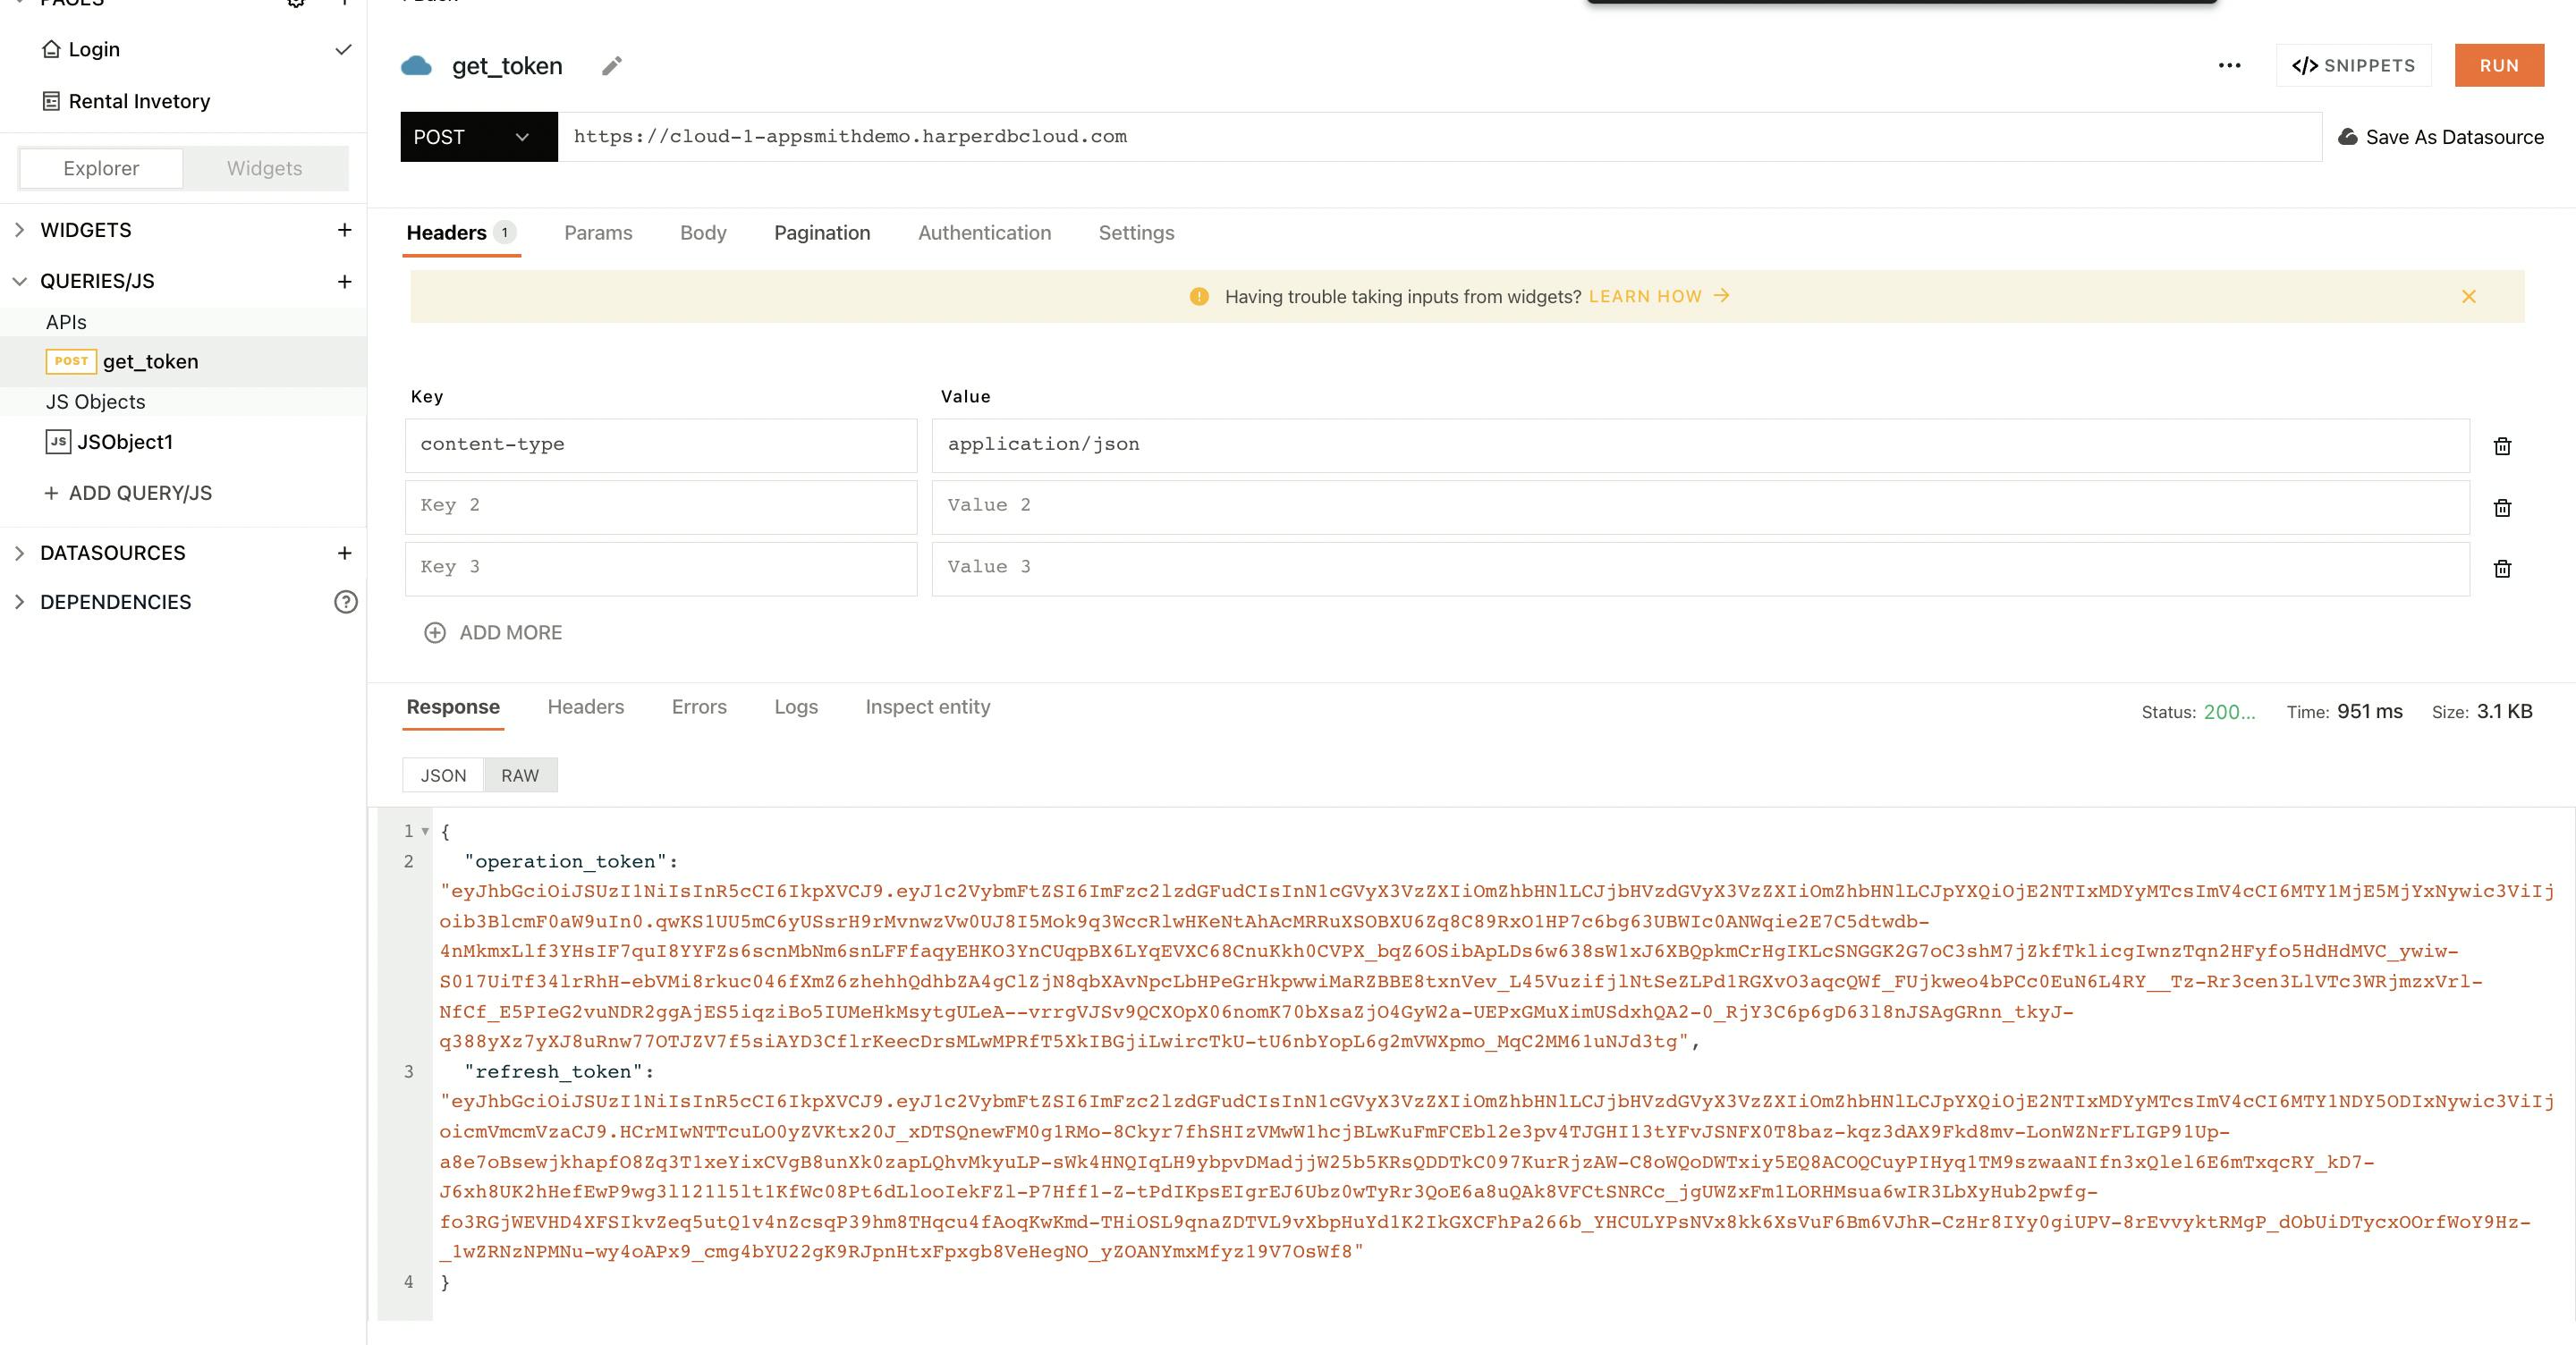
You can enter the username and password on the Login form and then test run the query to view the response. This query returns two tokens - The operation_token which is used to authenticate all HarperDB operations in the Bearer Token Authorization Header and the refresh_token which is used to generate a new operation_token upon expiry.
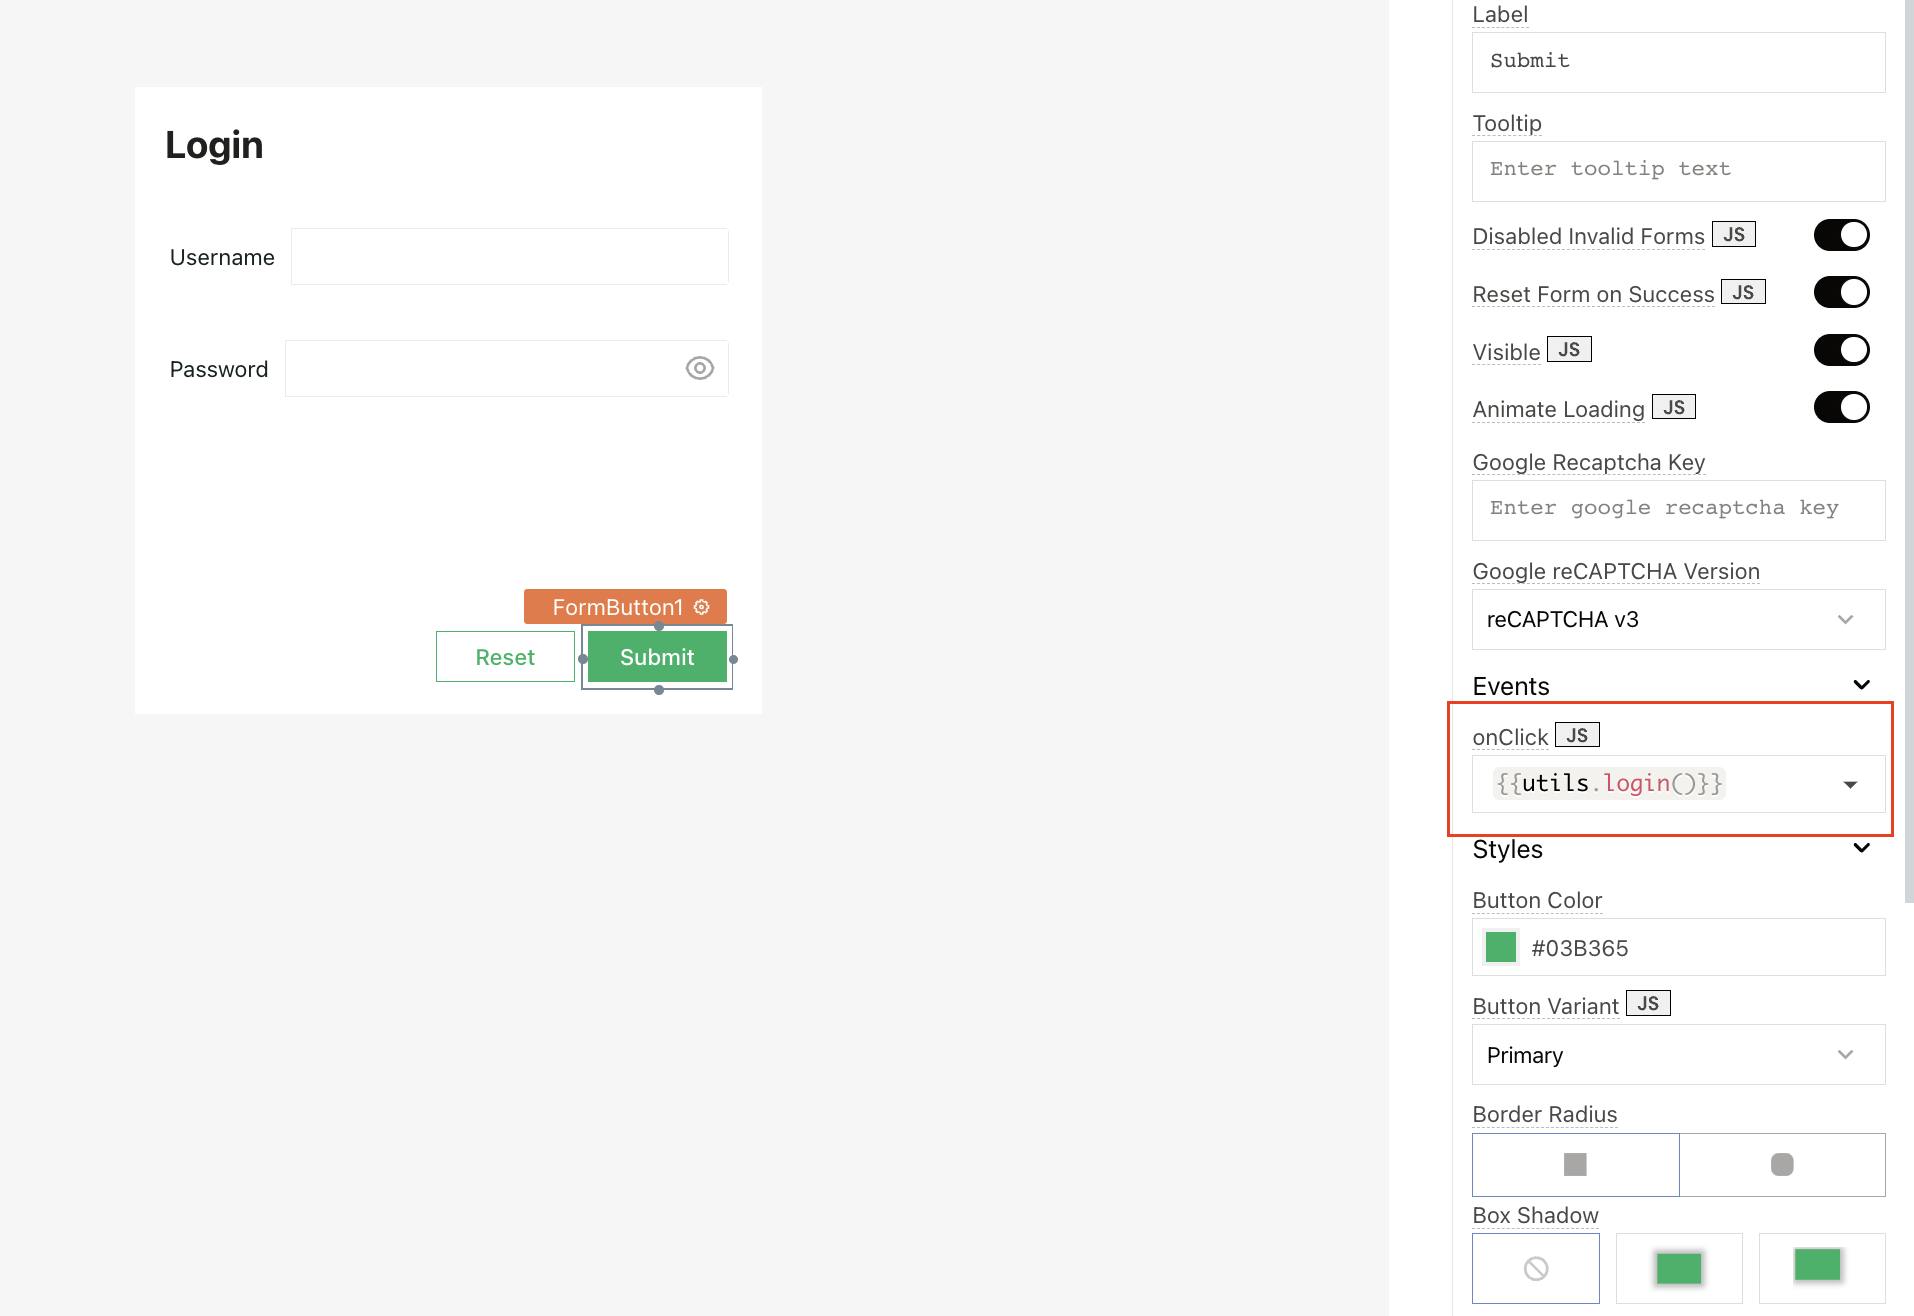
- Next, we are going to create a JavaScript function that will redirect the user to the main page (Rental Inventory) of the app based on credentials and their roles.
- Click on the + icon next to Queries/JS. Select New JS Object. Rename JSObject1 to utils and **paste the code snippet below in the JavaScript Editor.
export default {
    login: async () => {
        return get_token.run()
        .then(res => storeValue('user', {username: Input1.text, token: res.operation_token}))
        .then(() => navigateTo('App'))
        .catch(e => showAlert(e.message, 'error'))
    }
}
Note: storeValue is an Appsmith function that is used to store data in key-value pairs that can be accessed later anywhere in the application.
- Bind the JS Object to the onClick event of the Submit button on the login form.
Step 6: Write queries and bind data to widgets
- Create query to fetch data from Rental table in HarperDB and display it in the Table widget on Appsmith (rentalTable)
- On the Rental Inventory page, click on the + icon next to Queries/JS. Select New Blank API
- On the API pane, rename Api1 to get_rental and select the POST method. For the URL endpoint, enter the url of the HarperDB instance as shown in Step 5.
- Under Headers, add the following key-value pairs. We have to pass the Bearer token generated on successful login under Authorization.
| Key | Value |
| content-type | application/json |
| Authorization | Bearer {{appsmith.store.user.token}} |
- Under the Body tab of the API pane, enter the following in Raw format. This is an SQL query to fetch the data from the rental table and we are using server-side pagination to display data in the table widget (rentalTable), hence the limit and offset are set in the query.
{
    "operation": "sql",
    "sql": "SELECT * FROM movies.Rental LIMIT {{rentalTable.pageSize}} OFFSET {{(rentalTable.pageNo - 1) * rentalTable.pageSize}}"
}
- Bind the data from this query under Table Data property of the rentalTable table using the following snippet
{{get_rental.data}}
- You will notice the table widget populates with results from the query.
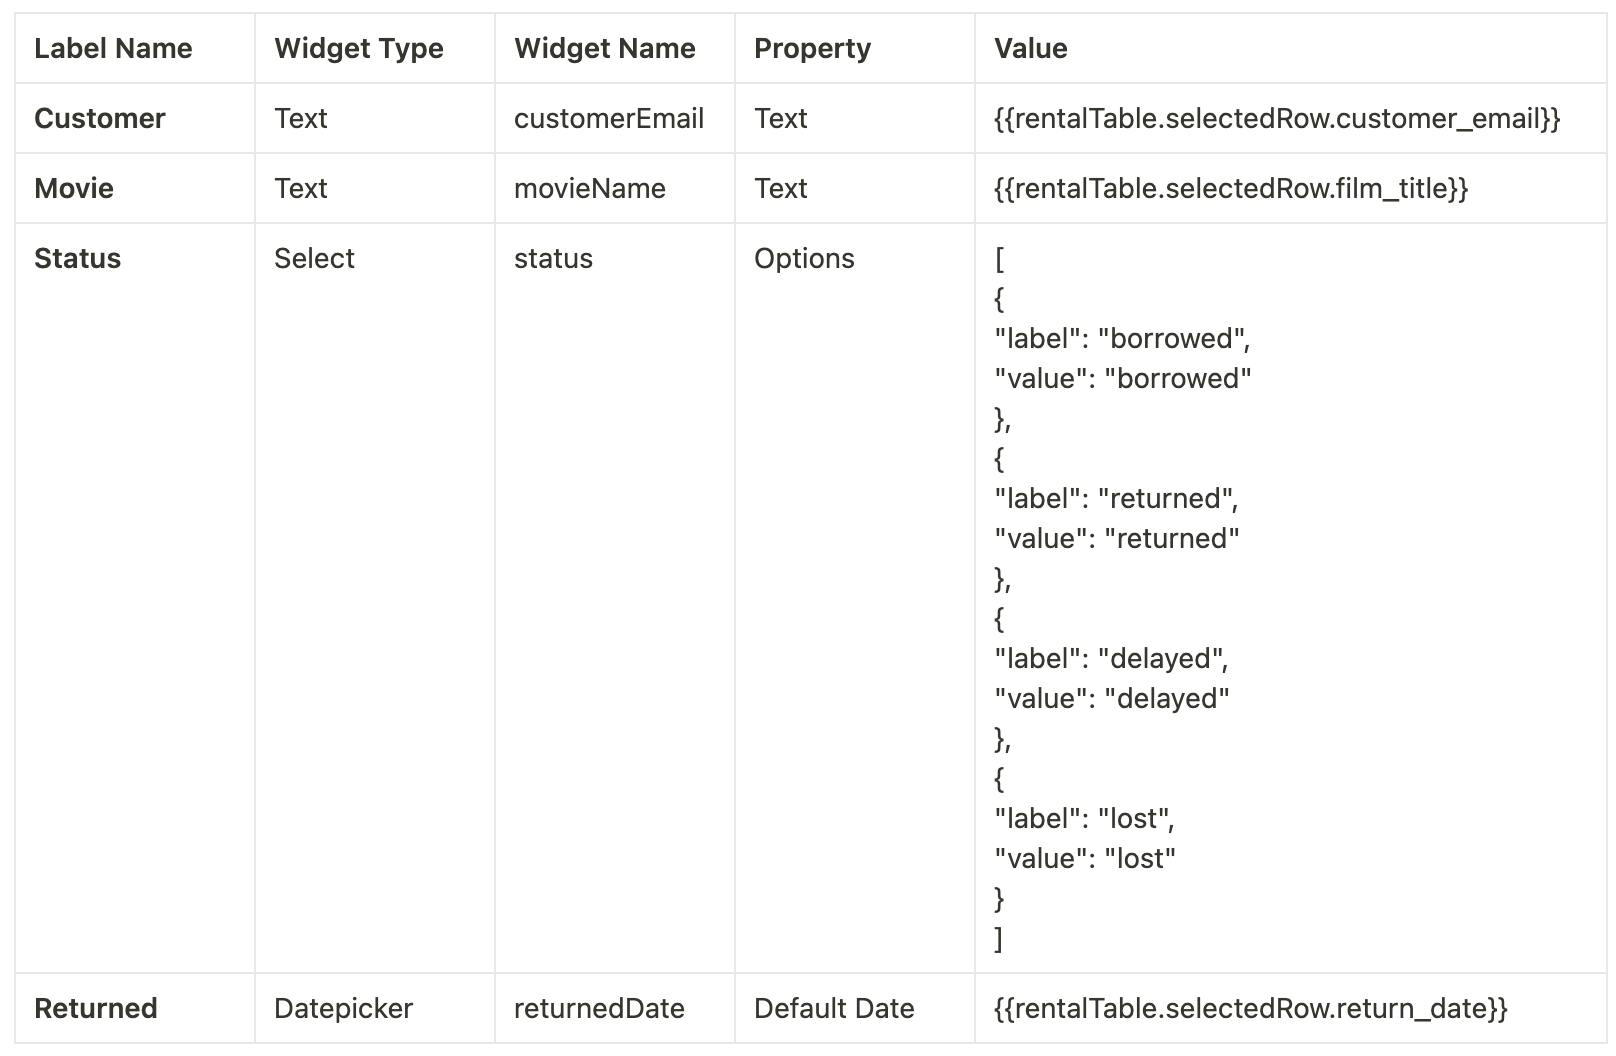
- Next, we will bind data to the widgets on the Update form to the right of the table. When a user click on the table row, the corresponding details should be displayed on the form.
- For the Rental Update form, set the widgets in the following manner. Notice that we are manually adding the values in the Status select widget so that the status of the rental can be updated on the form.
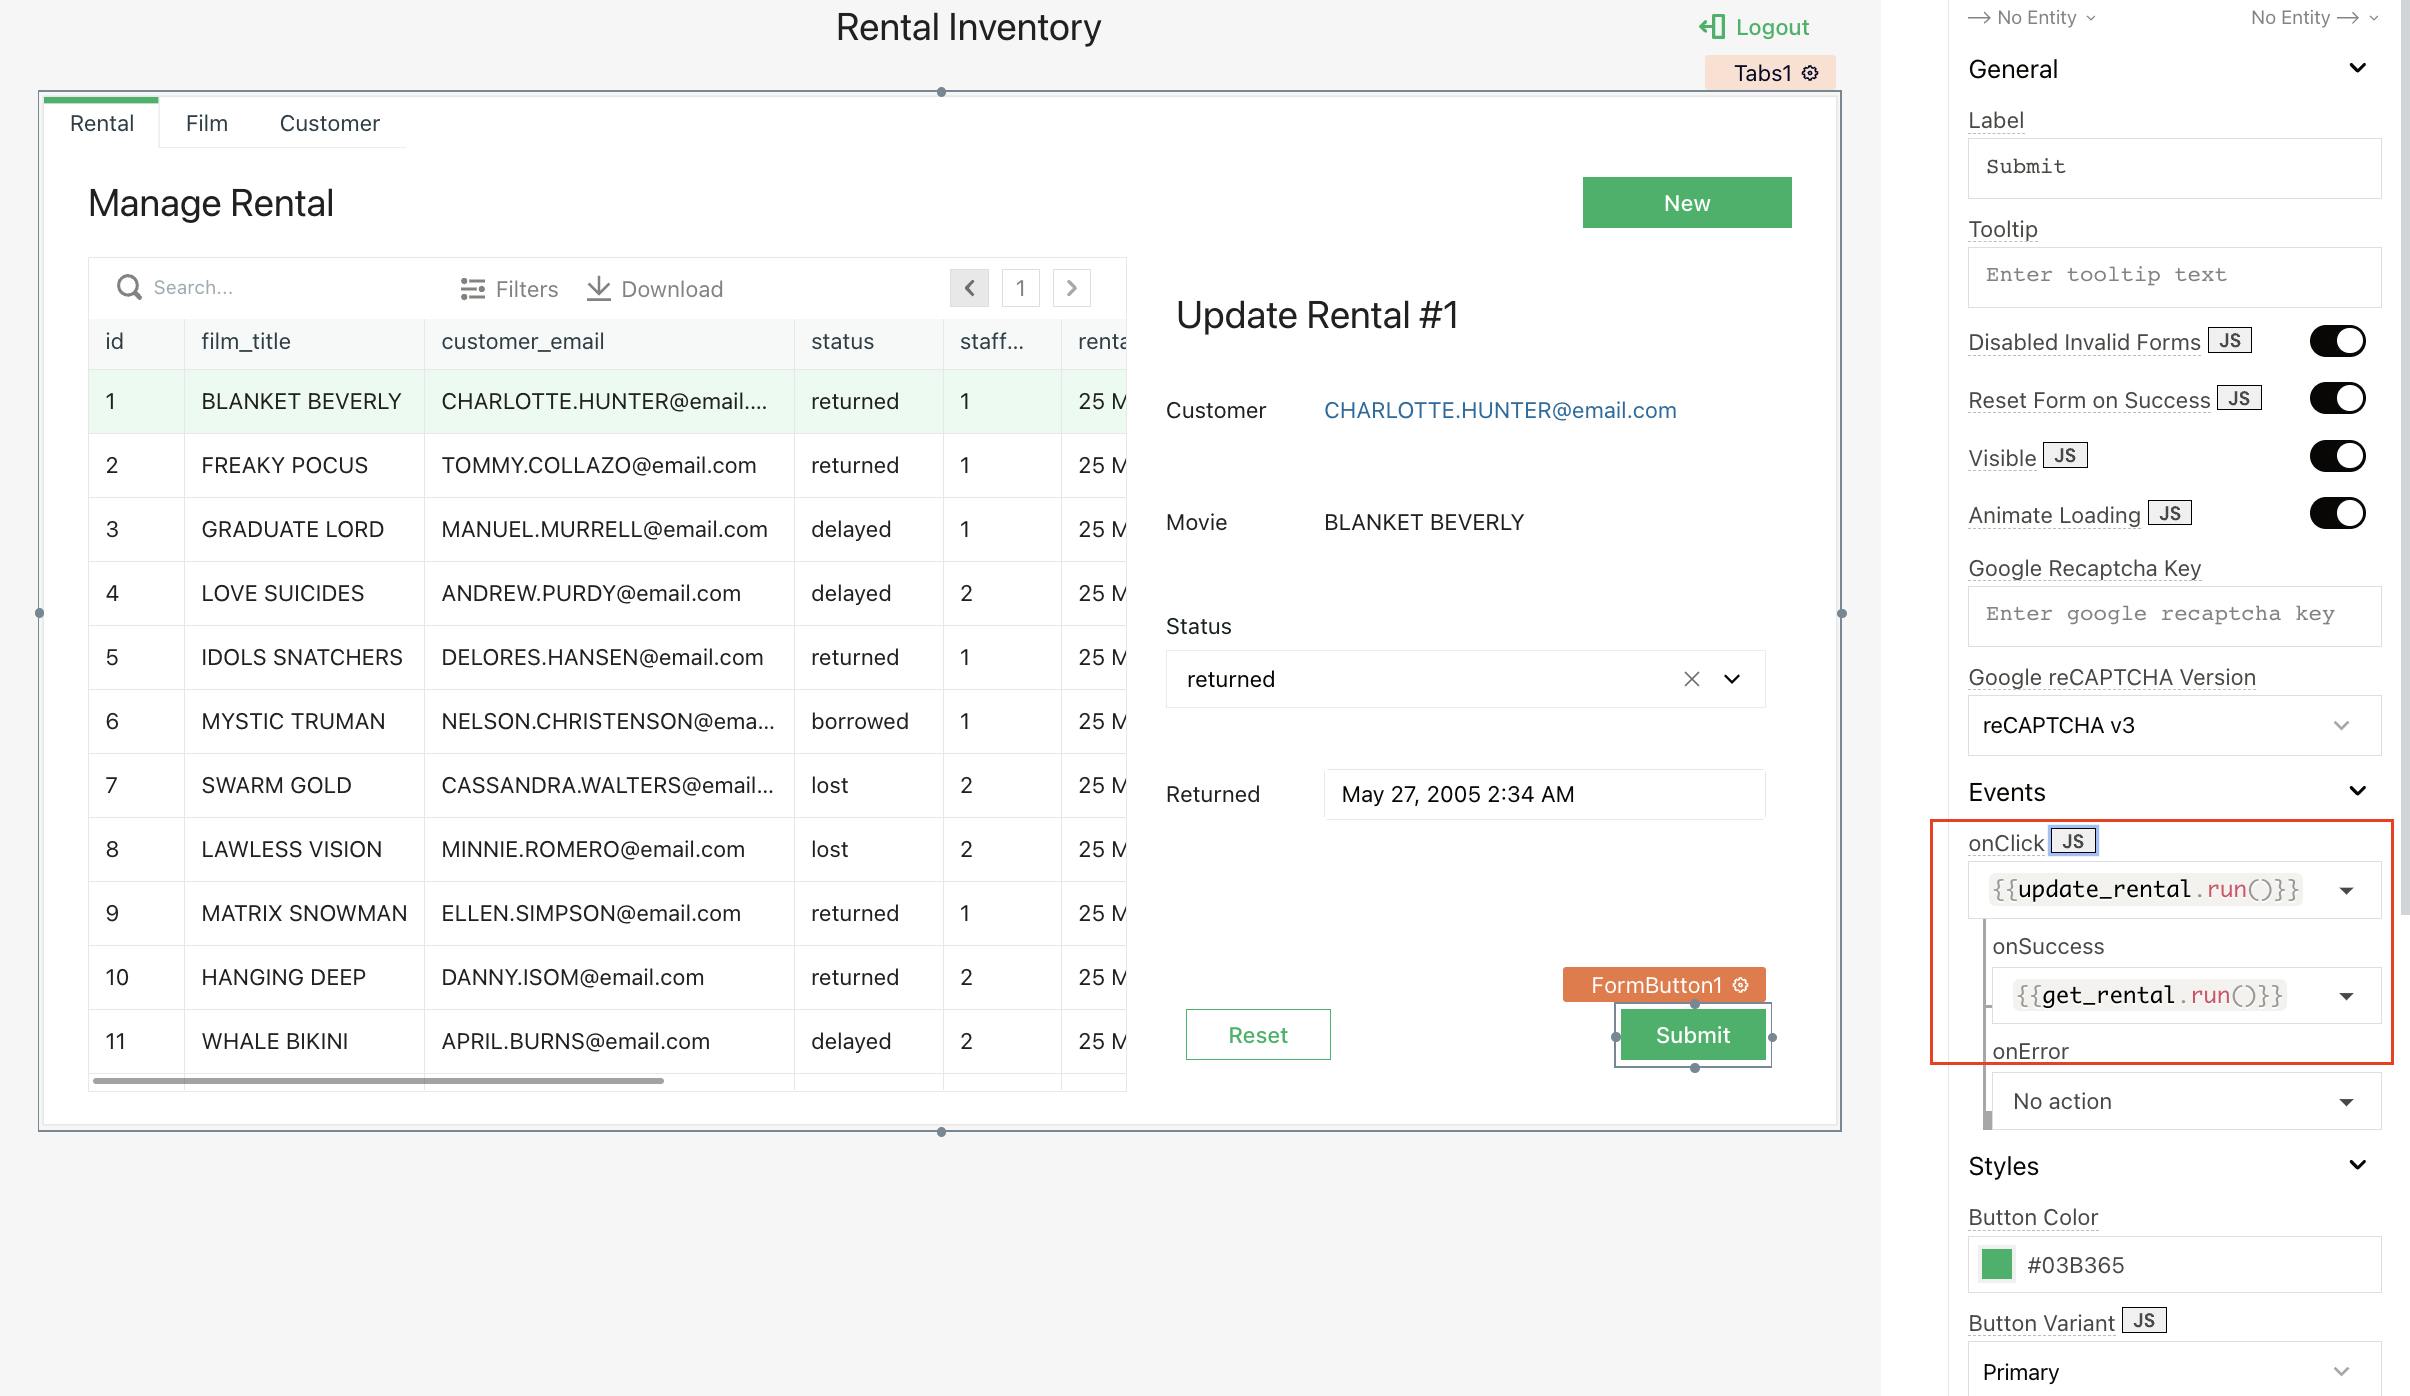
- Create a query to update the Rental status and Returned date on this form.
- On the Rental Inventory page, click on the + icon next to Queries/JS. Select New Blank API
- On the API pane, rename Api1 to update_rental and select the POST method. Repeat the same steps as above for the URL endpoint and the Headers
- In the Body tab of the API pane, enter the following under Raw tab
{
    "operation": "update",
    "schema": "movies",
    "table": "Rental",
    "records": [
        {
            "id": {{rentalTable.selectedRow.id}},
            "status": {{status.selectedOptionValue}},
                        "return_date": {{returnedDate.selectedDate}}
        }
    ]
}
- Hook this query on the onClick event of the Submit button on the Update Rental form. On success of this query also run the get_rental query to repopulate the table widget with updated data.
Create API query named search_customer with headers same as before with the following code snippet under Body tab of the API pane in Raw format
  {
      "operation": "search_by_value",
      "schema": "movies",
      "table": "Customer",
      "search_attribute": "email",
          "limit": 10,
      "search_value": {{`*${rentalCustEmail.filterText}*`}},
      "get_attributes": [
          "id", "email"
      ]
  }
Create another API query named search_film with the following code snippet under Body tab of the API pane in Raw format
  {
      "operation": "search_by_value",
      "schema": "movies",
      "table": "Film",
      "search_attribute": "title",
          "limit": 10,
      "search_value": {{`*${filmTitle.filterText}*`}},
      "get_attributes": [
          "id", "title"
      ]
  }
Create a third query name new_rental to add new rental information with the following code snippet under Body tab of the API pane in Raw format
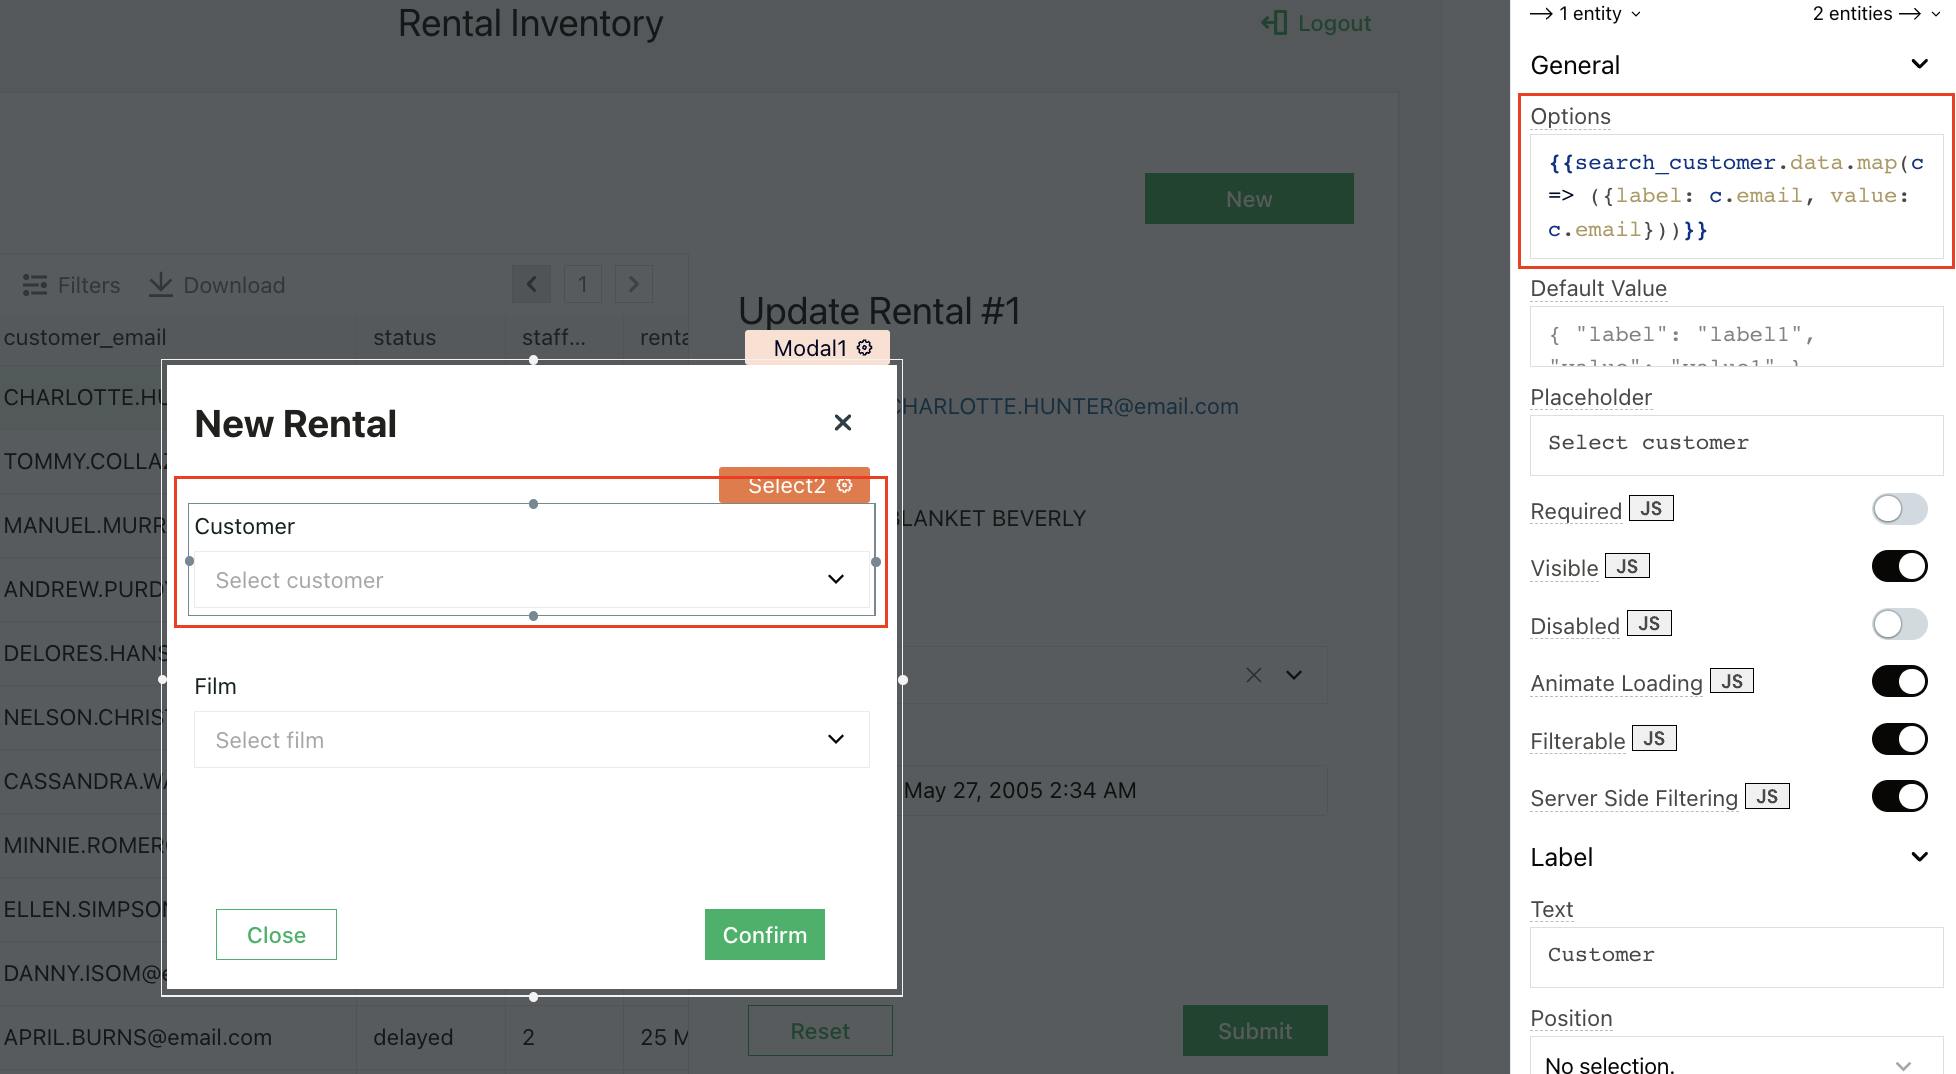
  {
      "operation": "upsert",
      "schema": "movies",
      "table": "Rental",
      "records": [
          {
                          "film_title": {{filmTitle.selectedOptionValue}},
                          "rental_date": {{moment().utc()}},
                          "staff_id": {{appsmith.store.user.username == 'assistant'? 2: 1}},
                          "customer_email": {{rentalCustEmail.selectedOptionValue}},
                          "status": "borrowed"
          }
      ]
  }
Open the modal by clicking the New button on the Rental tab. On Customer select widget write the following code snippet to populate the customer email ids from the search_customer query
{{search_customer.data.map(c => ({label: c.email, value: c.email}))}}
Similarly, populate the Film select widget from the search_film with **below code snippet.**
{{search_film.data.map(m => ({label: m.title, value: m.title}))}}Set the new_rental query to run on the onClick event of the Confirm button on the modal.
- Repeat the above steps for the Film Tab.
- The Update Form on the Film tab has the following data bindings
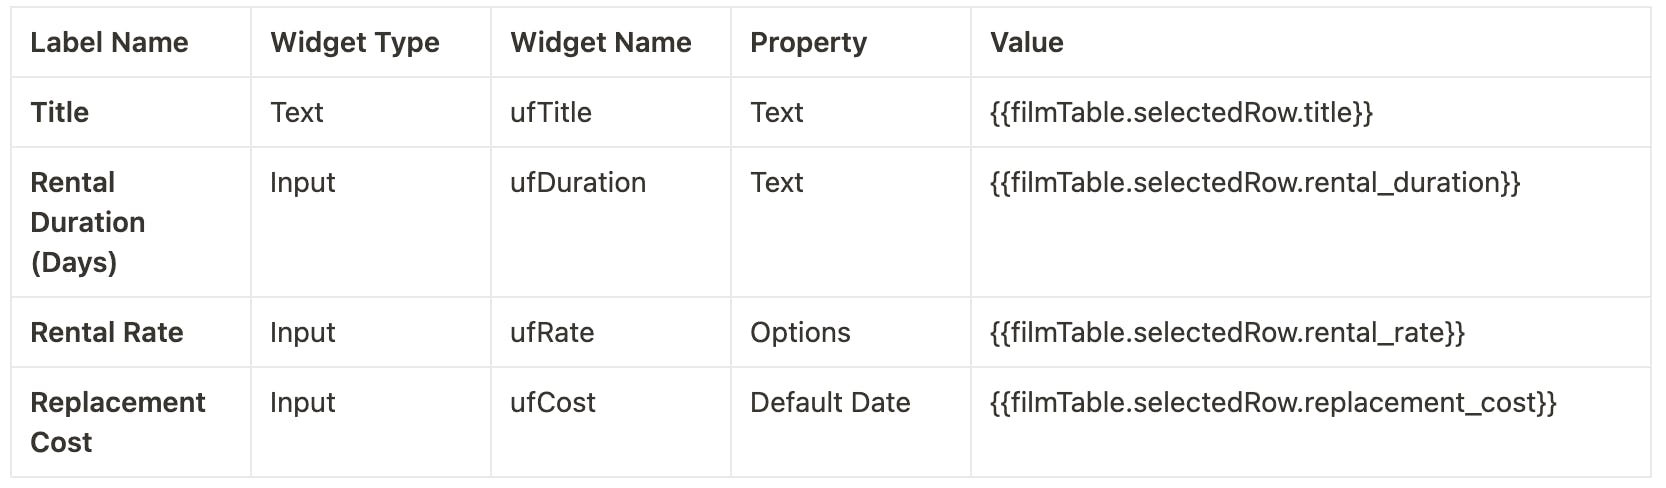
- Create an API query named update_film with the following code snippet under Body tab of the API pane in Raw format. **Bind this query to run on the onClick action of the onClick event of the Submit button on the Update Film** form
{
    "operation": "update",
    "schema": "movies",
    "table": "Film",
    "records": [
        {
                    "id": {{filmTable.selectedRow.id}},
                    "rental_duration": {{ufDuration.text}},
                    "rental_rate": {{ufRate.text}},
                    "replacement_cost": {{ufCost.text}}
        }
    ]
}
Let’s configure the queries to run to add new film data. Create API query named create_film with headers same as before. Add the following code snippet under Body tab of the API pane, enter the following in Raw
  {
      "operation": "upsert",
      "schema": "movies",
      "table": "Film",
      "records": [
          {
                      "title": {{cfTitle.text}},
                      "description": {{cfDescription.text}},
                      "release_year": {{cfReleaseYear.text}},
                      "rental_duration": {{cfDuration.text}},
                      "rental_rate": {{cfRate.text}},
                      "replacement_cost": {{cfCost.text}}
          }
      ]
  }
Open the modal by clicking the New button on the Film tab. Set the create_film query to run on the onClick event of the Confirm button on the modal. Close the modal and rerun the get_film query to refresh the Film table widget on success of the query.
- Finally on the Customer page, write queries for the search input widget (customerSearchInput) and for displaying data in the list(customerList) below.
- Create query called get_customers with the following under Body tab of the API pane.
{
    "operation": "search_by_value",
    "schema": "movies",
    "table": "Customer",
    "search_attribute": "email",
        "limit": 10,
    "search_value": "{{`*${customerSearchInput.text}*`}}",
    "get_attributes": [
        "id", "email", "first_name", "last_name"
    ]
}
Bind this query to the onTextChanged action of the customerSearchInput box
{{get_customers.run()}}
- Bind the results of this query {{get_customers.data}} to the Items property of the customerList box
Let’s configure the queries to run to add new Customer data. Create API query named new_customer with headers same as before. Add the following code snippet under Body tab of the API pane, and enter the following in Raw
  {
      "operation": "upsert",
      "schema": "movie",
      "table": "customer",
      "records": [
          {
                          "first_name": {{ncFNameInput.text}},
                          "last_name": {{ncLNameInput.text}},
                          "email": {{ncEmailInput.text}}
          }
      ]
  }
Open the modal by clicking the New button on the Film tab. Set the new_customer query to run on the onClick event of the Confirm button on the modal. Close the modal on success.
Step 7: Control access to information based on user roles
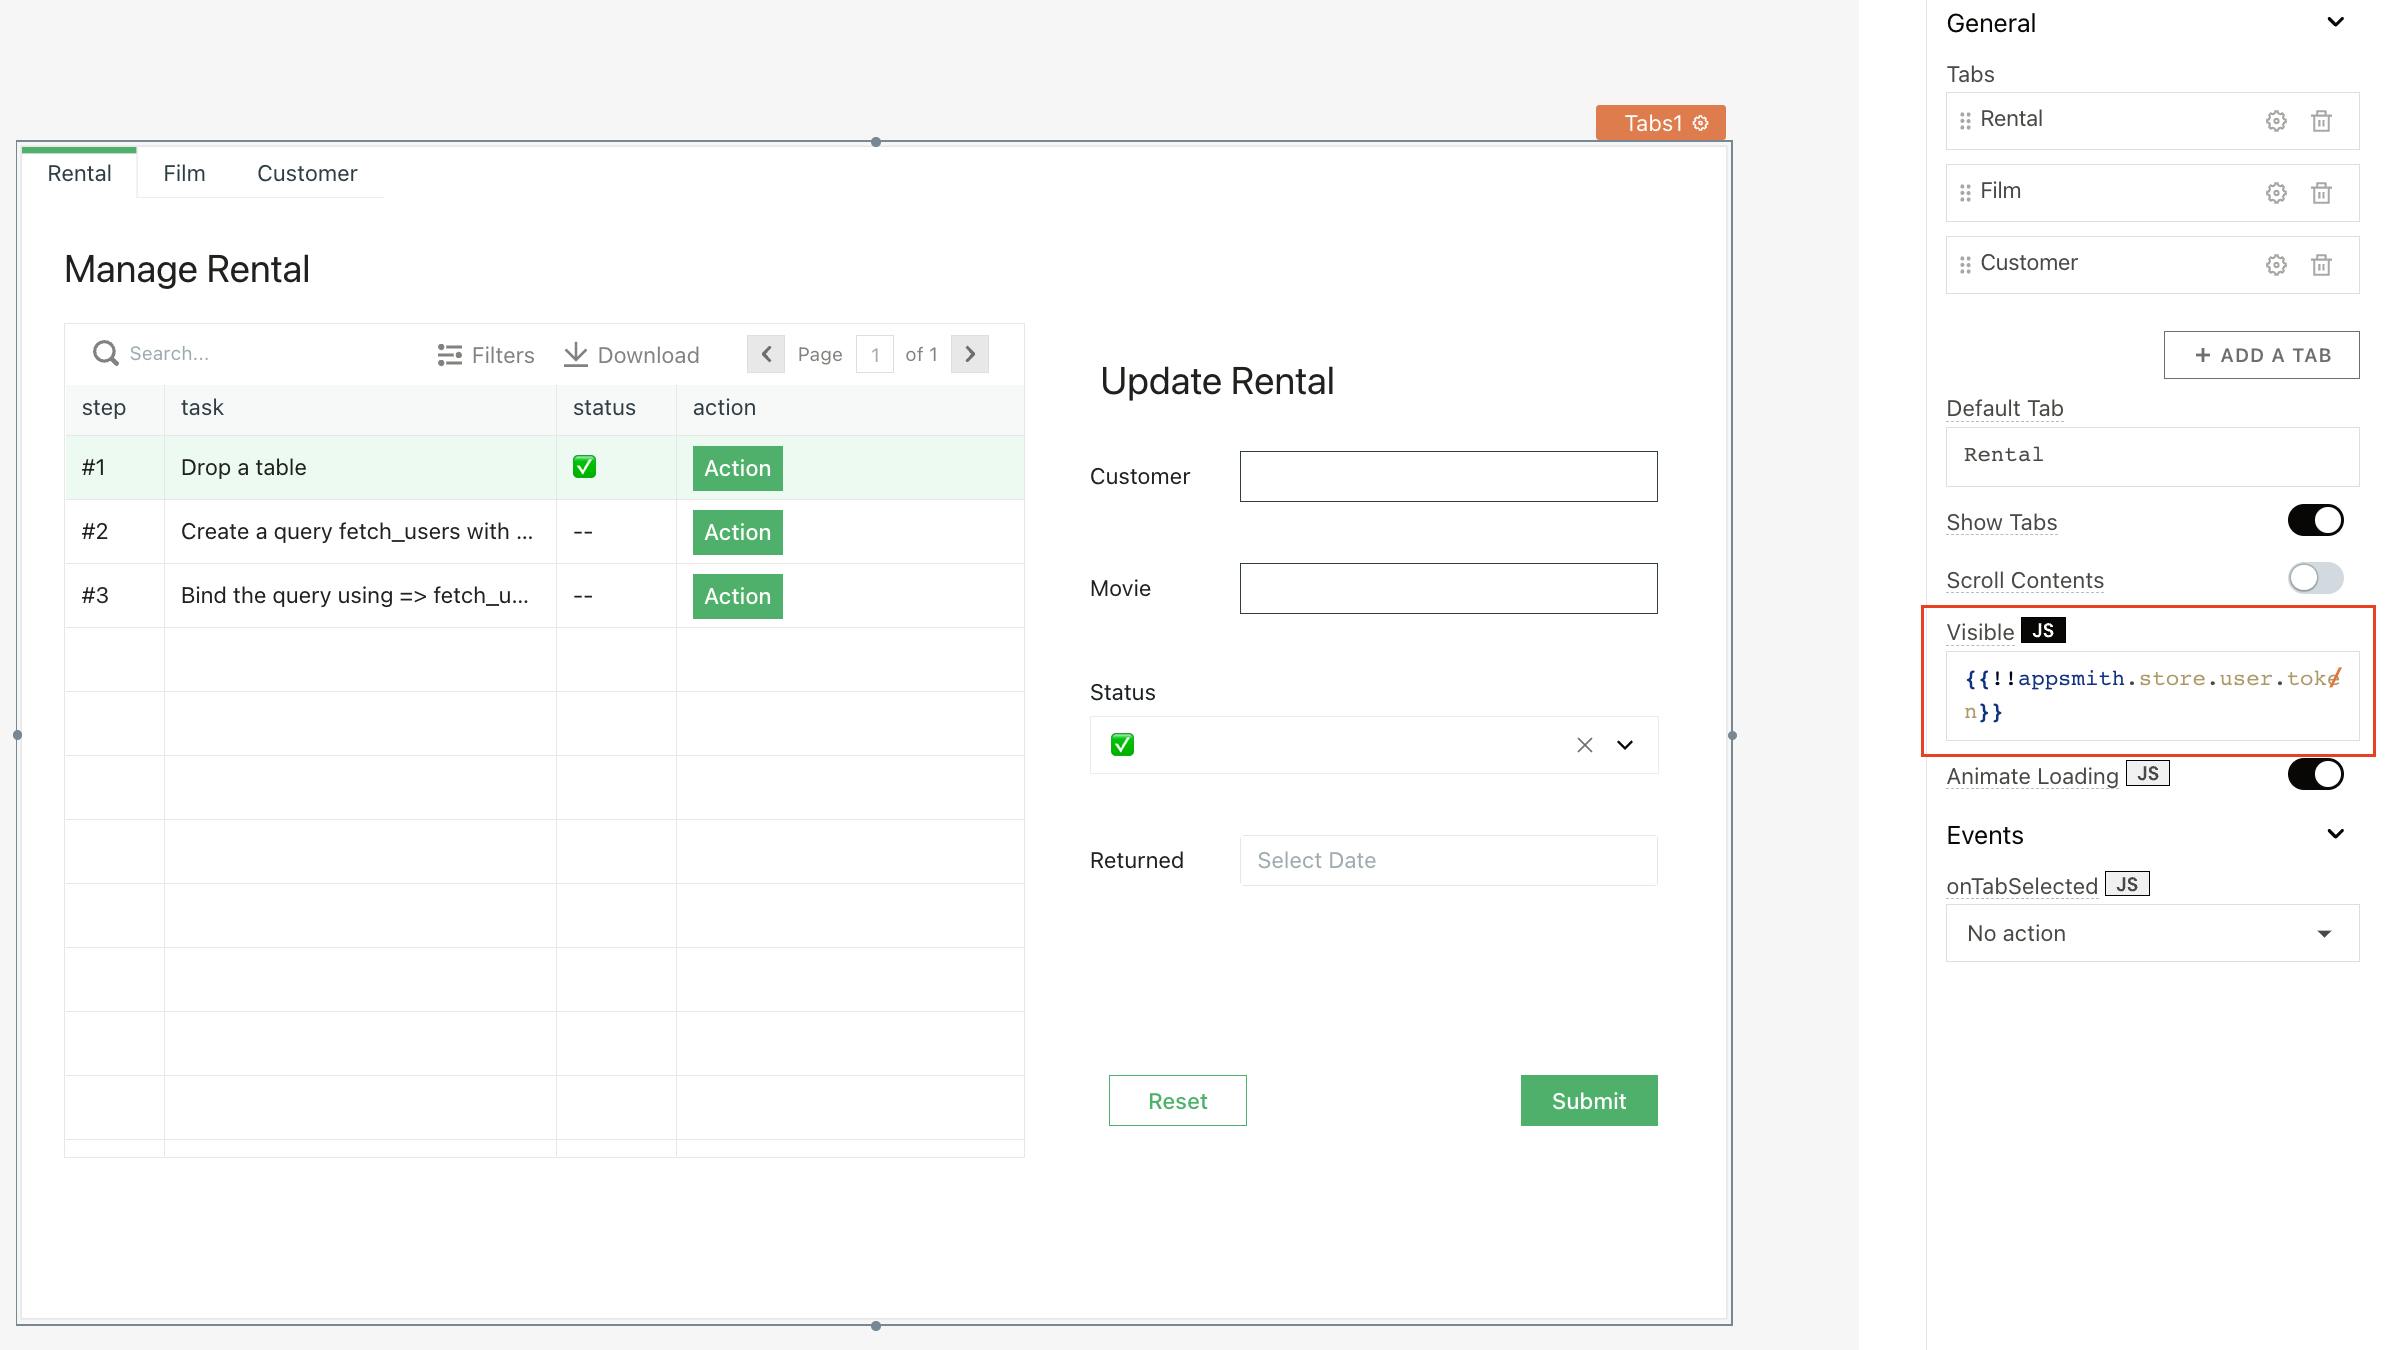
- On the Rental Inventory page, set the Visibility of the Tab widget to show only if the login process returns tokens on success. Toggle the JS button next to the Visible property to enter the following code snippet
{{!!appsmith.store.user.token}}
- The Rental tab is visible to both the Manager and Assistant roles so we leave its visibility as is
- The Film and Customer tab should only be visible to the Manager
- The Visible property of the individual tabs can be accessed by clicking on the gear icon next to the tab name
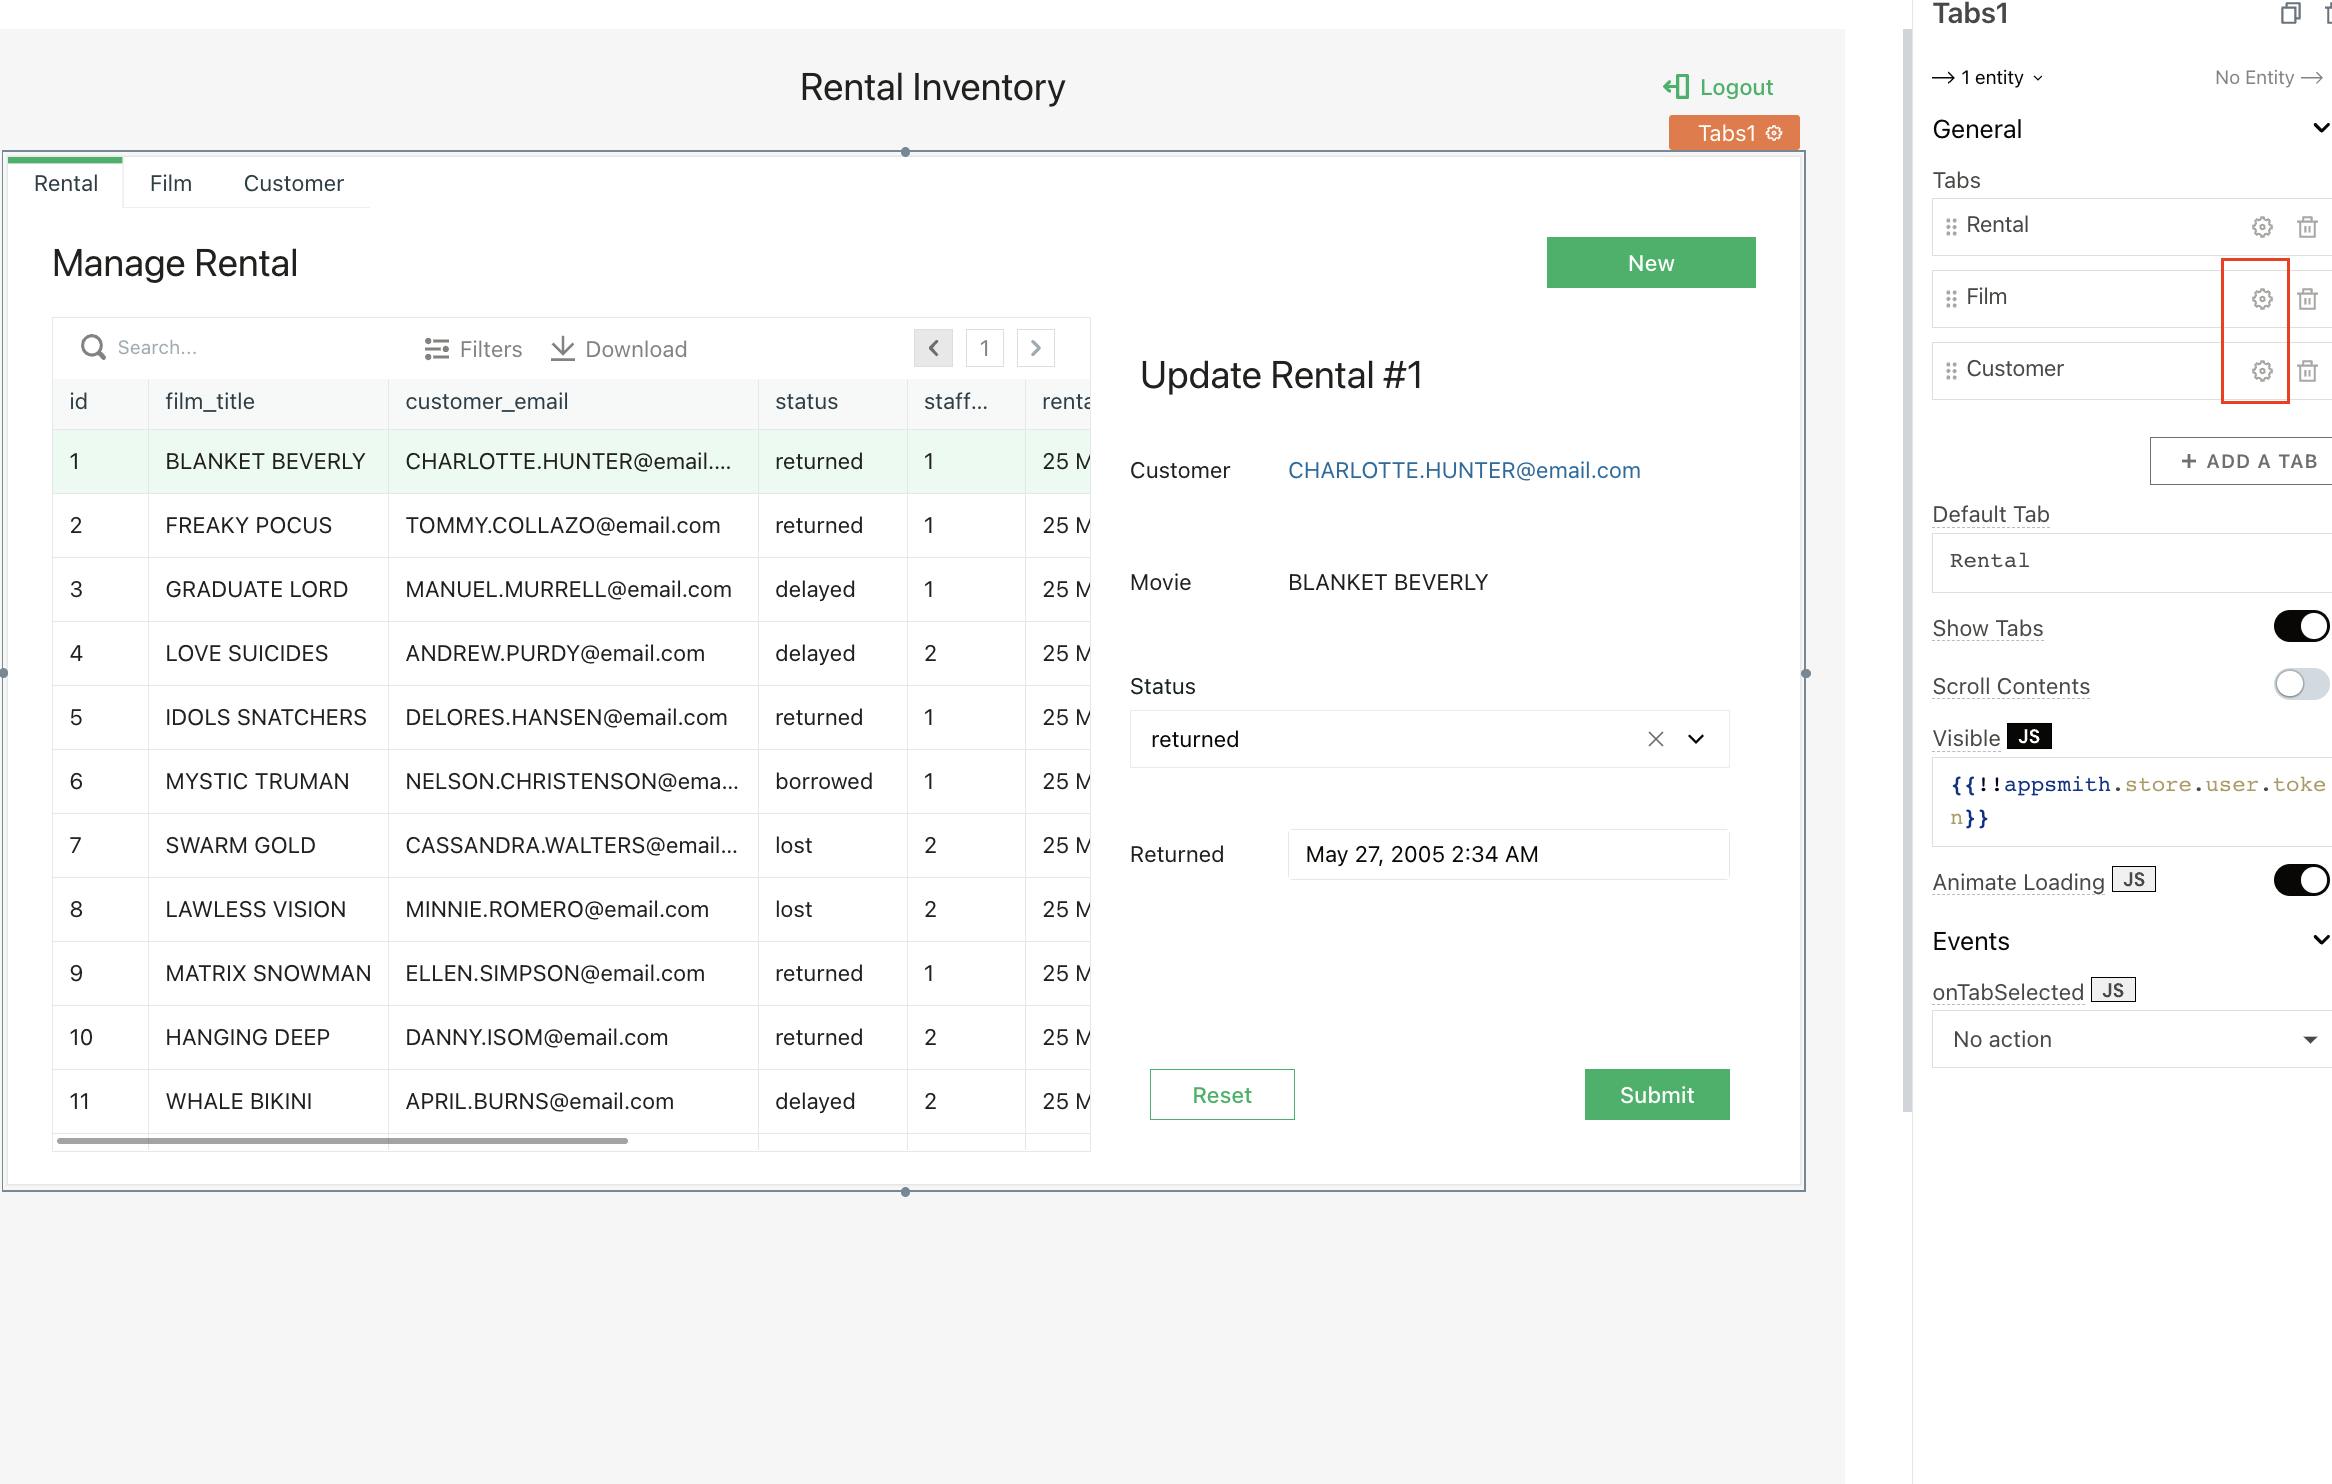
- Add the following snippet of code in the Visible property of both the tabs
{{appsmith.store.user.username !== 'assistant'}}
Step 8: Configure the Logout button
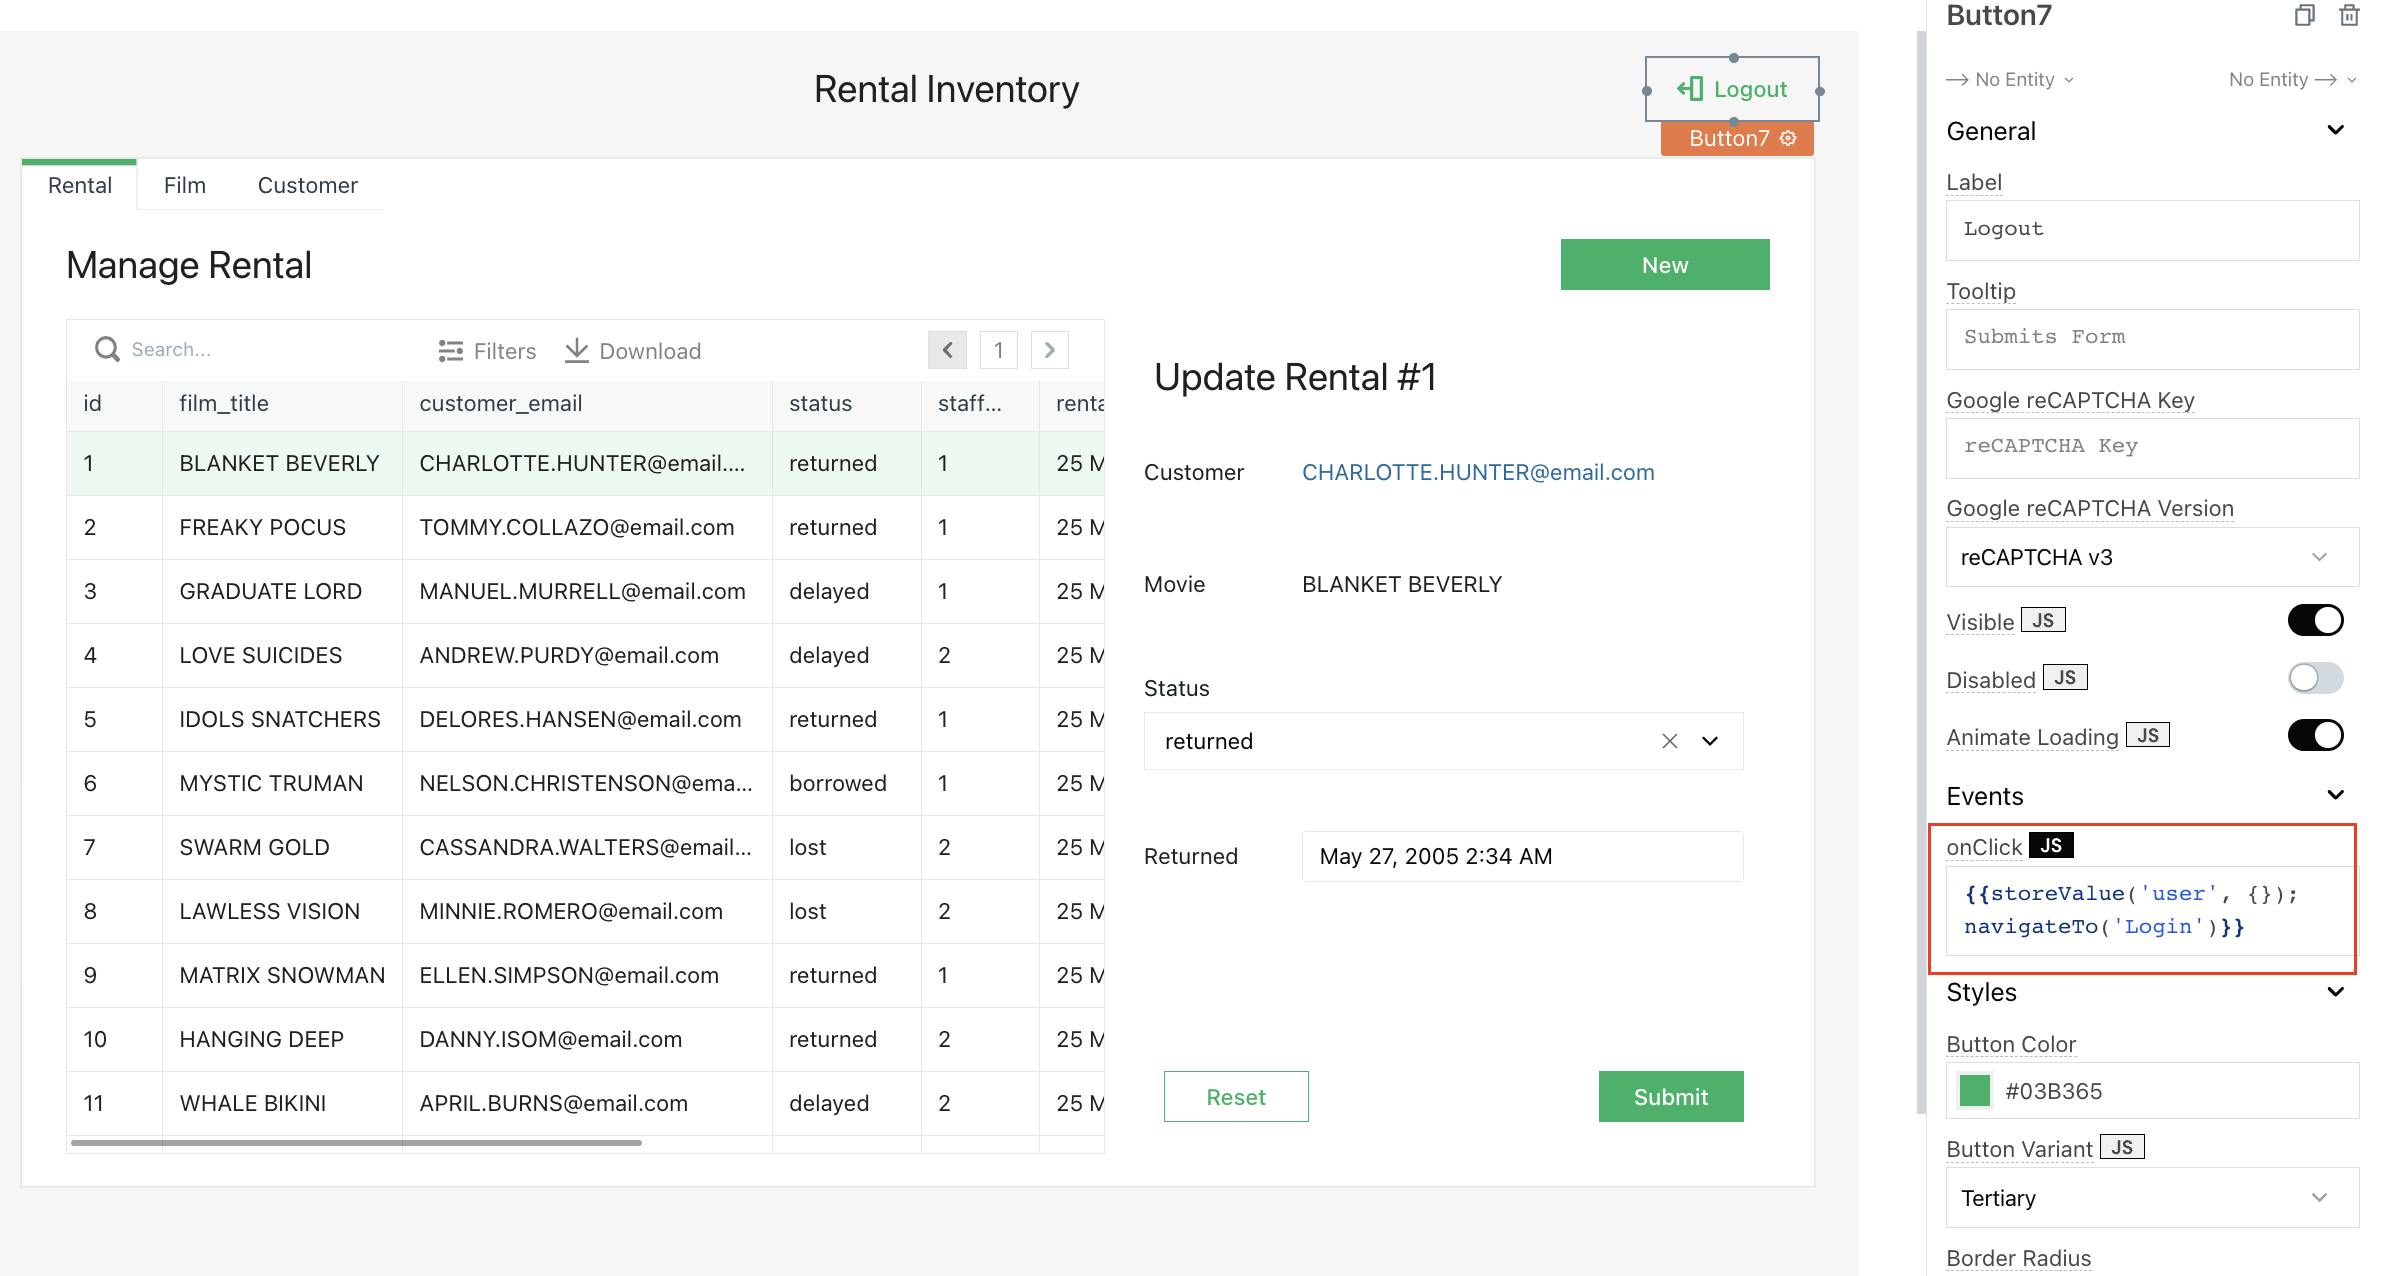
When the user clicks on the Logout button, we will clear the username and token information in the store variable and redirect the user to the Login page. Add the following snippet of code on the onClick event of the Logout button.
{{storeValue('user', {}); navigateTo('Login')}}
So far, we've done a great job. The last part of this project will deploy our application. On the dashboard's top right section, click on the 'Deploy' button. You can also deploy this application by connecting to a Git repository. Our application is now deployed!
If you're interested in using a database not listed on our website as an integration, please let us know about it by raising a PR on Github, and we will do our best to include it at the earliest.
Join our growing community on Discord, and follow us on Youtube and Twitter to stay up to date.