Managing leaves is hard. But sudden issues can arise with anyone, anytime, and organisations must keep a clear record of all the employees leaves to maintain proper working with constant efficiency month-by-month. But there's no time to really set a system in place for accountability, and they were forced to use Google Sheets to maintain these.
But not everyone are comfortable using Google Sheets, anyone can make edit’s to it once given access, and the process of approving and rejecting leaves by founders or managers is out of context. Hence, we at Appsmith came up with an internal app for leave management. It’s minimal and super easy to use.
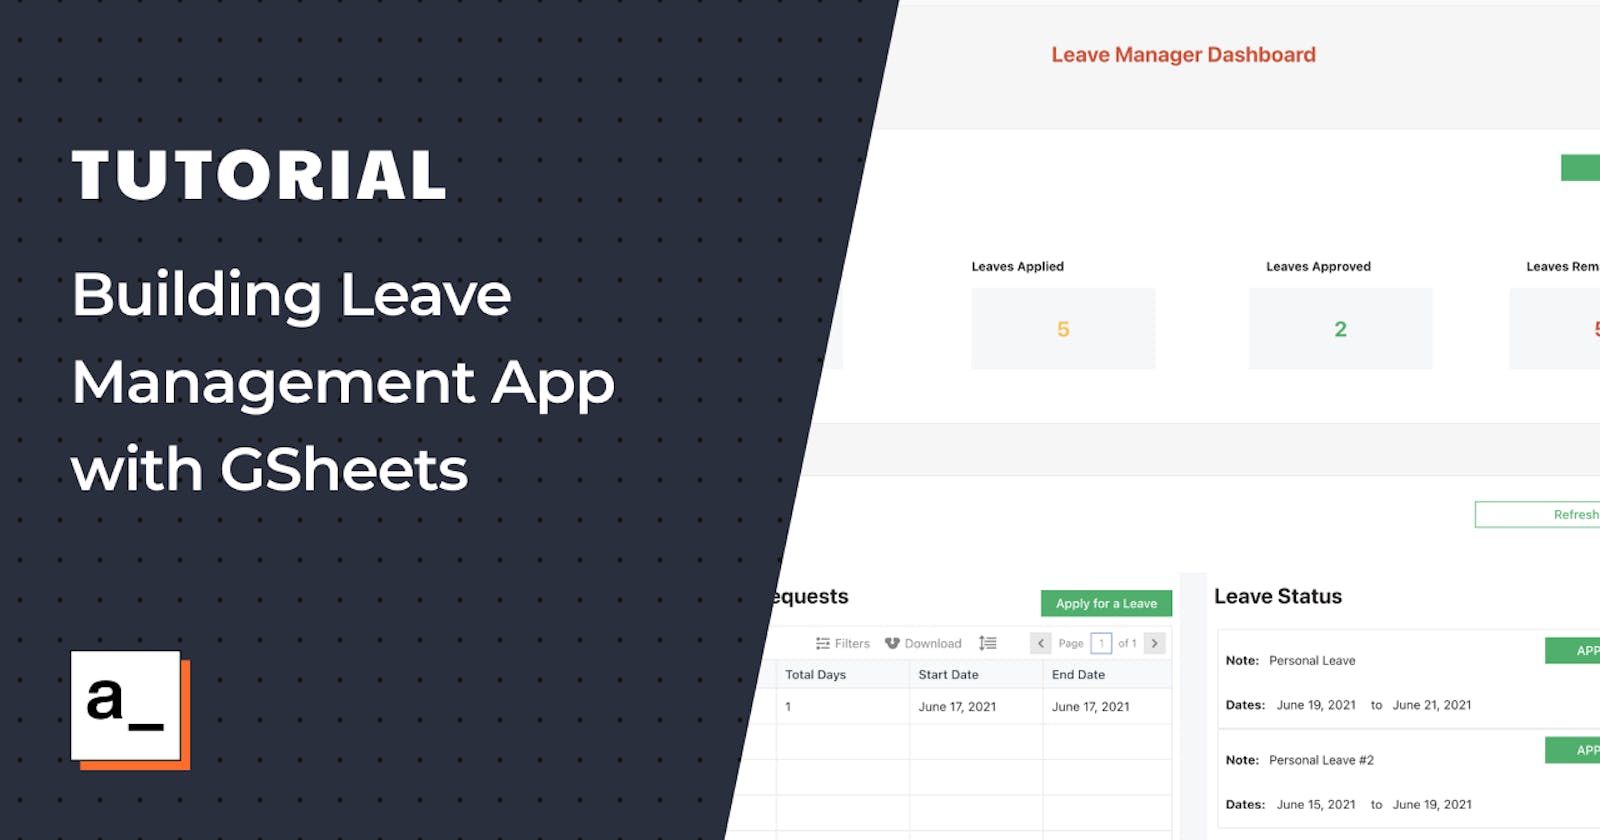
Here’s a quick sneak peek of what the app looks like. This is forkable, customisable and can be shared across organisations and teams. This tutorial will walk you through building this application with Appsmith and its Google Sheet Integration.
Appsmith is an open-source framework that lets developers build dashboards, workflows, and CRUD apps with only the necessary code. You can connect to any API or databases like MongoDB, PostgreSQL, or MYSQL and get access to multiple widgets, including charts, tables and forms, for building a UI fast.
Following are the table of contents:
- Getting Started with Appsmith and Gsheets
- Creating and listing all the leaves user has requested
- Building an admin page to accept or reject the leaves
- Listing down all the leaves that are approved and rejected
- Conclusion
Let's dive in!
Getting Started with Appsmith and Gsheets
In this tutorial, we’ll be using the community edition of Appsmith Cloud to build the application. However, if you want to build this on a local instance and deploy it on your server, you could set up Appsmith’s on-prem version by following through with this documentation here.
Now let’s follow the below steps to setup Appsmith Cloud and GSheets:
- Firstly, you will need to create a new account on Appsmith (it’s free)! If you’re already an existing user, you can sign in to your account.
- Create a new application under any organisation by clicking on the
Create Newbutton, and you can rename the application by simply double-clicking on the existing name. In our case, let’s name this asLeave Management Dashboard. - Next, on the left navigation, we should see three options under your Page: Widget’s, APIs and DB Queries. Here, we can connect to data sources and build UI for these data sources using different widgets.
- Now, let’s create a new API by clicking on the
+button next to the APIs section. Next, choose Google Sheets and select New Datasource.
The Google Sheets integration on Appsmith helps us use Google Sheets as a backend or data source and perform multiple operations without writing any piece of code.
- Rename the data source name to
Leave Management Data Sourceand set the scope toRead and Write, and hit continue. It will redirect for authorising your Google account, choose the email you want to connect with and authorise it.
Awesome, we now have access to all your google sheets from your Google account. Now let’s create a new Google Sheet and add the necessary fields to build our leave management dashboard.
Here’s a mock Google Sheet that we used to build the application. Feel free to copy the same google sheet to your account and try it out, or you could create a new one instead.
Following are the Sheets and fields that we used to build the application:
Sheet One: Users
This Sheet has all the information about the company’s employees and their roles. Following are the fields:
| Name | Available Leaves | Leaves Applied | Total Leaves |
Sheet Two: Leave Requests
This Sheet has information about leave requests requested by the employees and their status if they are approved. Following are the fields:
| Name | Start Date | End Date | Total Days | Reason | Other Contact | Status |
We’ll connect to this particular Google Sheet and build a UI to create and list our leave requests in the next section.
Creating and listing all the leaves user has requested
Firstly, let’s build a Google Sheet API using the GSheet integration Appsmith. To do this, click on the Leave Management Data Source you’ve created in the previous section and hit NEW API. We should see the following screenshot:
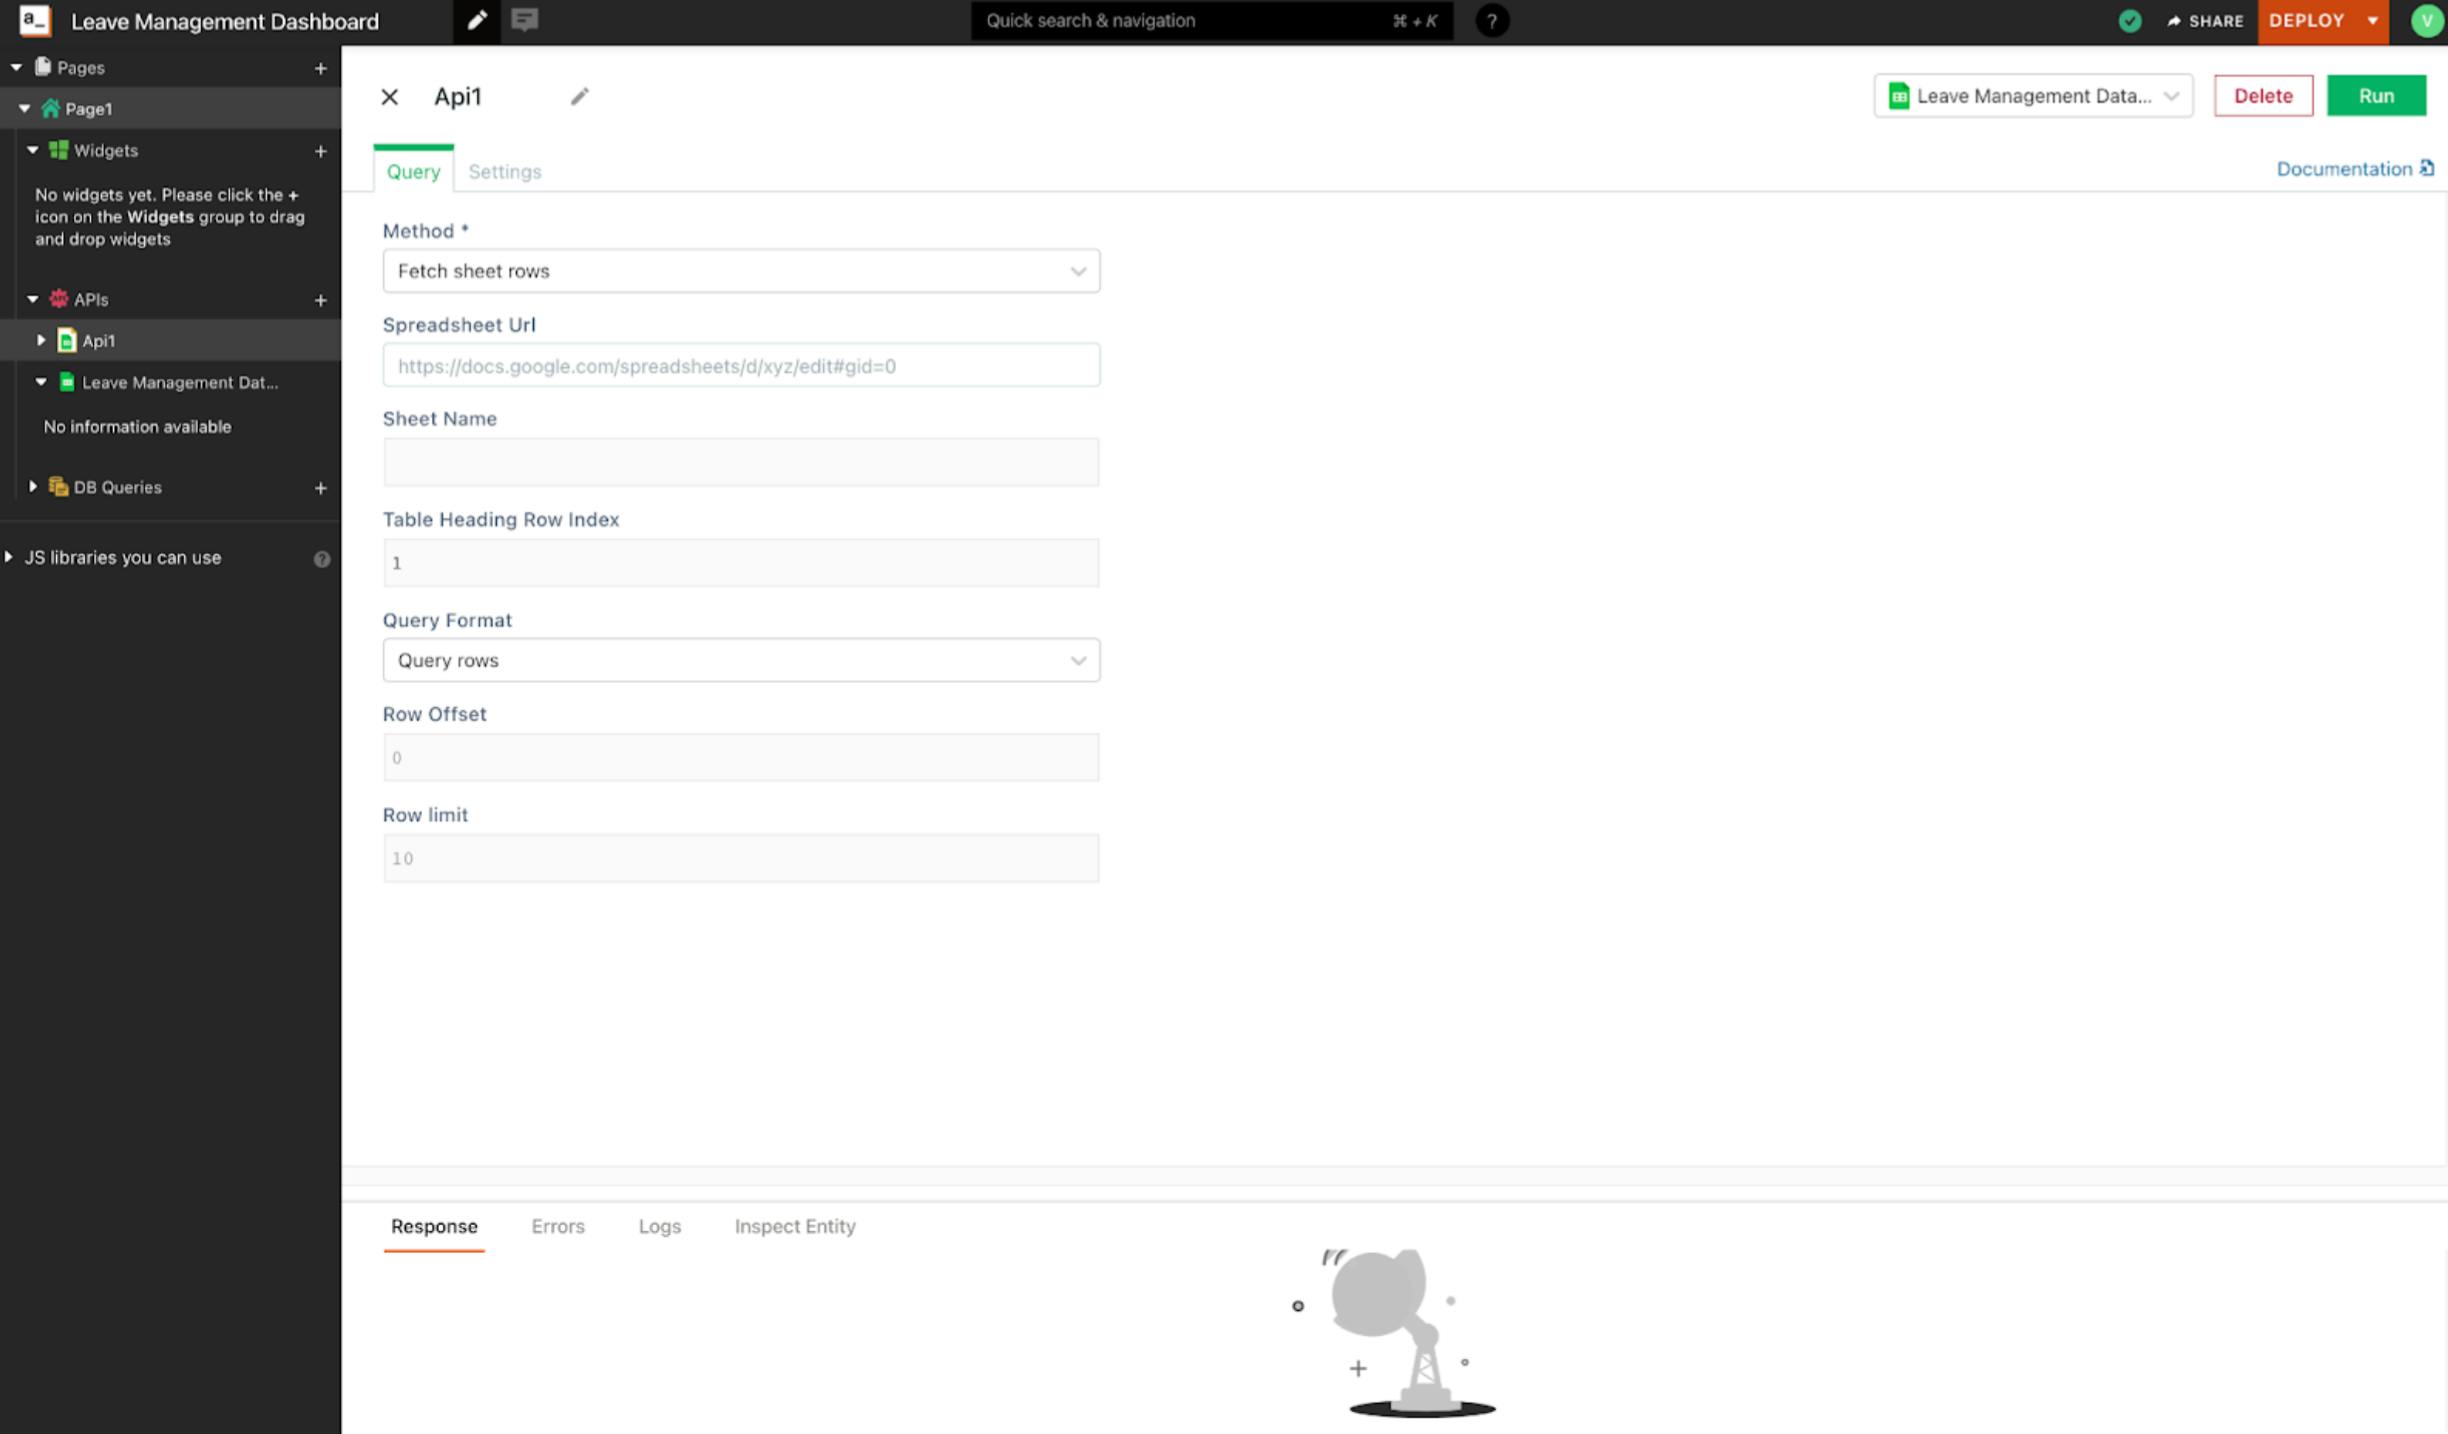
Follow the below steps to list down all our leave requests:
- Rename the API as
getLeavesRequestedand copy-paste the Google Sheets URL you're working on; in this case, we'll be using the duplicated mock-sheet. (Make sure you copy it to your account cause you'll need to authorise it to perform all the operations on it). Now set the following properties:
 Sheet Name: Leave Requests
 Table Heading Row Index: 1
 Query Format: Query Rows
 Row Offset: 0
 Row limit: 100
Lastly, hit the Run button on the top right. We should see the data that's inside the Leave Requests sheet. Now let's create a new table and display the data.
- Click the
+icon next to Widget's, drag and drop a new Table widget onto the canvas. We can configure the Table Widget by opening its property pane by clicking on the cog icon on the top right of the table widget. - Now, copy-paste the following JS code snippet into the Table Data property inside the table's property pane:
{{
getLeavesRequested.data.filter(
  (item) => (item.name = appsmith.user.name && item.Status === "REQUESTED")
);
}}
Awesome! Here, we call the getLeavesRequested API and use the filter method to filter the object's based on the user_name and the leave status. In my case, the name inside the GSheet is Iron Man, and I'm matching the same with my username on Appsmith. We can do that by using Appsmit's internal store. Here, appsmith.user.name returns the user name Iron Man in my case. Similarly, say your profile name is Bat Man. Then, you should filter all the leaves that are named after Bat Man in the Google Sheet.
Now let's add an option to create a new leave request and post it to the GSheets. Follow the below steps:
- Firstly, drag and drop a new button widget on top of the table. Next, open the Button's property pane and set the onClick property to open a Modal. In the dropdown's we'll see an option to create a new Modal directly there; let's choose it.
- Name the modal as
leaveApplyModal, and its property pane sets the modal type to Form Modal.
Now drag and drop the following Widget's on the modal to create a form:
- Firstly a
text widgetand aninput widgetto display the name of who's applying for the leave. We'll add the label to the text widget asNameand rename the input widget asappliedBy. Cause we'll be referring to this when we're making an API call to the Google Sheet. Also, set theDefault TextofappliedByinput widget to{{appsmith.user.name}}and disable property. So that Users can't create leaves on other's names. Cool right! - Next, add another text and input widget to add a
Leave Noteand rename the input widget toleaveNote. - Now, let's add two more text widgets and date-picker widgets to add the start date and end date. Set the default date's date picker widget to
{{moment.now()}}. This will add today's date as a placeholder to the date picker widget. - We'll also add one more field that'll show us the number of day's we're applying for leave. We'll set the default value of the input to
{{moment(DatePicker2.selectedDate).diff(DatePicker1.selectedDate, "days") +1}}
- Lastly, add a select widget that set's the alternate contact. Then, we'll pull the name's of our employees from the Users sheet. For now, let's set the options property to the following:
{{
getUserDetails.data.map((item) => {
  return {
    label: item.Name,
    value: item.Name,
  };
});
}}
Our form is now ready; let's create a new API from the Gsheets data source that lets us post values from this form to the Leave Requests Sheet:
Follow the below steps to list down all our leave requests:
- Click on the
Leave Management Data Sourceand hitNEW API. - Rename the API as
requestLeaveand copy-paste the Google Sheets URL you're working on. Now set the following properties:
 Method: Insert sheet row
 Sheet Name: Leave Requests
 Table Heading Row Index: 1
Add the following snippet in the Row Object property:
    {
    "Name":"{{appliedBy.text}}",
    "Start Date":"{{DatePicker1.formattedDate}}",
    "End Date":"{{DatePicker2.formattedDate}}",
    "Total Days":"{{totalDays.text}}",
    "Reason":"{{leaveNote.text}}",
    "Other Contact":"{{alternateContact.selectedOptionValue}}",
    "Status": "REQUESTED"
    }
As you can see, we're setting the Status of requested leave as REQUESTED. We'll be changing this to APPROVED or REJECTED based on the actions from the leave manager admin page in the following sections.
Fantastic, now, when we add details on the form and submit it, we should see a new entry on the Gsheet. But we have one problem here, and the leaves on the table are not updated. So, for this, let's create a workflow that submits the data and refreshes the table data when the leave is requested.
Now open the modal and set the onClick property of the submit button to the following:
{{
requestLeave.run(
  () => {
    getLeavesRequested.run();
    closeModal("leaveApplyModal");
  },
  () => showAlert("Leave Status updated!")
);
}}
Here, we create a workflow that does the following:
- First, call the
requestLeaveAPI and submit the form. - Run's the
getLeavesRequestedAPI and updates the data in the Table. - Closes the
leaveApplyModalModal - Finally, it shows an alert saying, "Leave Status updated!"
We'll also create a new API from the Sheets data source getUserDetails that fetches the names in the Users sheet. For this, just copy the getLeavesRequested API to the same page and change the Sheet Name to Users. This will get all the User's that are there in our org.
Building an admin page to accept or reject the leaves
In the previous section, we created a table and form to create and display all the leave requests. Now let’s build an admin dashboard where we could look at all the leaves requested by the team and accept or reject them. Let’s follow the below steps:
- Create a new Page by clicking on the
+icon next to the pages option in the side navigation. Name it asLeave Manager Admin - Now drag and drop a new Table widget onto the canvas.
- Now copy the
getLeavesRequestedfromPage1to theLeave Manager Adminpage. - Now add the following code snippet to the Table Data property:
{{
getLeavesRequested.data.filter(item=> item.Status==="REQUESTED")
}}
With this, we should be filtering all the row’s from the Leave Requests sheet that has leave status set to REQUESTED. Now let’s add two buttons that will allow us to update the status to Approved or rejected. Follow the below steps:
- Open the table’s property pane and click on the
ADD A NEW COLUMNoption. This will create a new column in your table. Now set the Column type to Button and set the label asAPPROVED. - Similarly, add one more column and set the label to
Reject. - To make it more intuitive, add the background colour to the buttons. In my case, I set the background colour of the
Approvebutton to green and the background colour of the rejected colour to red. - Awesome, let’s add an onClick property to both these buttons. For this, let’s create two new API’s that will handle the leave status.
- Now, create the new API from the GSheets data source and name it as
approveLeaveStatus; the method will beUpdate sheet rowas we update the google sheet. - Set the Sheet Name as
Leave Requestsand Table Heading Row Index as1 - Lastly, set the Row Object to the following:
{
    "rowIndex":{{Table1.selectedRow.rowIndex}},
    "Status":"APPROVED"
}
Similarly, create one more API named rejectLeaveStatus and set the Row Object as following to reject the leave:
{
    "rowIndex":{{Table1.selectedRow.rowIndex}},
    "Status":"REJECTED"
}
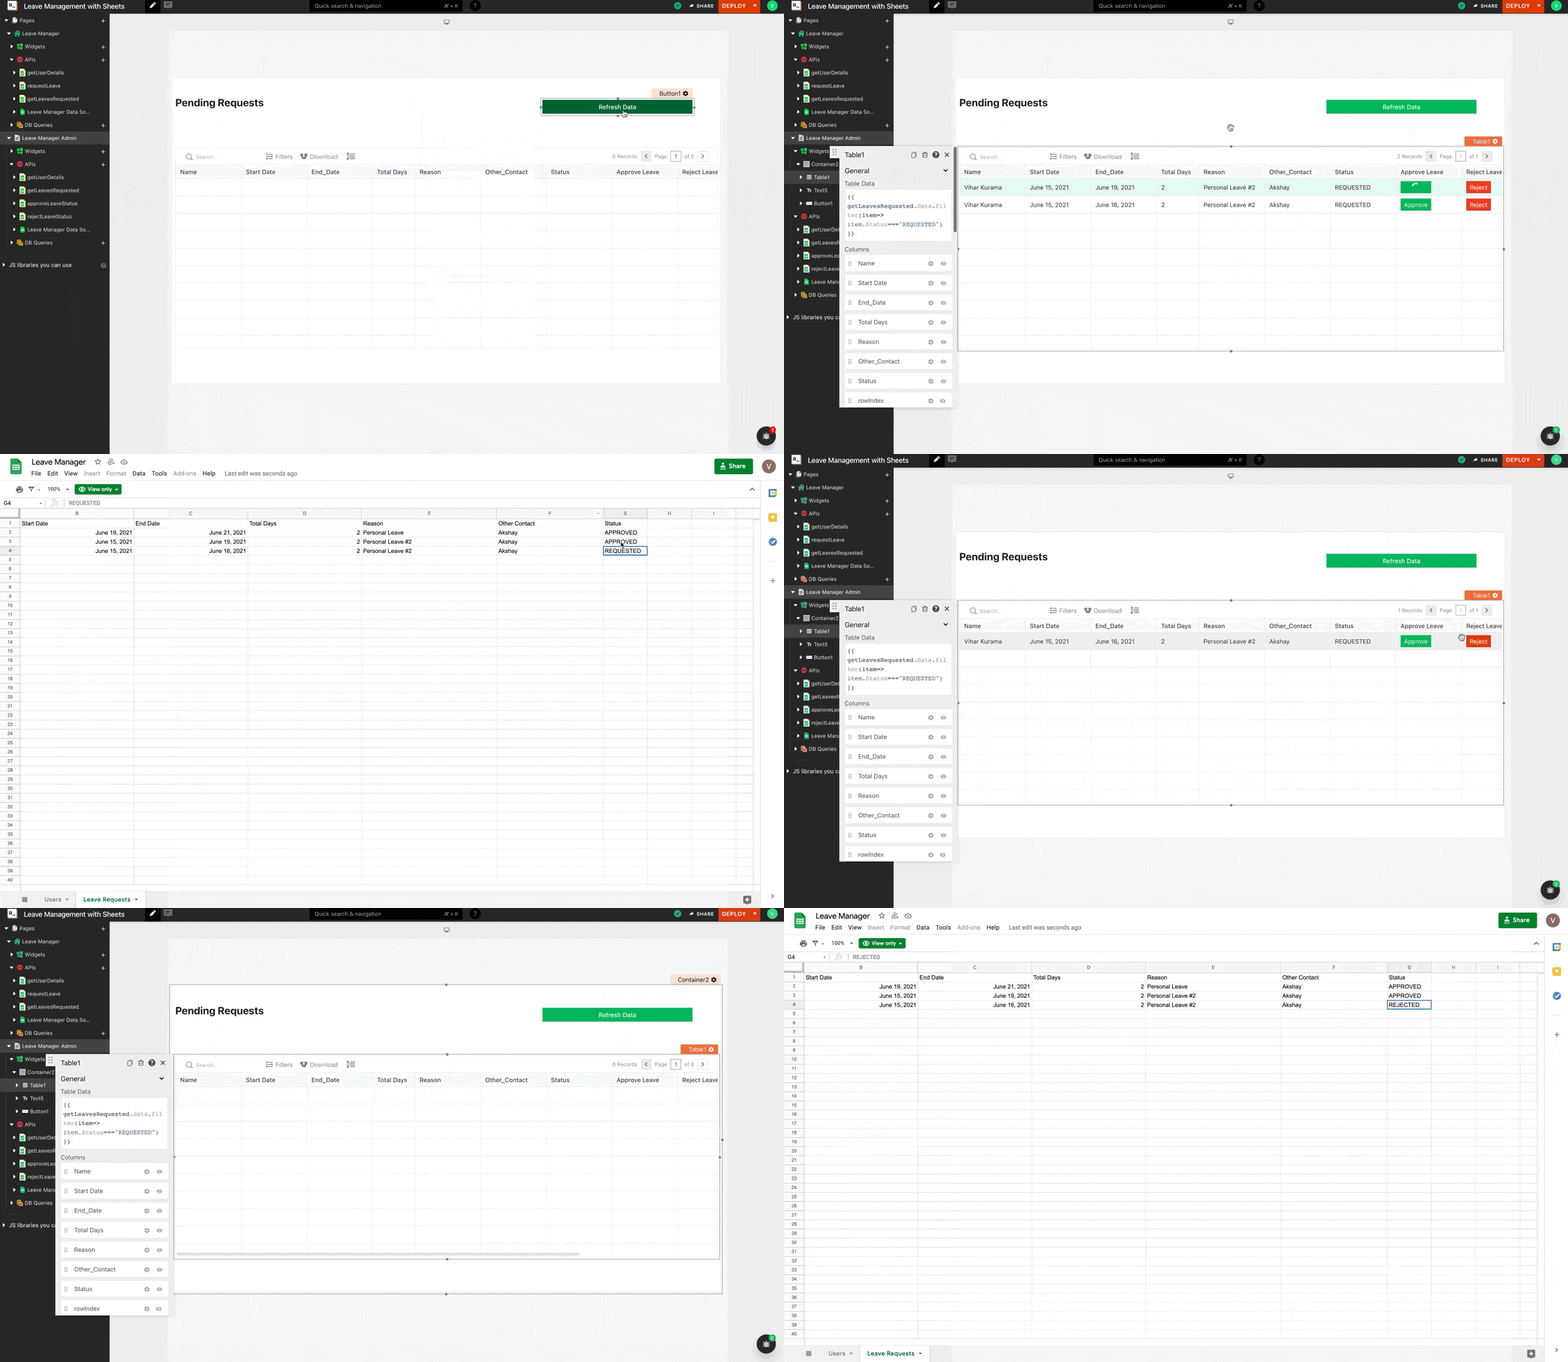
Let’s set the Approve to button onClick property to call the approveLeaveStatus API and the reject button to call the approveLeaveStatus. Additionally, onSubmit, you can call the getLeavesRequested API to refresh the Table data. Below is the GIF showing the same:
Listing down all the leaves that are approved and rejected
This section will notify the user if the leave he applied for is accepted or rejected. For this, we’ll be using the List Widget and display all the leaves that are approved and rejected. Follow the below steps:
- Now head back to
Page1and drag and drop a new List Widget onto the canvas. - We already have the
getLeavesRequestedAPI that has all the data of the leaves. So all we need to do is filter them based on the username and the leave status. - Now, let’s bind this API onto the list widget. First, open theList Widget’s property pane and add the following code snippet under the Items property:
{{
getLeavesRequested.data.filter(
  (item) =>
    (item.name =
      (appsmith.user.name && item.Status === "APPROVED") ||
      item.Status === "REJECTED")
);
}}
Next, drag and drop a few text widget’s and bind the list widget data using the currentItem property.
Leave Notes: {{currentItem.Reason}}
Leave Start Date: {{currentItem["Start Date"] }}
Leave End Date: {{currentItem["End Date"] }}
Leave Status: {{currentItem.Status}}
Finally, this is how the List widget should look like:
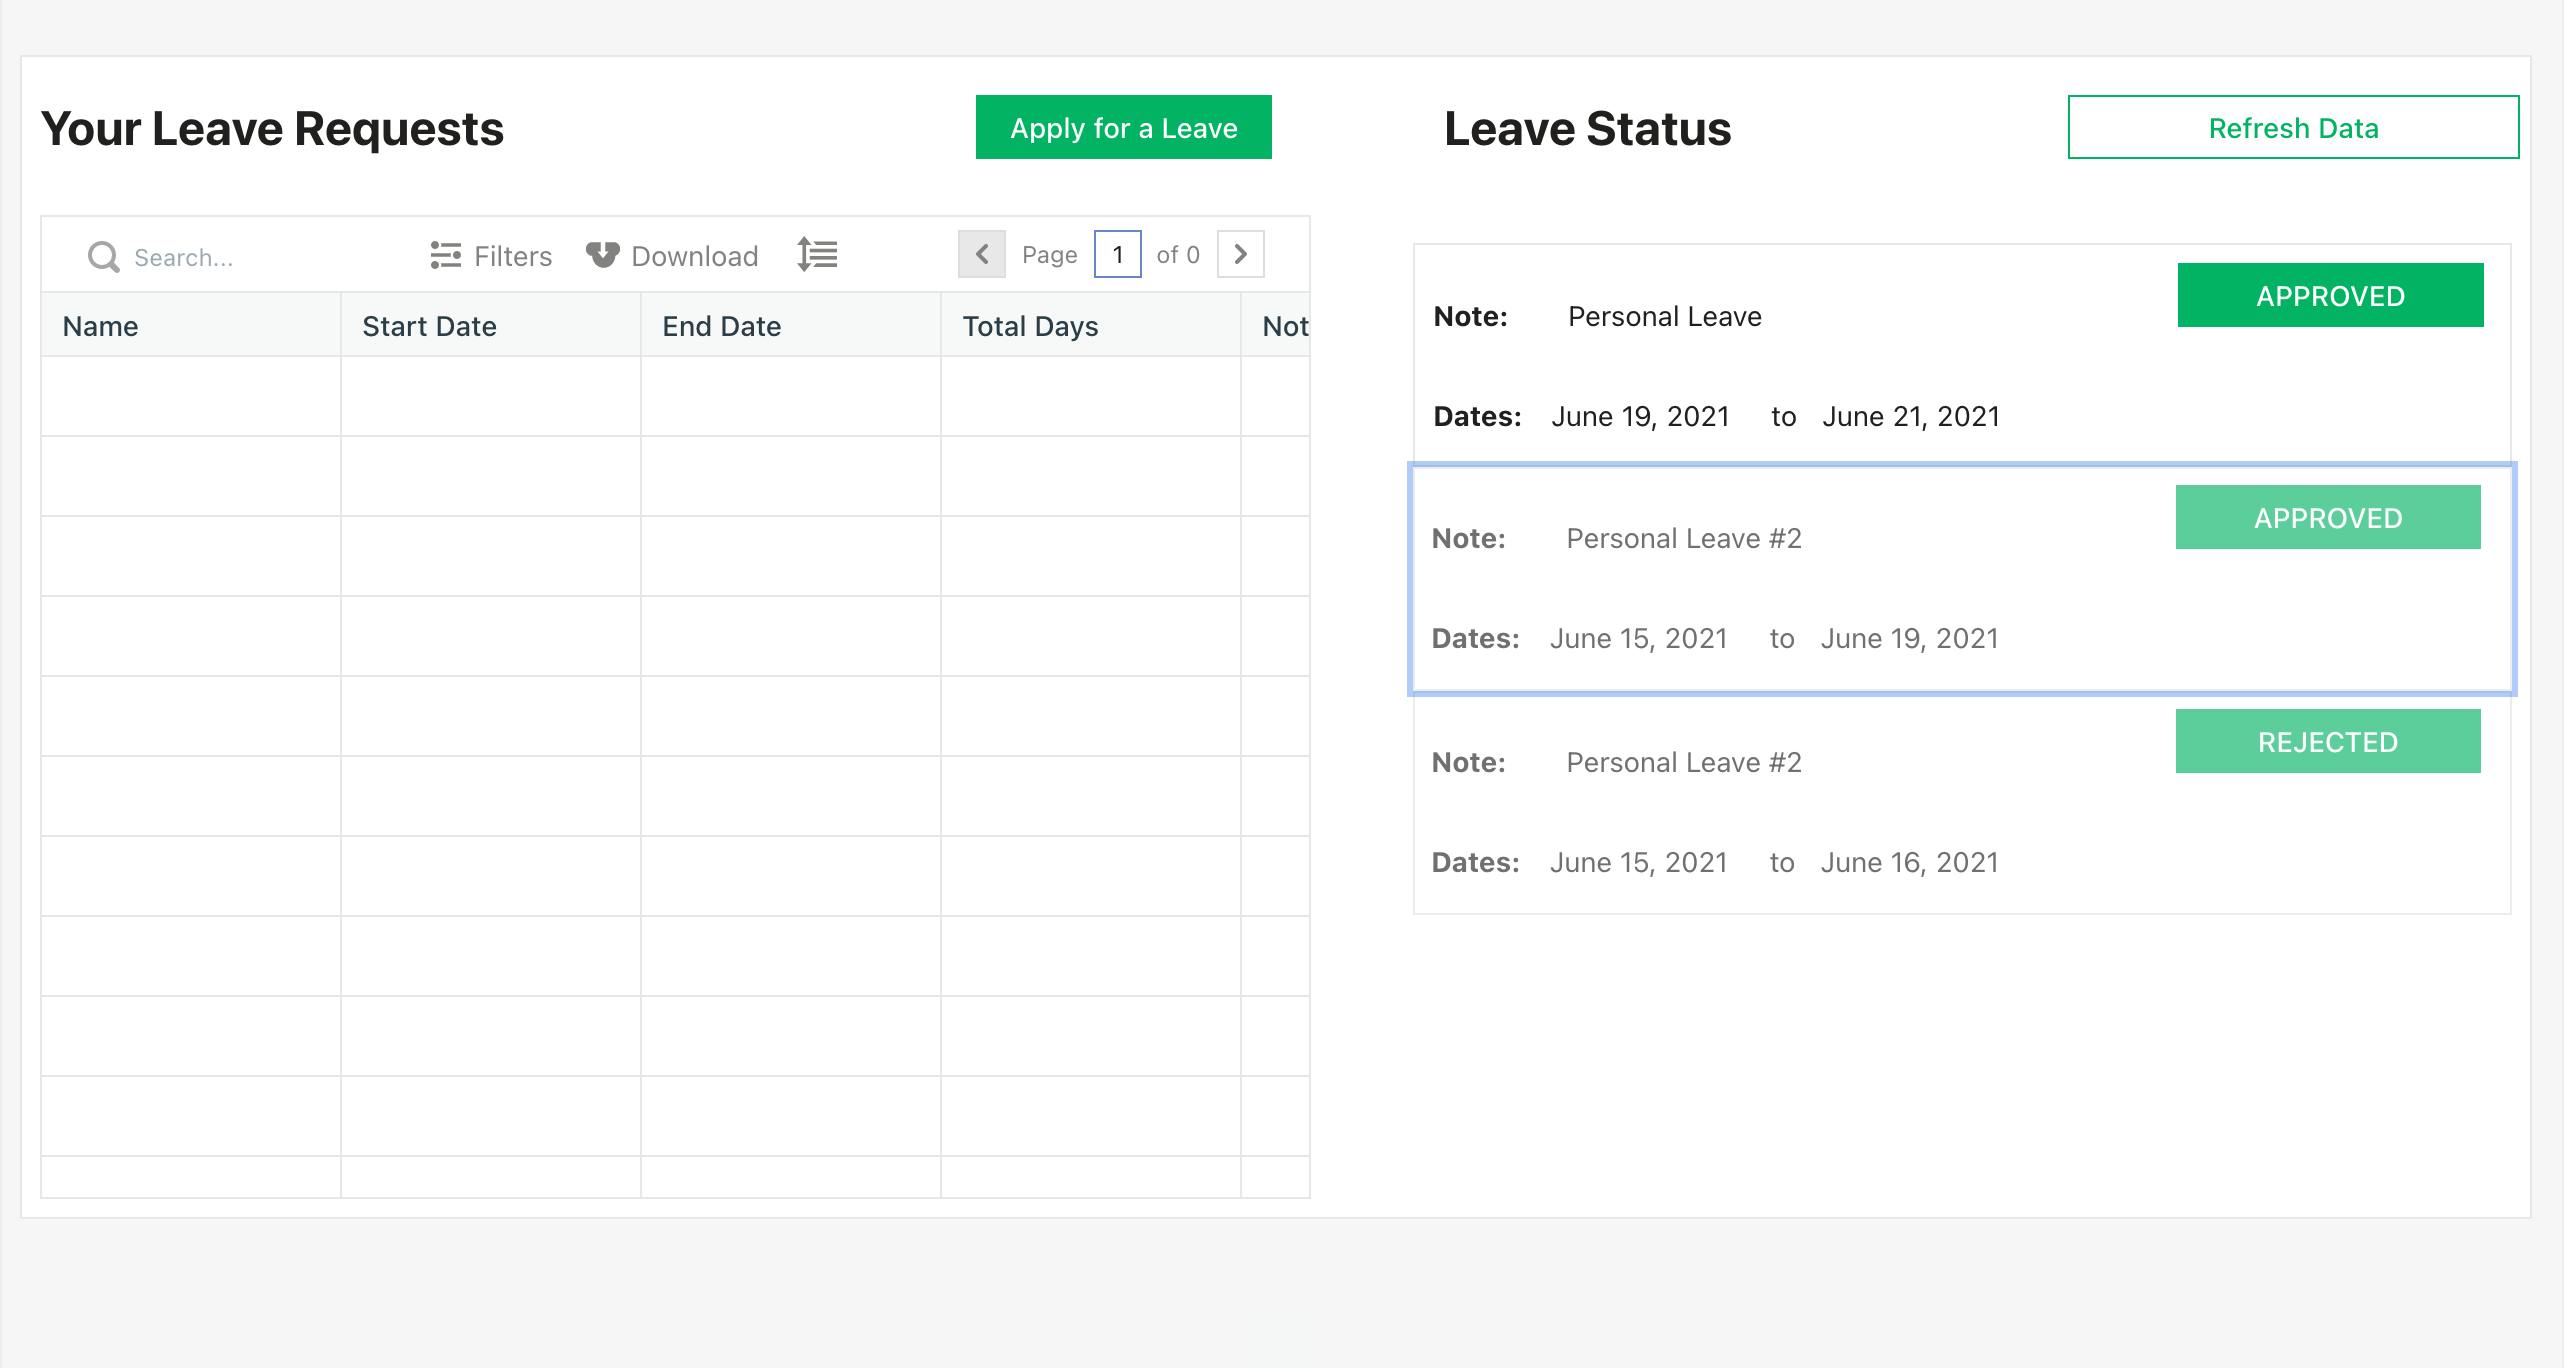
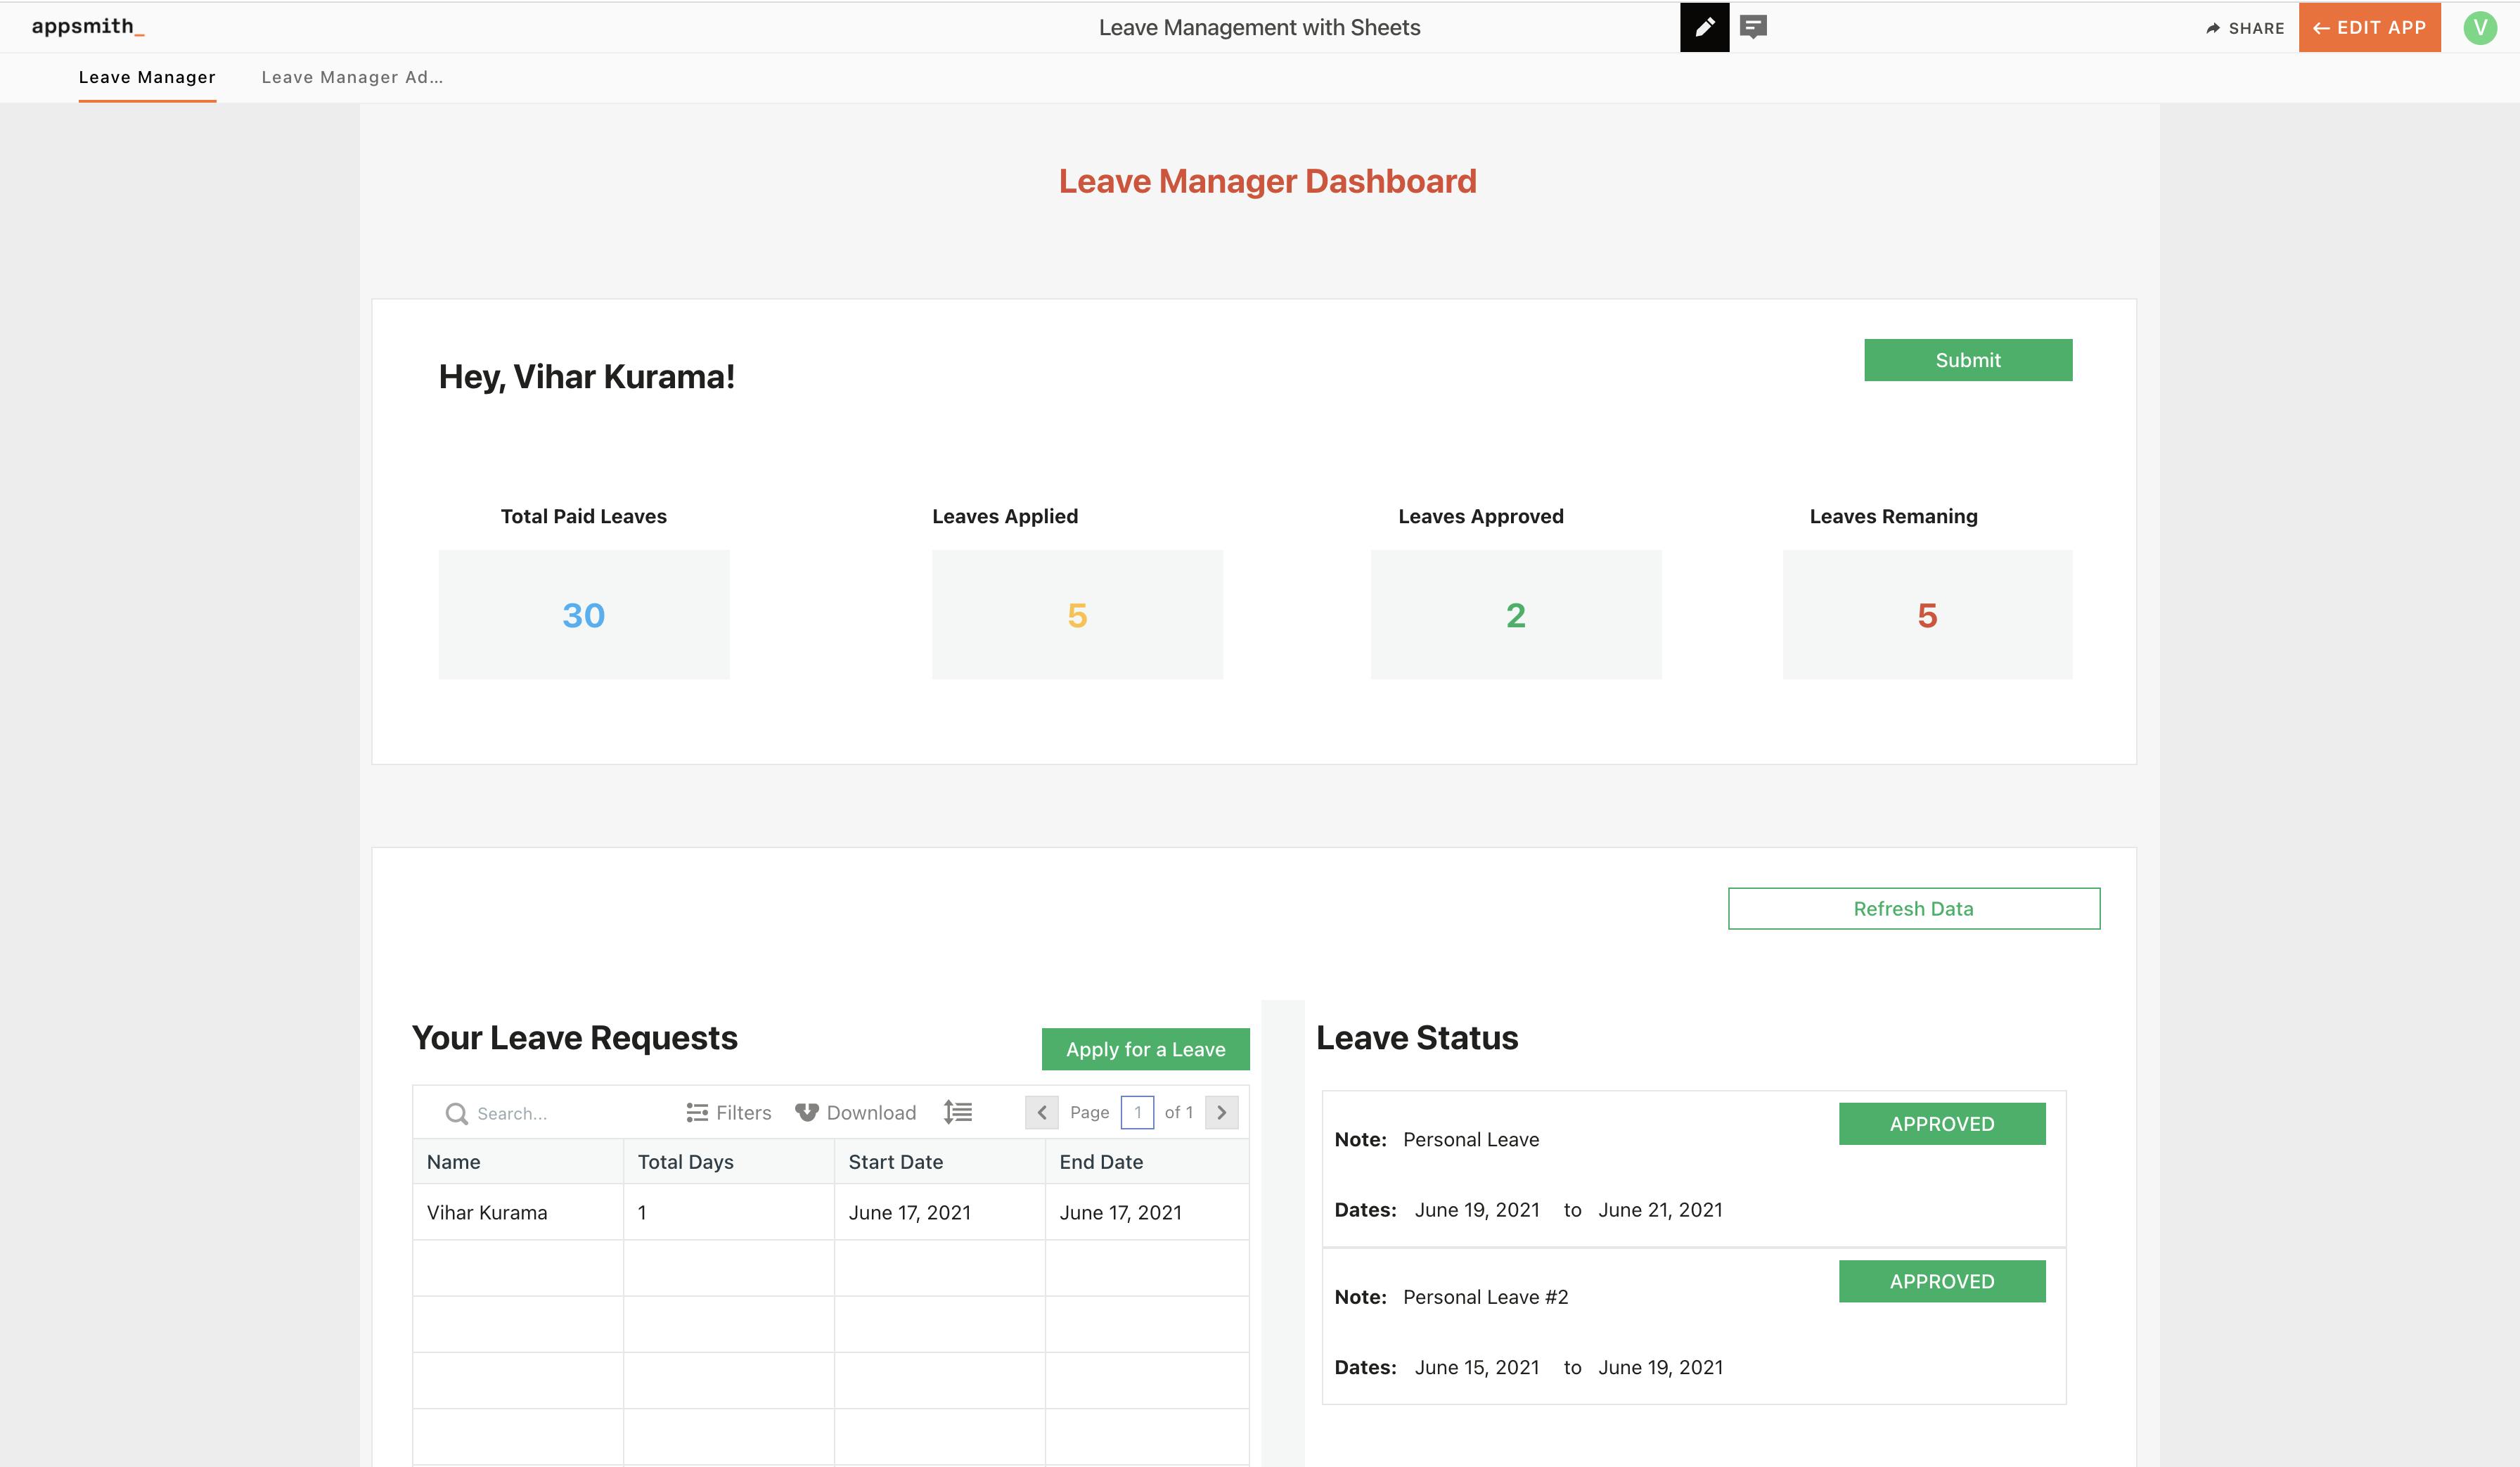
Finally, we've added some container's and added some additional information to make the app UI more beautiful. This is how the final look's like:
Conclusion
Deploy your application on the cloud and share it with others, and that's it. We're done!
You've seen how easy it is to build CRUD Apps and Workflows on Appsmith. Similarly, we can integrate the number of APIs and data sources and build customised dashboards.
If you like this tutorial, drop us a star on our GitHub repository here.

