Appsmith On Google Cloud Run - Secure Static Outbound IP Address
At the end of this tutorial, you will have a working Cloud Run serverless application securely connecting all outbound requests through a static IP Ad
Goal
At the end of this tutorial, you will have a working Cloud Run serverless application securely connecting all outbound requests through a static IP Address.
Prerequisites
A Google Cloud Run working application.
The gcloud command line interface installed on your machine
Overview
By default, a Cloud Run, a serverless product, connects to external endpoints on the internet using a dynamic IP address pool. This default is unsuitable if the Cloud Run service connects to an external endpoint that requires connections originating from a static IP address, such as a database or API using an IP address-based firewall. You must configure your Cloud Run service to route requests through a static IP address for those connections.
This guide describes enabling a Cloud Run service to send requests using a static IP address. In my test scenario, I have an Appsmith application (the best low-code opensource platform) running in Google Run and I need a static IP address to connect it to a MongoDB Database running in MongoDB Atlas, and any secure application should block any connection that is not from a trusted origin, in this case, only our Cloud Run app should access the database.
Let's review the following diagram of the implementation:
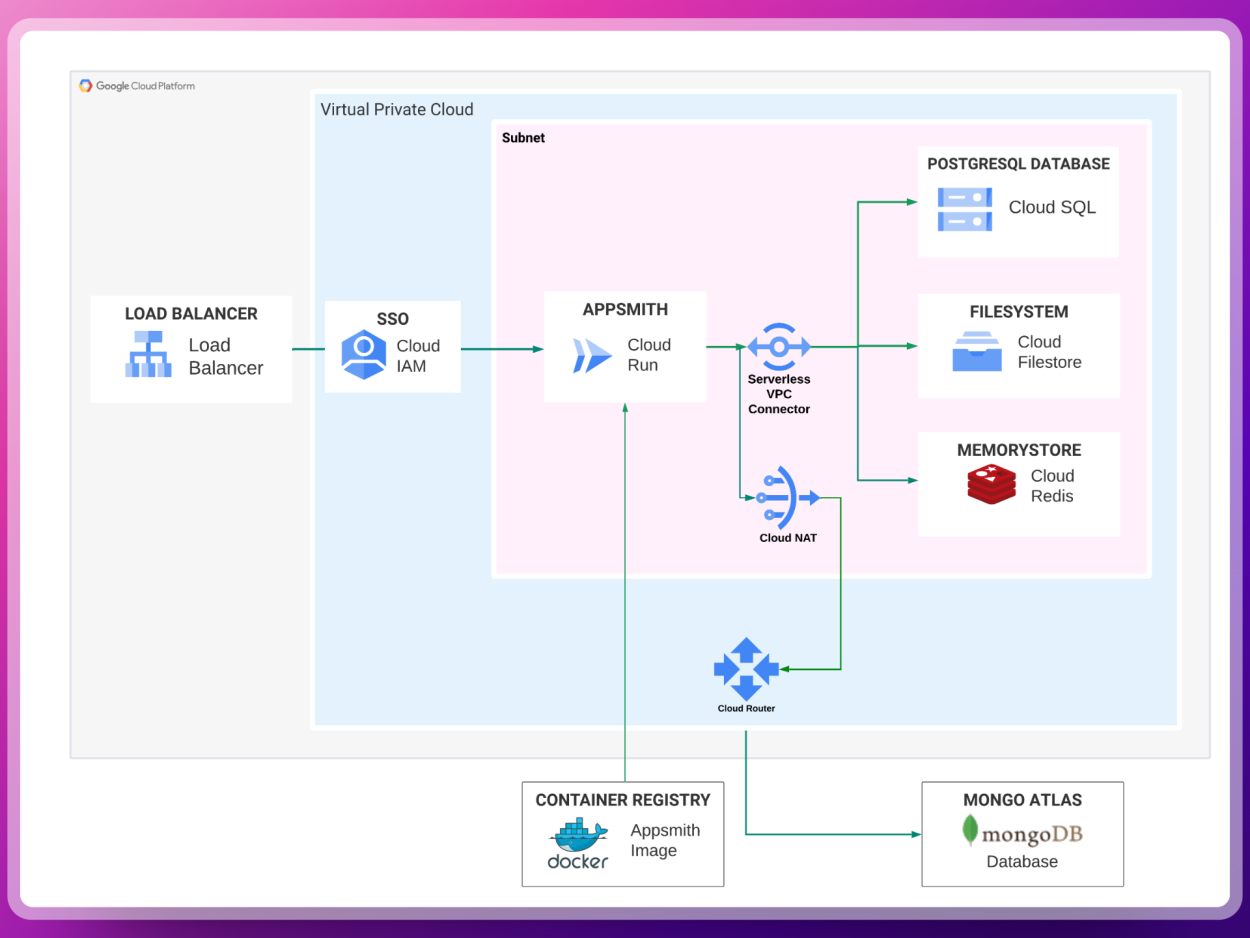
As you can notice, the mechanisms to securely outbound the Cloud Run requests to the Database is using, first of all, a Serverless VPC connector, then, Cloud NAT, and lastly, Cloud Router, let's elaborate on these.
Configuring a Serverless VPC Connector
A Serverless VPC is a feature that allows you to connect serverless applications, such as Cloud Run, to your Virtual Private Cloud (VPC) network without needing a dedicated IP address or a public IP. This enables serverless applications to access resources within your VPC securely.
First, enable the API by running:
gcloud services enable vpcaccess.googleapis.comNow we can create the VPC Connector using the following command:
 gcloud compute networks vpc-access connectors create CONNECTOR_NAME \

   --region=REGION \

   --subnet-project=PROJECT_ID \

   --subnet=SUBNET_NAME
Replace the following values in this command:
CONNECTORwith a name you want to give to this resource.PROJECT_IDwith a name that hosts the subnetwork.SUBNET_NAMEwith the name of the subnetwork you created.REGIONwith the region where you want to create a VPC Access.
Remember always to use the same region for all these commands, this is key for the networking interfaces to function properly.
In my case, the command looks like this:
    gcloud compute networks vpc-access connectors create appsmith \
    --region=us-central1 \
    --network=default \
    --range=10.8.0.0/28 \
    --min-instances=2 \
    --max-instances=10 \
    --machine-type=e2-micro
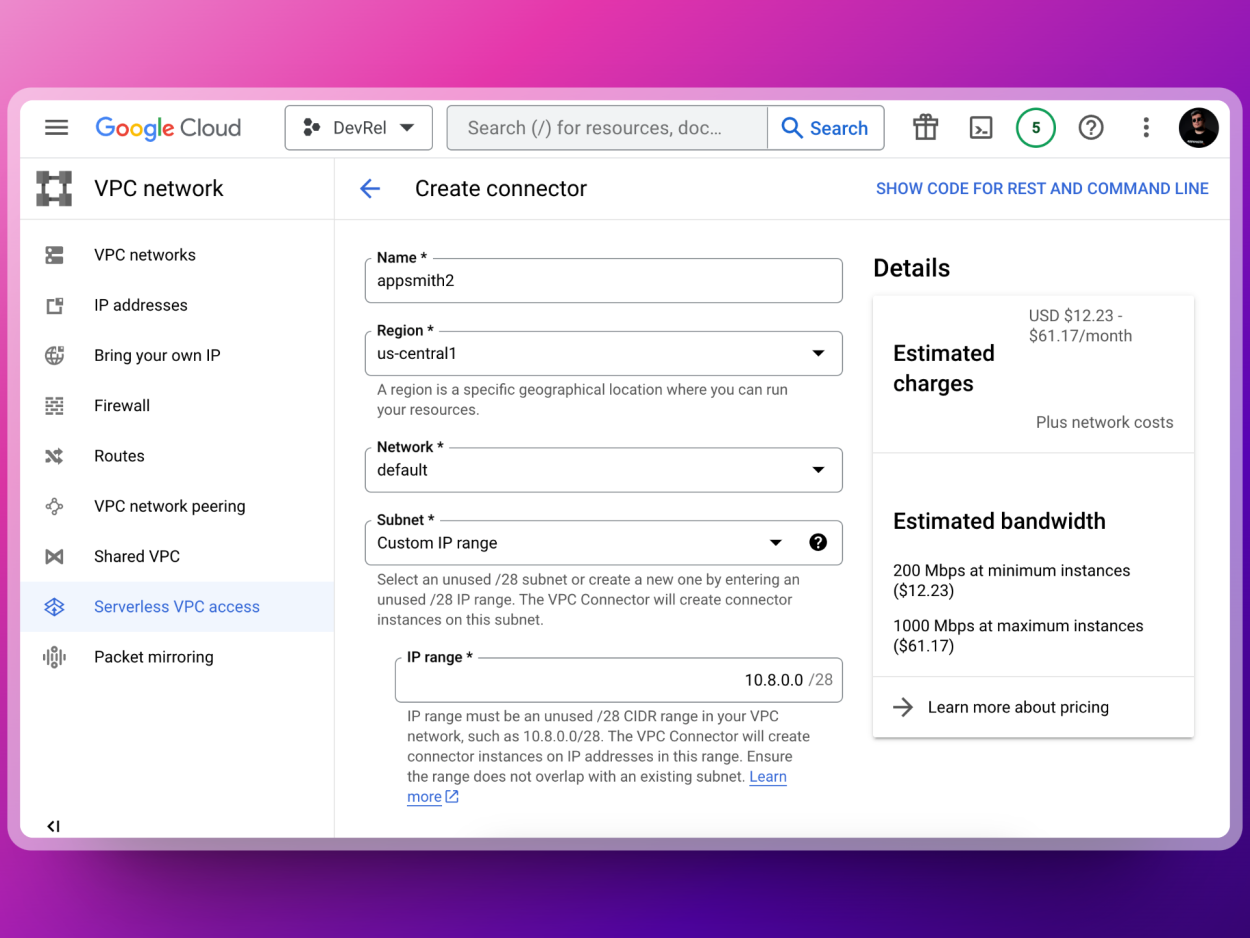
You can also do this the browser by going to https://console.cloud.google.com/networking/connectors/add and entering the same information.
Configuring Cloud Router
Google Cloud Router is a networking service that enables dynamic exchange of routes between your on-premises network and your Virtual Private Cloud (VPC) network in the Google Cloud. It facilitates the creation of a dynamic and scalable hybrid cloud network architecture, in our case it will be the one connecting the Serverless VPC to the Cloud NAT to allow the Outbound Static IP address for MongoDB Atlas.
Before setting up the Cloud Router, we need to reserve a new Static IP:
 gcloud compute addresses create appsmith-static-ip \
     --region=us-central1
Now, validate it was successfully created by running:
gcloud compute addresses listAnd you will see something like this:
 NAME: appsmith-static-ip
 ADDRESS/RANGE: 34.67.254.239
 TYPE: EXTERNAL
 PURPOSE:
 NETWORK:
 REGION: us-central1
 SUBNET:
 STATUS: IN_USE
As you can see, the Static IP Address assigned has been
34.67.254.239, hurray! this is the one that we will attach Cloud Router and Cloud NATNow, to create the Cloud Router, run the following command:
 gcloud compute routers create appsmith-router \
     --network default \
     --region us-central1
And that's it! Easy right, now let's create the last portion of this setup:
Configuring Network Address Translation (NAT)
When using a Serverless VPC Access connector, requests from your Cloud Run service are directed to your VPC network. To ensure outbound requests to external endpoints are routed through a static IP, it is necessary to configure a Cloud NAT gateway. This gateway will allow you to manage the egress traffic from your Cloud Run service, providing a secure and reliable connection to external resources.
Now, here's where we glue it all together, in the following command we will tell Google Cloud to create a new NAT using the Router and the IP Address we previously created
 gcloud compute routers nats create appsmith-cloud-nat-config \
     --router=appsmith-router \
     --nat-external-ip-pool=appsmith-static-ip \
     --nat-all-subnet-ip-ranges \
     --enable-logging
     --router-region=us-central1
And that's it, this is all we need to have this setup in place, now we can use Cloud Logger to validate this is actually working
Validate Outbound Requests go through the Router/NAT
Now we can validate this is working by going to Cloud Logs https://console.cloud.google.com/logs/query and create a new query filtering the logs by those created by the NAT Gateway:
resource.type="nat_gateway"You will see a lot of network results after filtering, you can expand any of those results and see how your Cloud Run application is using the gateway, the Static IP Address, and the Router we defined in the previous steps
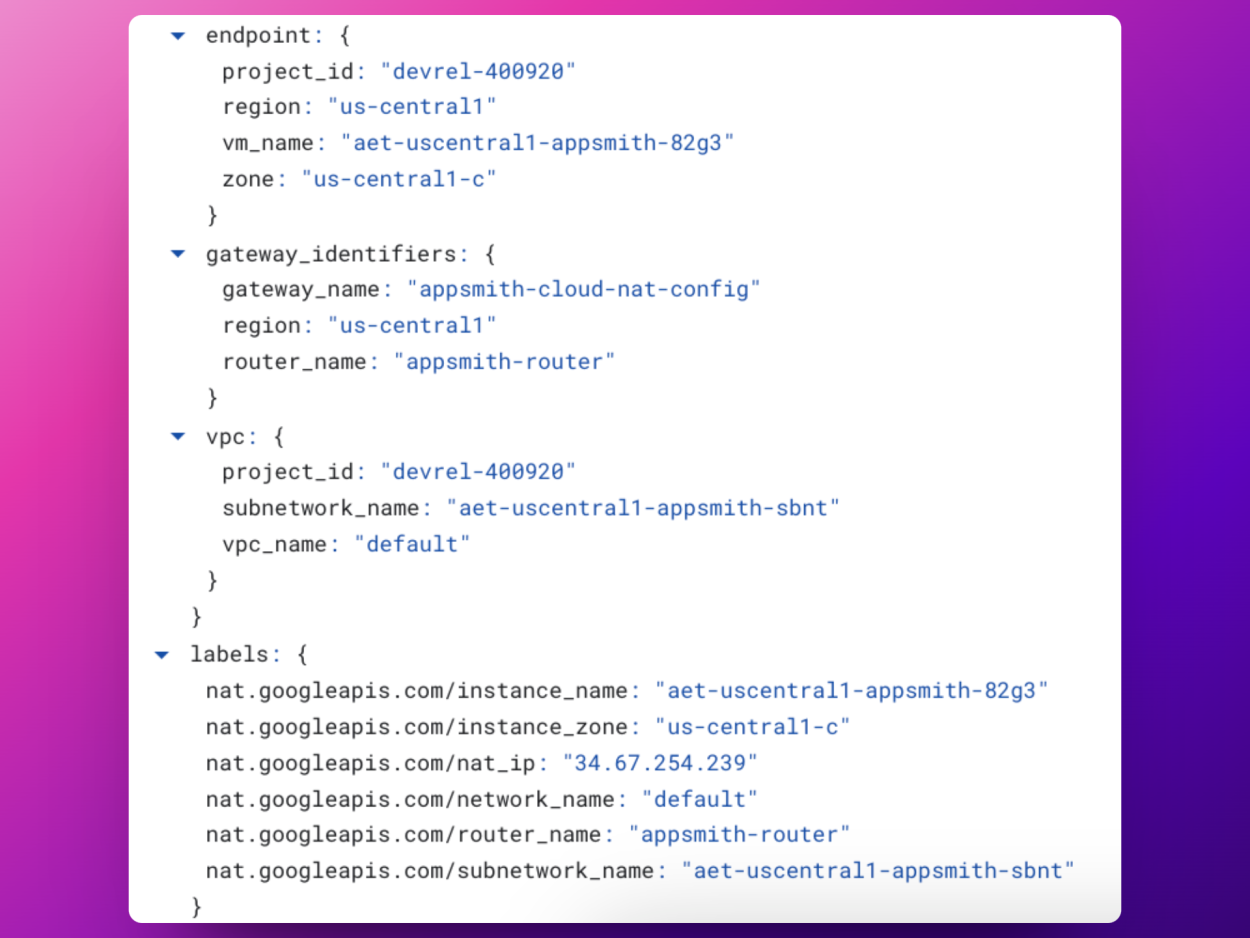
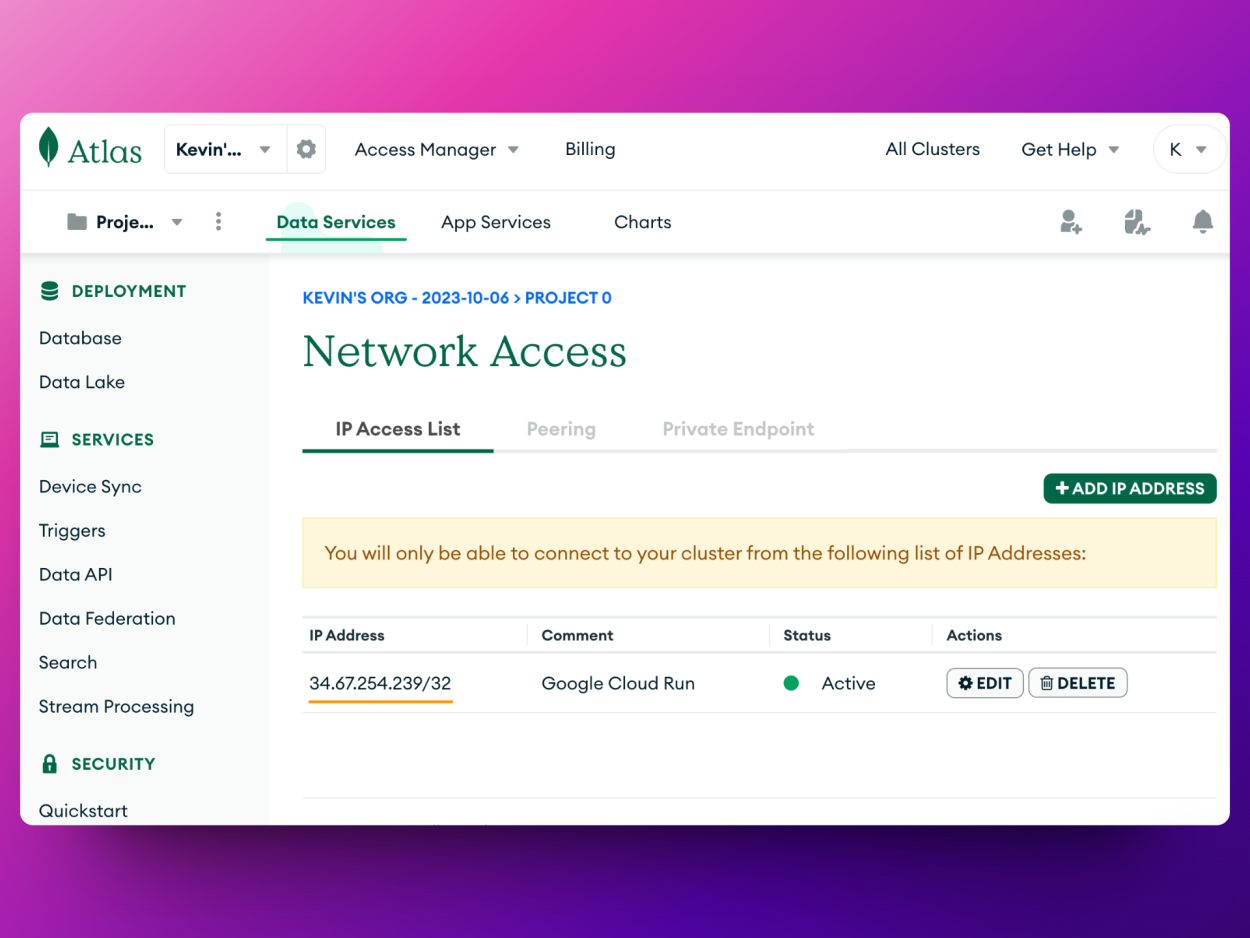
Sucess!! Now, you can securely use the Static IP Address to allow requests coming from Cloud Run! In my example, I'm going to only allow request from that IP in MongoDB Atlas
Conclusion
We explained how Cloud Run outbounds the network requests to the VPC using the Serverless VPC Connector, which, will use the Cloud Router to route the requests to the outside world using the static IP Address and the Cloud NAT! Easy right?

